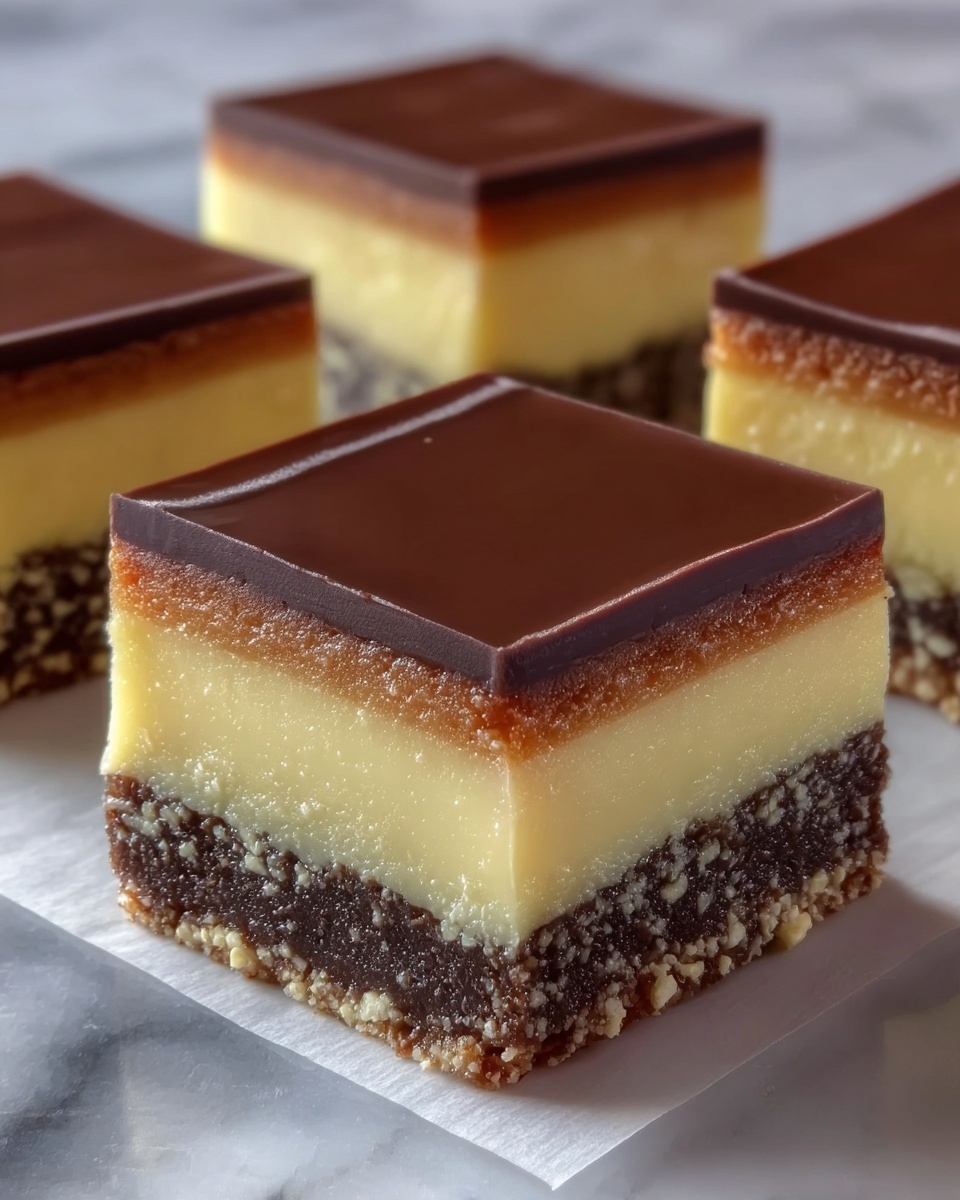
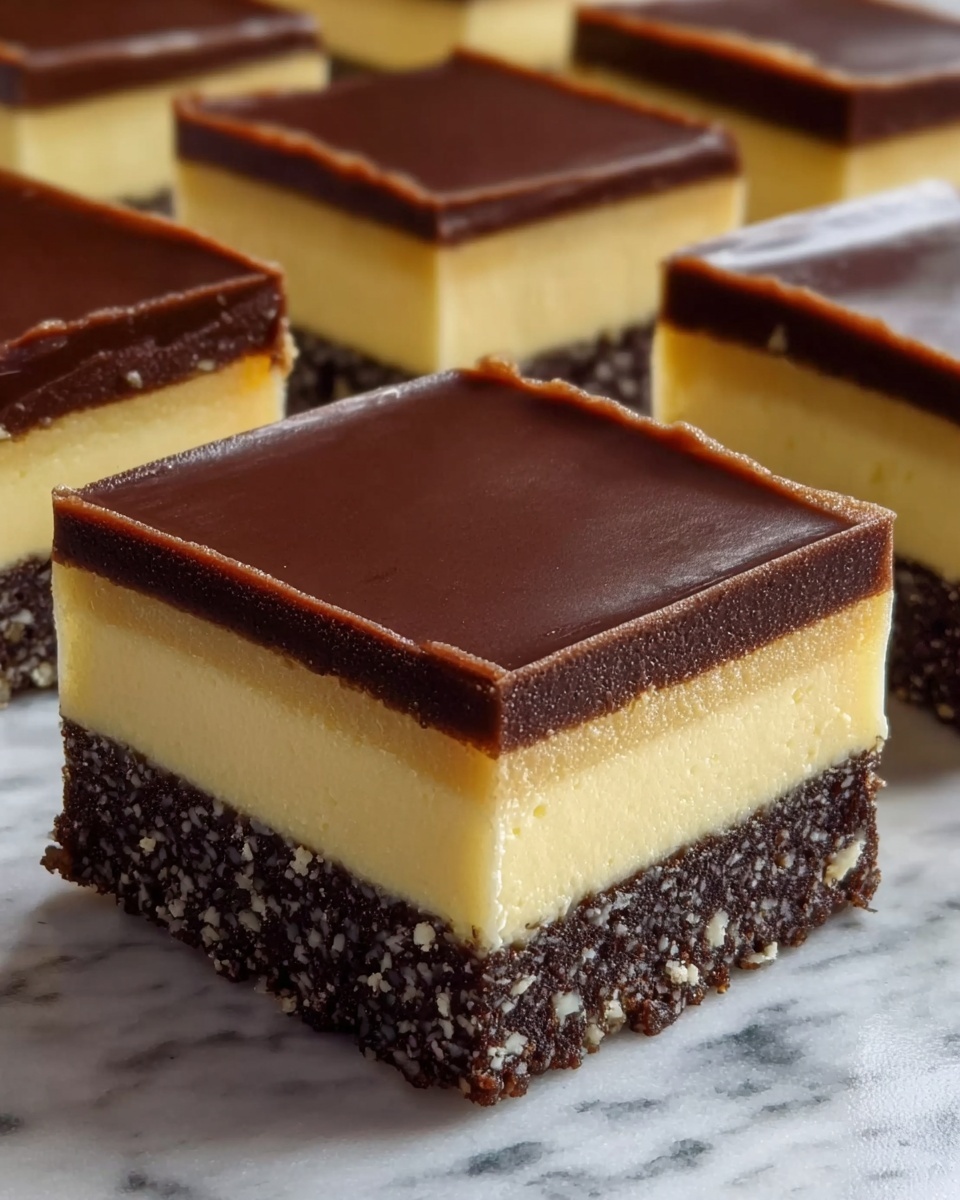
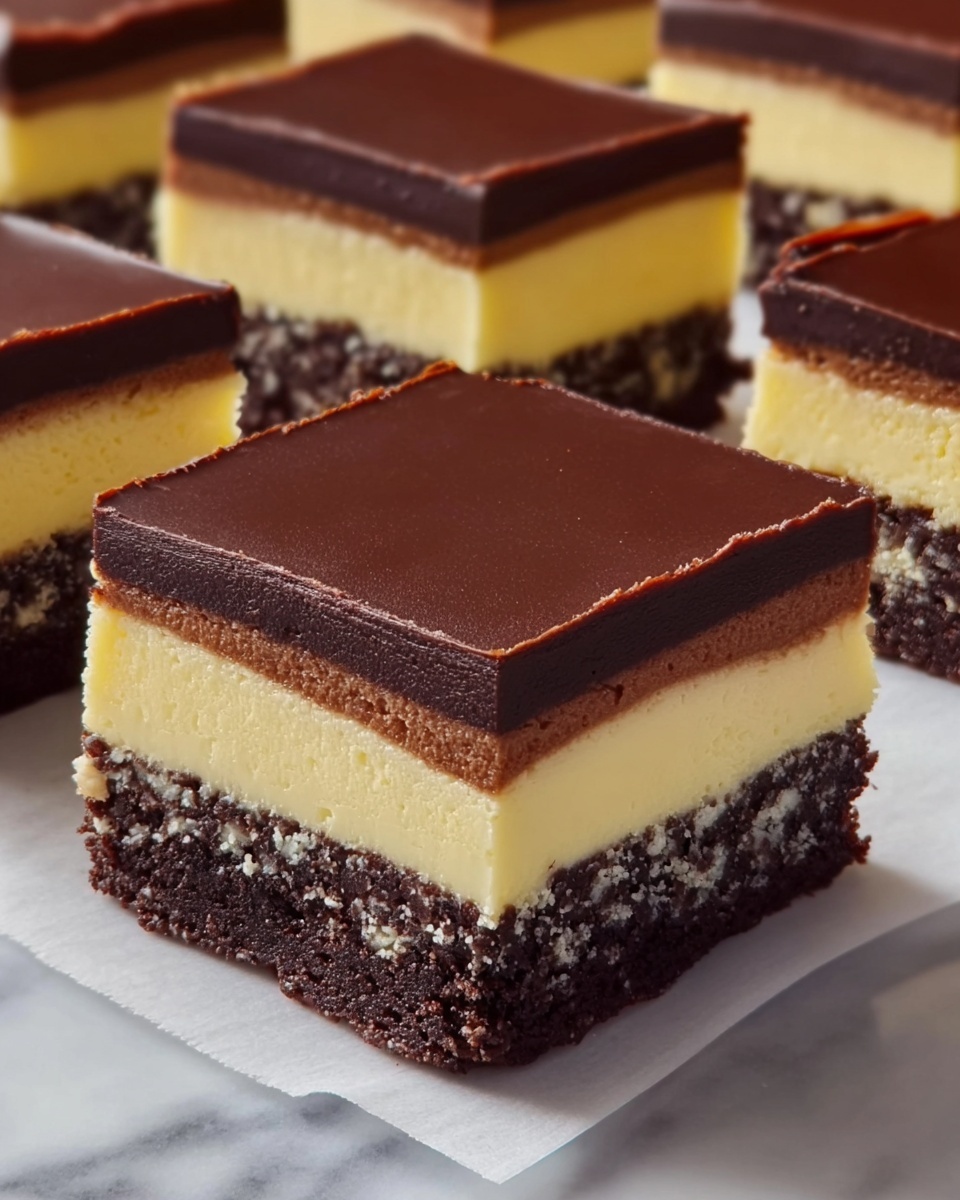
If you’re craving a dessert that’s both decadent and delightfully layered, the Nanaimo Bars Recipe is an absolute must-try. Originating from Canada, these no-bake bars combine a rich, chocolatey crust, a luscious custard filling, and a smooth chocolate topping into one unforgettable treat. Whether you’re entertaining guests or just treating yourself, this Nanaimo Bars Recipe delivers a perfect balance of textures and flavors that everyone will adore.
Ingredients You’ll Need
These ingredients are simple but essential, each bringing its own magic to the Nanaimo Bars Recipe. From the crunchy graham cracker base to the creamy custard filling and silky chocolate topping, every component plays a vital role in creating that classic layered delight.
- Unsalted butter (melted and softened): Adds richness and helps bind both the base and filling for perfect texture.
- Granulated sugar: Sweetens the base while balancing the cocoa’s slight bitterness.
- Unsweetened cocoa powder: Provides the deep chocolate flavor in the crust layer.
- Large egg (beaten): Gives structure and moisture to the base.
- Graham cracker crumbs: The crunchy foundation that holds the bars together.
- Shredded sweetened coconut: Adds chewiness and subtle sweetness to the texture.
- Chopped walnuts: Introduces a nutty crunch that complements the softness of the custard layer.
- Vanilla custard powder or instant vanilla pudding mix: Delivers that signature creamy, custard-like flavor and a beautiful yellow tint.
- Powdered sugar: Sweetens and lightens the custard filling.
- Milk: Helps achieve the perfect creamy consistency in the filling.
- Semi-sweet chocolate (chopped): Makes the rich, glossy topping that sets the bars apart.
How to Make Nanaimo Bars Recipe
Step 1: Prepare the Base
Start by lining an 8×8-inch pan with parchment paper for easy removal. Melt butter over low heat with sugar and cocoa powder, stirring until smooth to enhance the depth of the chocolate flavor. Quickly whisk in the beaten egg, then gently cook until thickened. Mixing in graham cracker crumbs, shredded coconut, and chopped walnuts creates a wonderfully textured crust that is crunchy and flavorful. Press this mixture firmly into the pan and chill to set while you work on the next layer.
Step 2: Make the Filling
The filling is where this Nanaimo Bars Recipe truly shines with its silky smooth and sweet custard layer. Beat together softened butter, custard powder (or pudding mix), powdered sugar, and milk until the mixture is light and fluffy. This ensures a creamy texture that contrasts beautifully with the crunchy base. Spread this evenly over the chilled crust and pop the pan back in the fridge to firm up for 15 to 20 minutes.
Step 3: Create the Chocolate Topping
For the crowning glory, melt chopped semi-sweet chocolate with butter in a double boiler or microwave until glossy and silky. Let it cool slightly — this prevents it from melting the filling — then pour it over the custard layer. Tilt the pan gently to spread the chocolate evenly, creating a smooth surface. Chill again until the chocolate topping is fully set, about an hour, so your bars will slice cleanly.
Step 4: Cut and Serve
Using a warm knife for clean edges, cut the bars into squares. This warm-knife trick helps prevent cracks and maintains the bars’ beautiful layers. Serve chilled or bring them to room temperature to enjoy a softer texture. Either way, these bars are a guaranteed crowd-pleaser.
How to Serve Nanaimo Bars Recipe
Garnishes
You can keep things simple with the classic bars on their own or sprinkle a little toasted coconut or finely chopped nuts on top for an extra touch of texture and visual appeal. For a festive look, dust some powdered sugar or drizzle white chocolate over the dark chocolate topping.
Side Dishes
Because Nanaimo Bars pack so much flavor and richness, pairing them with something fresh like a fruit salad or a dollop of lightly sweetened whipped cream can help balance the indulgence. A cup of robust coffee or a creamy latte is also an ideal companionship for true decadence without overwhelming your palate.
Creative Ways to Present
To impress guests, serve Nanaimo Bars Recipe in mini bite-sized portions on decorative platters or stacked on tiered stands. They also make wonderful dessert bars for picnics or potlucks when wrapped individually in parchment paper or wax paper. For a modern twist, layer the bars in clear glass jars to showcase the beautiful layers.
Make Ahead and Storage
Storing Leftovers
Once your Nanaimo Bars Recipe is made, keeping them fresh is simple. Store any leftovers in an airtight container in the refrigerator, where they will stay deliciously fresh for up to one week. This makes them a perfect make-ahead treat for busy weeks or last-minute guests.
Freezing
If you want to store Nanaimo Bars longer, they freeze beautifully. Wrap individual bars tightly in plastic wrap and place them in a freezer-safe container or bag. They will keep well for up to two months. Thaw refrigerated overnight before serving for the best texture.
Reheating
Typically, Nanaimo Bars are enjoyed chilled or at room temperature, so reheating is not necessary. If you prefer a softer texture, you can let them sit at room temperature for a short while before indulging. Heating is not recommended, as it could affect the layers’ texture and the chocolate topping’s integrity.
FAQs
What if I don’t have custard powder for the filling?
No worries! You can substitute instant vanilla pudding mix instead — it adds the same creamy flavor and color, keeping your Nanaimo Bars Recipe just as authentic and delicious.
Can I use different nuts in the base?
Absolutely! While walnuts are traditional, you can swap them out for almonds, pecans, or even hazelnuts depending on what you have on hand. Just make sure they’re chopped finely to maintain the perfect texture.
Is the egg in the base cooked?
Yes, the beaten egg is gently cooked with the butter, sugar, and cocoa to ensure safety and help thicken the base layer — no raw eggs here.
How long do Nanaimo Bars last?
Stored properly in the fridge in an airtight container, these bars will stay fresh for about one week, making them great for preparing in advance.
Can I make Nanaimo Bars dairy-free?
It’s a bit tricky because butter and milk are central to the recipe’s texture and flavor, but you can experiment with plant-based alternatives for both. Just keep in mind the texture might slightly differ from the original.
Final Thoughts
There’s something truly special about this Nanaimo Bars Recipe that brings a slice of Canadian sweetness to your kitchen with ease and joy. Whether you’re a seasoned baker or just starting out, these bars are the kind of dessert that feels like a warm hug — comforting, rich, and unforgettable. Give them a try and watch how quickly they become a favorite for you and everyone you share them with.
Print
Nanaimo Bars Recipe
- Prep Time: 25 minutes
- Cook Time: 5 minutes
- Total Time: 1 hour 30 minutes
- Yield: 16 bars
- Category: Dessert
- Method: No-Cook
- Cuisine: Canadian
- Diet: Vegetarian
Description
Nanaimo Bars are a classic Canadian no-bake dessert featuring a layered bar with a rich cocoa crumb base, creamy custard-flavored middle, and a smooth semi-sweet chocolate topping. These bars combine a crunchy, nutty bottom with a fluffy, sweet filling and a luscious chocolate finish, perfect for any occasion or sweet craving.
Ingredients
For the Base:
- 1/2 cup unsalted butter (melted)
- 1/4 cup granulated sugar
- 1/3 cup unsweetened cocoa powder
- 1 large egg (beaten)
- 1 3/4 cups graham cracker crumbs
- 1 cup shredded sweetened coconut
- 1/2 cup chopped walnuts
For the Filling:
- 1/2 cup unsalted butter (softened)
- 2 tablespoons vanilla custard powder or instant vanilla pudding mix
- 2 cups powdered sugar
- 2 tablespoons milk
For the Topping:
- 4 ounces semi-sweet chocolate (chopped)
- 2 tablespoons unsalted butter
Instructions
- Prepare the Pan: Line an 8×8-inch baking pan with parchment paper, ensuring some overhang for easy removal of the bars later.
- Make the Base: In a medium saucepan over low heat, combine melted butter, sugar, and cocoa powder. Stir continuously until smooth. Remove from heat and quickly whisk in the beaten egg, then return to low heat and cook for 1–2 minutes until thickened. Remove from heat and stir in graham cracker crumbs, shredded coconut, and chopped walnuts until fully combined. Press this mixture firmly and evenly into the bottom of the prepared pan. Refrigerate to set while preparing the filling.
- Make the Filling: In a mixing bowl, beat together softened butter, custard powder or pudding mix, powdered sugar, and milk until the mixture is light, creamy, and fluffy. Spread this filling evenly over the chilled base layer. Return the pan to the refrigerator for 15–20 minutes to firm up the filling.
- Prepare the Topping: Melt the chopped semi-sweet chocolate and butter together using a double boiler or microwave in 30-second intervals, stirring well between each until smooth and glossy. Allow the mixture to cool slightly but remain pourable.
- Assemble and Chill: Pour the melted chocolate mixture evenly over the custard filling. Gently tilt the pan to spread the chocolate across the entire surface. Refrigerate the assembled bars for about 1 hour or until the topping is fully set.
- Serve: Use a warm knife to cut the bars into 16 squares for clean edges. Serve the bars chilled or let them come to room temperature, according to preference.
Notes
- Vanilla custard powder gives the filling its classic yellow color and signature flavor; instant vanilla pudding mix can be used as a substitute if preferred.
- For added flavor depth and texture, use toasted coconut instead of raw.
- These bars can be stored in the refrigerator for up to one week or frozen for longer-term storage.


