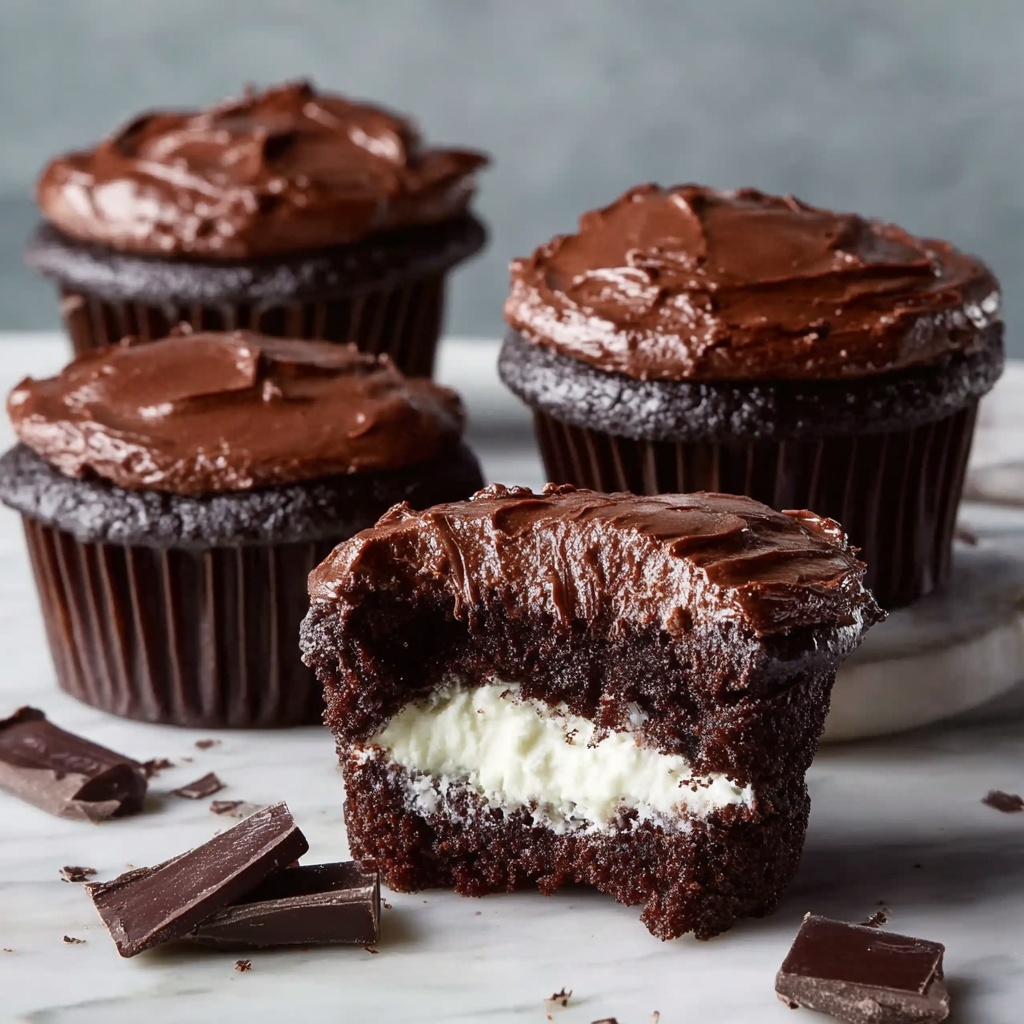
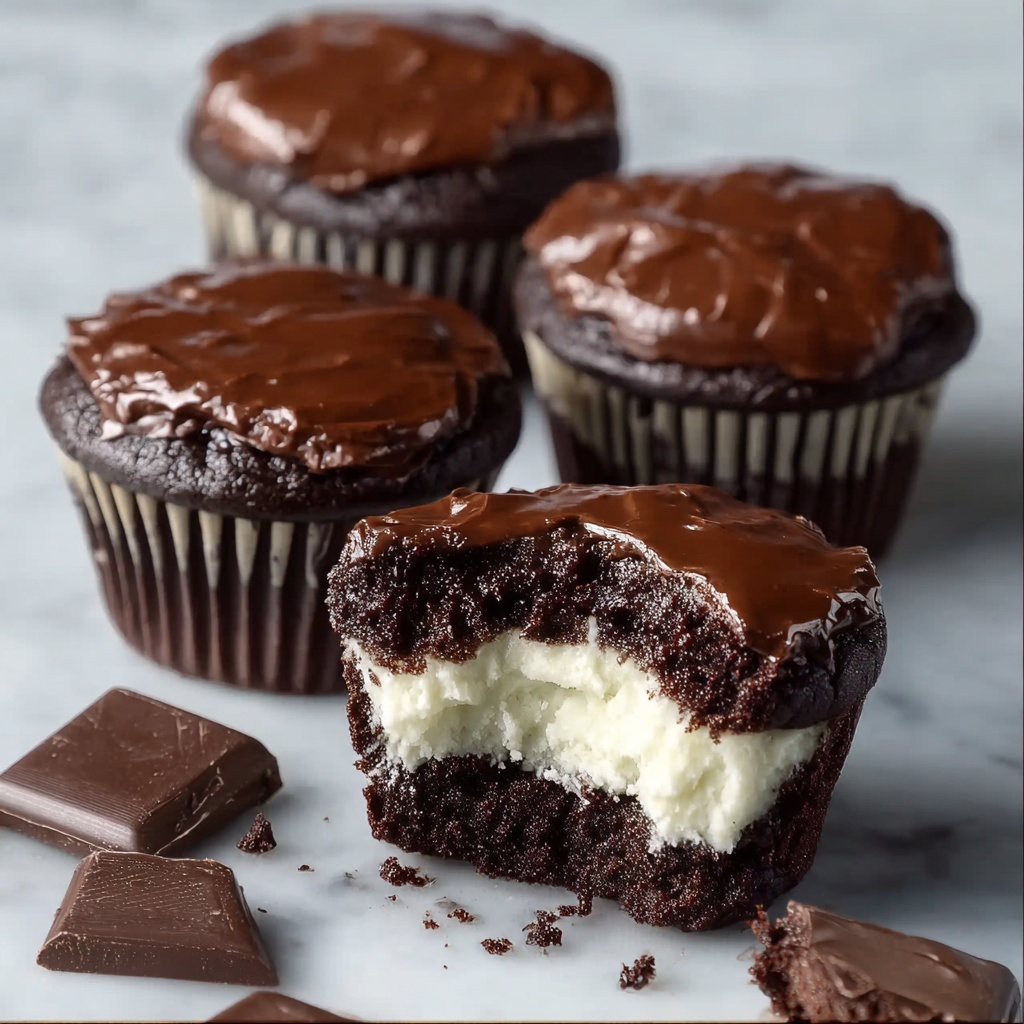
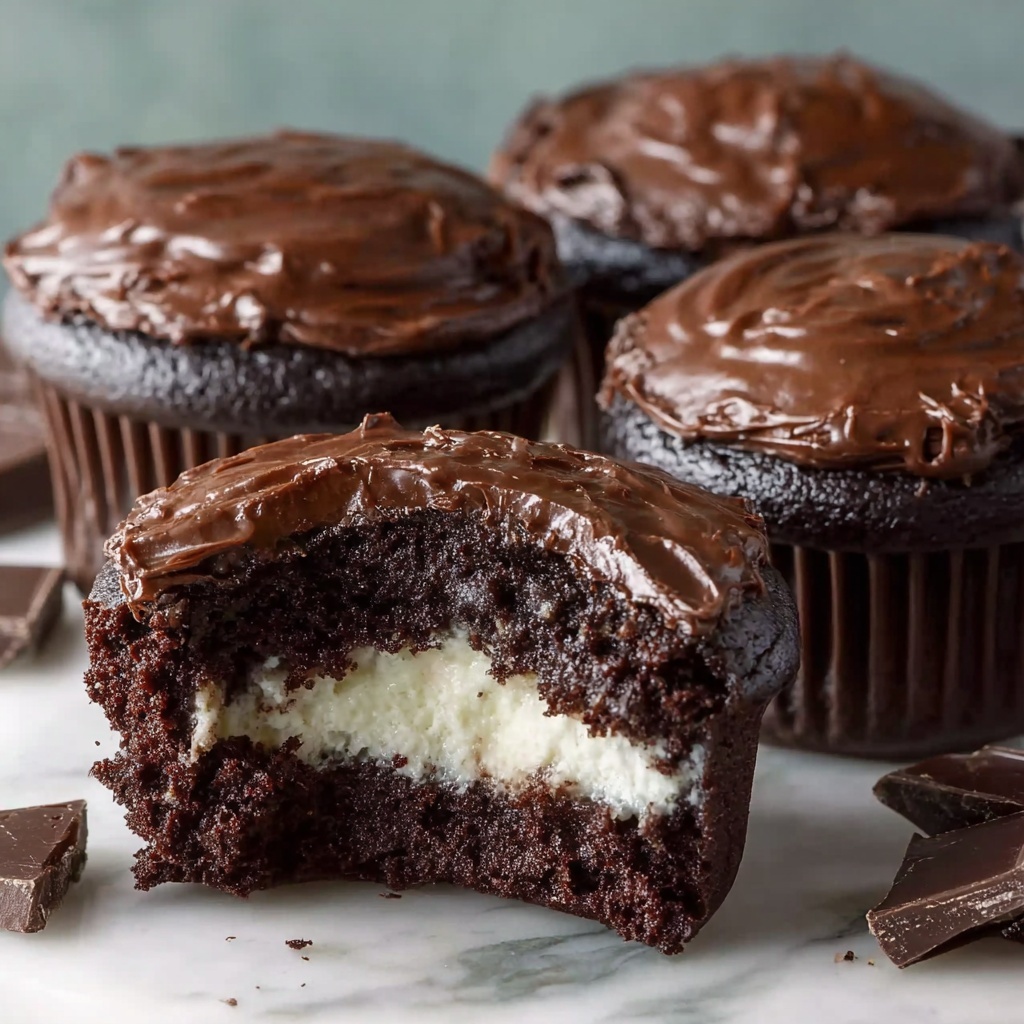
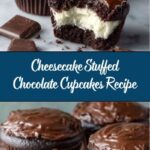
There is nothing quite like the irresistible combination of rich chocolate and tangy cheesecake, which is exactly why this Cheesecake Stuffed Chocolate Cupcakes Recipe is an absolute game-changer for dessert lovers everywhere. Imagine sinking your teeth into a moist, fudgy chocolate cupcake that surprises you with a creamy cheesecake center, all topped with gooey melted chocolate chips. This recipe brings together luscious textures and vibrant flavors in every bite, making it perfect for celebrations, cozy nights in, or anytime you want a special treat that feels both decadent and comforting.
Ingredients You’ll Need
The magic of this recipe lies in its simple yet thoughtfully chosen ingredients. Each one plays a vital role, from giving the cupcakes their tender crumb to creating that creamy cheesecake surprise in the middle and the glossy chocolaty finish on top.
- Semisweet chocolate chips (2 cups, divided): Use good-quality chips for a deep chocolate flavor and smooth melting texture.
- All-purpose flour (1 1/2 cups): Provides the perfect structure to keep cupcakes soft but stable to hold the cheesecake filling.
- Baking soda (1 teaspoon): Helps the cupcakes rise just right, creating a light crumb.
- Salt (1/2 teaspoon plus 1/8 teaspoon): Balances sweetness and enhances overall flavor complexity.
- Granulated sugar (3/4 cup total): Sweetens both the cupcake base and the cheesecake filling harmoniously.
- Vegetable oil (1/3 cup): Keeps the cupcakes moist and tender without overpowering flavors.
- Large eggs (2 total): Bind ingredients and contribute to a rich texture.
- Vanilla extract (1 teaspoon): Brings warmth and rounds out the chocolate’s intensity.
- Water (1 cup): Thins the batter for a perfectly tender cupcake.
- Cream cheese (6 ounces, room temperature): The star of the cheesecake filling, offering that silky tangy contrast to the chocolate.
How to Make Cheesecake Stuffed Chocolate Cupcakes Recipe
Step 1: Getting Ready
Start by preheating your oven to 350°F (175°C) and lining two muffin tins with paper liners. Setting the right temperature upfront is key to ensuring even baking from start to finish.
Step 2: Melting the Chocolate
Gently melt half a cup of your semisweet chocolate chips in the microwave, stirring every 20 seconds to avoid burning. Let this melt cool slightly so it doesn’t scramble your batter when mixed.
Step 3: Mixing the Cake Batter
In one bowl, sift together the flour, baking soda, and half a teaspoon of salt—the dry ingredients that guarantee fluffiness and rise. In a separate larger bowl, whisk the granulated sugar, vegetable oil, one egg, and vanilla extract until smooth. Now, gradually add the melted chocolate and water alternately with the dry ingredients, stirring just until incorporated. This results in a thin, luscious batter ready for your cupcake cups.
Step 4: Preparing the Cheesecake Filling
Using a mixer, beat the softened cream cheese with the remaining sugar, one egg, and 1/8 teaspoon salt until perfectly smooth and creamy. Fold in one full cup of chocolate chips to bring bold flavor pockets in every cheesecake bite.
Step 5: Building the Cupcakes
Fill each muffin liner halfway with the chocolate cupcake batter. Then, carefully spoon about one tablespoon of the cheesecake filling into the center of each cup. Top off the cheesecake with the remaining chocolate batter, making sure it’s covered completely.
Step 6: Baking and Finishing Touches
Bake your cupcakes for 20 to 25 minutes, until a toothpick inserted near the edge comes out clean but the cheesecake center stays soft. Immediately after removing from the oven, sprinkle the leftover chocolate chips on top. Their warmth will melt them slightly, creating a natural, glossy frosting that’s easy to spread and irresistibly shiny.
Step 7: Cooling to Perfection
Allow the cupcakes to cool in the pan initially to stabilize, then transfer them to a wire rack to cool completely. This step ensures the texture sets beautifully, and you get to savor the full depth of flavors once cooled.
How to Serve Cheesecake Stuffed Chocolate Cupcakes Recipe
Garnishes
Add a finishing touch by dusting powdered sugar or finely chopped toasted nuts for texture contrast. Fresh berries like raspberries or strawberries pair wonderfully too, offering a bright, juicy burst against the rich chocolate and tangy cheesecake.
Side Dishes
Serve alongside a scoop of vanilla bean ice cream or a dollop of lightly whipped cream to elevate the dessert experience. A cup of freshly brewed coffee or a rich hot cocoa also complements these cupcakes beautifully.
Creative Ways to Present
Try arranging these cupcakes on a tiered dessert stand for parties or gifting them in pretty, reusable tins lined with parchment paper. You can even top each with a small flag or decorative picks to really wow your guests with presentation.
Make Ahead and Storage
Storing Leftovers
Your cheesecake stuffed chocolate cupcakes can be kept fresh by storing them in an airtight container in the refrigerator for up to 3 days. This helps maintain the creamy filling’s texture while preserving that moist chocolate base.
Freezing
For longer storage, you can freeze the cooled cupcakes individually wrapped in plastic wrap, then placed in a freezer bag for up to 2 months. Thaw overnight in the fridge before serving to retain their delightful texture and flavor.
Reheating
To bring back that just-baked warmth, reheat cupcakes gently in a microwave for about 15 seconds or until slightly warm. Avoid overheating to preserve the smoothness of the cheesecake filling and prevent drying out the chocolate cake.
FAQs
Can I use other types of chocolate for this Cheesecake Stuffed Chocolate Cupcakes Recipe?
Absolutely! While semisweet chocolate chips provide a balanced sweetness, you can experiment with bittersweet or milk chocolate depending on your preference. Just be mindful of the sugar content since milk chocolate is sweeter and can alter the overall sweetness of the cupcakes.
Is it possible to make these cupcakes gluten-free?
Yes, you can substitute the all-purpose flour with a gluten-free flour blend designed for baking. Be sure to check that your baking soda and other ingredients are gluten-free as well. The texture might be slightly different but still delicious.
Can I prepare the cheesecake filling in advance?
Yes! You can make the cheesecake filling a day ahead and keep it refrigerated. Just give it a quick stir before assembling the cupcakes to ensure it maintains its smooth consistency.
What’s the best way to prevent the cheesecake filling from sinking?
Filling your cupcakes only halfway, then adding the cheesecake and topping with more batter creates a stable layering effect. Also, avoid overmixing the batter, as a lighter batter helps keep the filling centered during baking.
Can these cupcakes be made dairy-free?
By swapping the cream cheese with a dairy-free alternative and using dairy-free chocolate chips, you can adapt this recipe to be dairy-free. Just remember that dairy-free cream cheese may alter the texture slightly, so choose a brand known for baking.
Final Thoughts
If you are looking to impress friends, treat your loved ones, or simply indulge yourself, this Cheesecake Stuffed Chocolate Cupcakes Recipe is a beautiful way to marry two beloved desserts into one glorious bite. Don’t hesitate to dive in and bake these cupcakes — the combination of fudgy chocolate and creamy cheesecake is sure to become one of your all-time favorites!
Print
Cheesecake Stuffed Chocolate Cupcakes Recipe
- Prep Time: 15 minutes
- Cook Time: 30 minutes
- Total Time: 45 minutes
- Yield: 16 cupcakes
- Category: Dessert
- Method: Baking
- Cuisine: American
Description
Delight your taste buds with these decadent Cheesecake Stuffed Chocolate Cupcakes, featuring rich chocolate batter filled with creamy cheesecake and topped with melted chocolate chips for a luscious finish.
Ingredients
Chocolate Cupcake Batter
- 2 cups (340 grams) semisweet chocolate chips, divided
- 1 1/2 cups (187 grams) all-purpose flour
- 1 teaspoon baking soda
- 1/2 teaspoon salt
- 1/2 cup (100 grams) granulated sugar
- 1/3 cup (66 grams) vegetable oil
- 1 large egg
- 1 teaspoon vanilla extract
- 1 cup water
Cheesecake Filling
- 6 ounces (170 grams) cream cheese, at room temperature
- 1/4 cup (50 grams) granulated sugar
- 1 large egg
- 1/8 teaspoon salt
- 1 cup (170 grams) semisweet chocolate chips
Instructions
- Preheat Oven and Prepare Pans: Preheat your oven to 350°F (175°C). Line two muffin tins with a total of 16 paper cupcake liners to prepare for baking.
- Melt Chocolate: Place 1/2 cup of the semisweet chocolate chips in a microwave-safe bowl and melt them in short intervals until smooth. Set aside to cool slightly.
- Make Cupcake Batter: In a medium bowl, whisk together the flour, baking soda, and salt. In a separate large bowl, mix the sugar, vegetable oil, egg, and vanilla extract thoroughly. Alternate adding the melted chocolate and water with the flour mixture into the wet ingredients, whisking gently. The resulting batter will be thin in consistency.
- Prepare Cheesecake Filling: Using a stand or hand mixer, beat the cream cheese, sugar, egg, and salt until very smooth. Fold in 1 cup of semisweet chocolate chips to add richness to the filling.
- Assemble Cupcakes: Fill each cupcake liner halfway with the chocolate batter. Spoon about 1 tablespoon of the cheesecake filling directly on top of the batter in each liner, then cover with the remaining chocolate batter to fill the cup almost to the top.
- Bake Cupcakes: Place the muffin tins in the oven and bake for 20 to 25 minutes until a toothpick inserted near the edge comes out clean.
- Add Chocolate Topping: Immediately after removing the cupcakes from the oven, sprinkle the remaining chocolate chips evenly over the hot cupcakes. Allow the chocolate chips to melt slightly, then gently spread the melted chocolate over the tops to create a glossy frosting.
- Cool and Serve: Let the cupcakes cool in the pan for several minutes before transferring to a wire rack. Allow them to cool completely before serving to enjoy the full flavor and texture.
Notes
- Ensure the cream cheese is at room temperature for the smoothest filling.
- The batter is intentionally thin to yield moist cupcakes.
- Sprinkling chocolate chips on hot cupcakes creates a natural glossy frosting—avoid using cold cupcakes to do this step.
- These cupcakes can be stored in an airtight container in the refrigerator for up to 3 days.
- For an extra touch, garnish with a dusting of powdered sugar or fresh berries.

