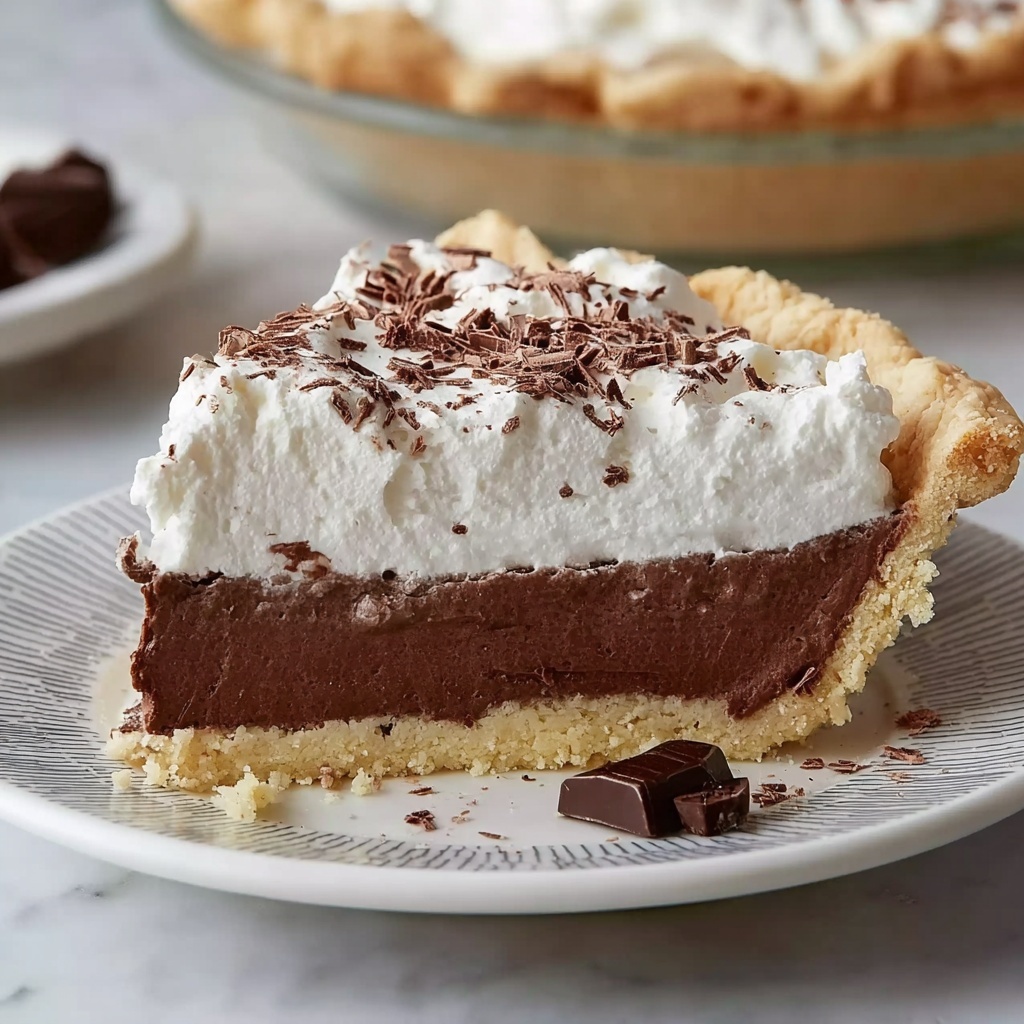
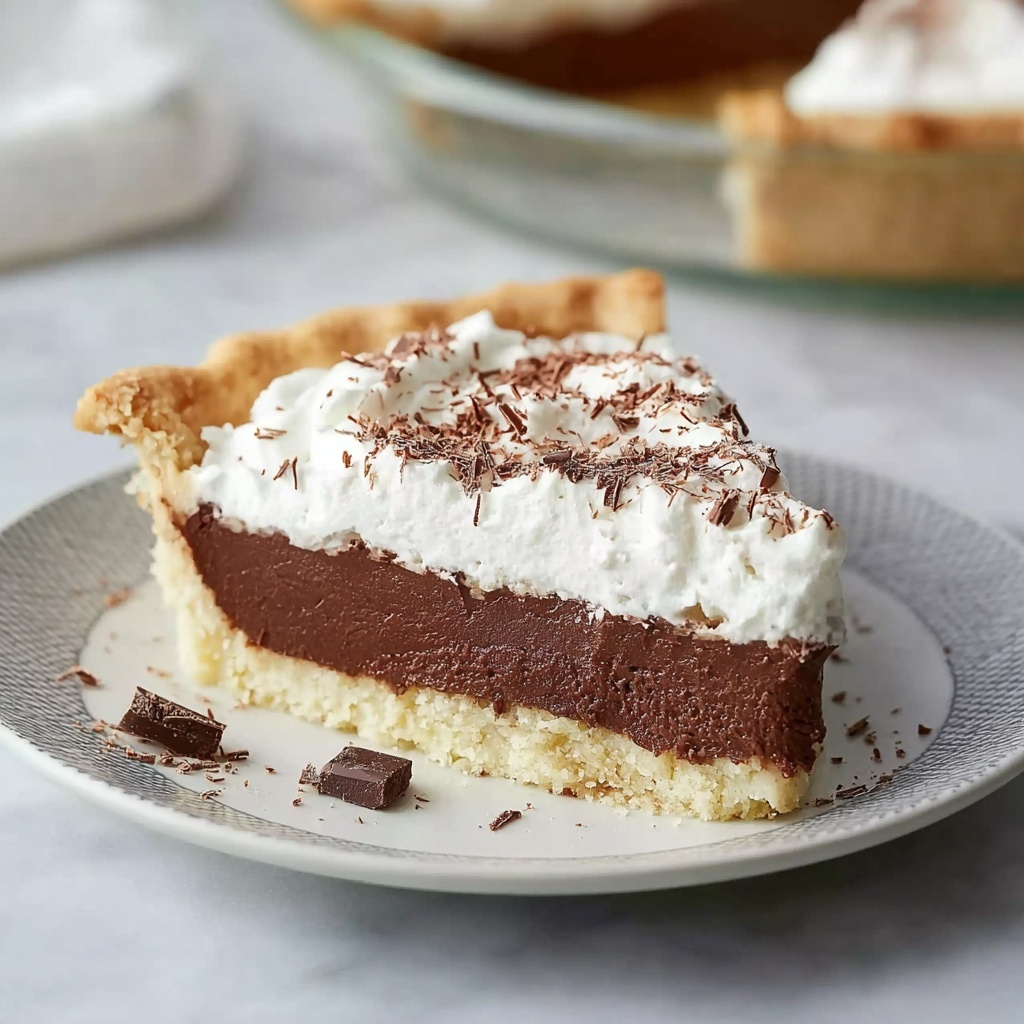
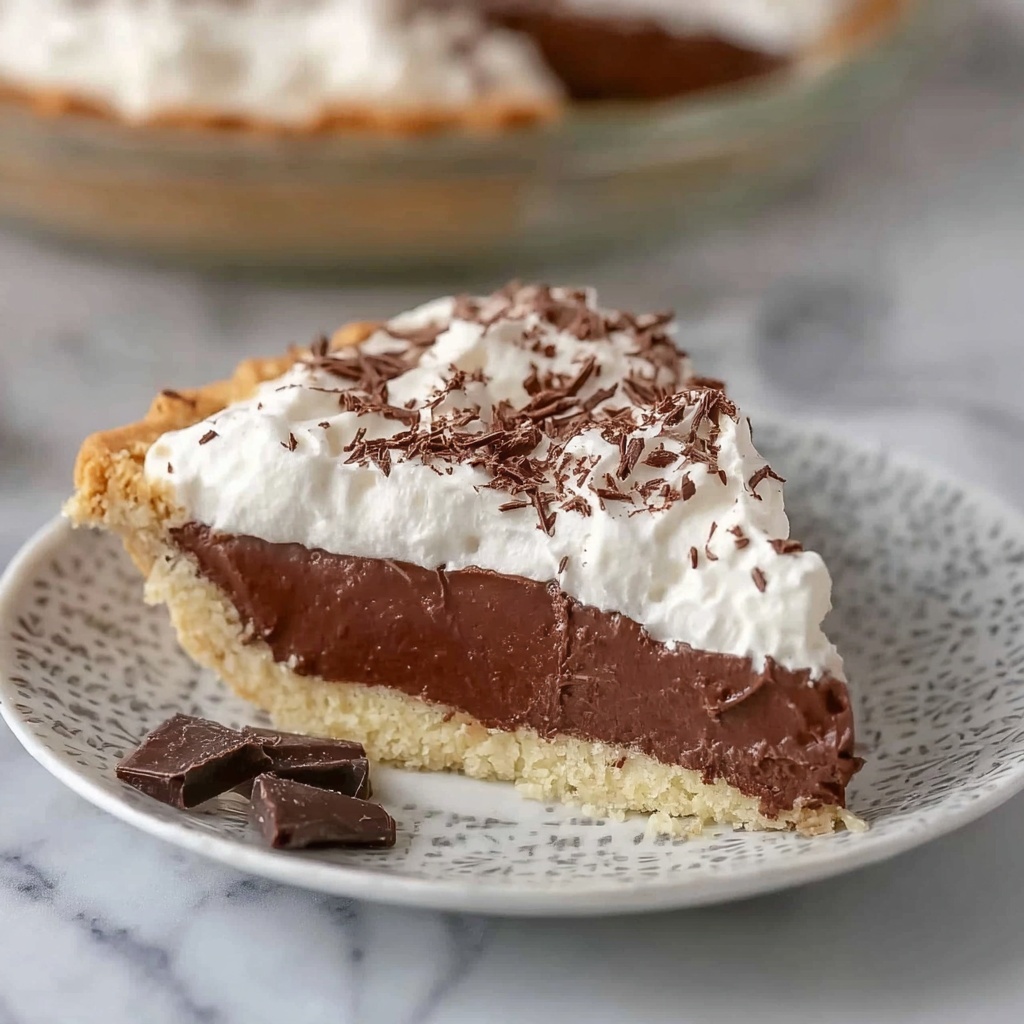
If you’ve been searching for a truly show-stopping, melt-in-your-mouth dessert that’s both indulgent and safe for gluten-free diets, look no further! This Gluten-Free Chocolate Angel Pie Recipe combines a crisp, airy meringue shell with a luscious, velvety chocolate filling and cloud-like whipped cream topping. It’s a dessert that’s as beautiful as it is delicious, promising to wow your guests or make any occasion feel extra special. Whether you’re new to gluten-free baking or a seasoned pro, this recipe is a fabulous way to enjoy rich chocolate without compromise.
Ingredients You’ll Need
Each ingredient in this recipe is simple yet essential, coming together perfectly to create the ideal balance of texture and flavor. From the silky egg whites that build the meringue’s delicate structure to the rich chocolate that forms the heart of this pie, every component contributes uniquely to your final masterpiece.
- 4 large egg whites, at room temperature: Whipping these is key to the pie’s fluffy, airy base.
- ¼ teaspoon cream of tartar: Stabilizes the egg whites for maximum volume and structure.
- ⅛ teaspoon fine salt: Enhances the sweetness and rounds out the flavor.
- 1 cup granulated sugar: Sweetens and strengthens the meringue’s texture.
- 1 tablespoon cornstarch, plus extra for dusting: Prevents grittiness and adds a tender texture.
- ½ teaspoon vanilla extract: Adds subtle warmth and aromatic depth.
- 8 ounces semisweet or bittersweet chocolate (60-70% cacao), finely chopped: Choose your favorite quality chocolate for the richest taste.
- 3 tablespoons water (or coconut milk for dairy-free): Helps gently melt the chocolate without seizing.
- 4 large egg yolks: Create a silky custard base for the filling.
- ¼ cup granulated sugar: Sweetens the custard perfectly.
- ½ teaspoon fine salt: Balances the sweetness and intensifies flavors.
- ½ cup half-and-half (or full-fat coconut milk for dairy-free): Adds creaminess to the custard.
- 1 teaspoon vanilla extract: Brings fragrance and richness to the chocolate filling.
- 1½ cups heavy cream, chilled (or solid part of 2 cans coconut milk, refrigerated overnight): Whipped for folding into the chocolate mixture.
- 1⅓ cups heavy cream, chilled (or solid part of 1 can coconut milk, refrigerated overnight): Whipped with powdered sugar for the topping.
- 2 tablespoons powdered sugar: Sweetens the whipped cream topping just right.
- 1 teaspoon vanilla extract: Enhances the whipped cream’s flavor.
- 2 tablespoons unsweetened cocoa powder or chocolate curls for dusting: Adds a beautiful finishing touch.
How to Make Gluten-Free Chocolate Angel Pie Recipe
Step 1: Prepare Your Pie Plate and Oven
Start by preheating your oven to 275°F and thoroughly greasing a 9-inch pie plate. Dusting it with cornstarch using a pastry brush creates a perfect non-stick surface. For easier removal later, line the bottom with parchment paper before greasing. These little prep steps make all the difference when it’s time to serve your pie with a flawless crust.
Step 2: Combine Sugar and Cornstarch
Whisk together granulated sugar and cornstarch in a small bowl. Mixing these before adding to the egg whites prevents any unwanted grittiness and helps stabilize the meringue beautifully, ensuring that delicate, crisp texture is exactly right.
Step 3: Whip the Egg Whites
Using a clean, grease-free bowl, beat your room-temperature egg whites with salt and cream of tartar until foamy. Increasing the mixer speed, keep beating until soft peaks form. Getting those egg whites just right unlocks the airy profile that makes this pie so special.
Step 4: Gradually Add Sugar Mixture
Add the sugar and cornstarch mixture two tablespoons at a time, continuously beating until glossy, stiff peaks develop. Folding in vanilla extract at the end brings a lovely fragrant note to the meringue. Careful not to rush this step or you’ll miss that perfect texture.
Step 5: Shape the Meringue Shell
Gently spread the meringue into your prepared pie plate, building up slightly higher edges and creating a shallow well in the center to cradle your luscious filling. Work with care here to maintain all the beautiful air bubbles you’ve whipped up so diligently.
Step 6: Bake the Meringue
Bake on the lower-middle rack for about 90 minutes at 275°F, then reduce the temperature to 200°F and bake for an additional hour. This slow, low-heat process dries the meringue properly without browning it, giving you the crisp exterior and tender inside that define a perfect angel pie crust.
Step 7: Cool the Crust
Turn off the oven and crack the door open, letting the crust cool inside for 15 minutes before removing it to cool completely on the counter. This gradual cooling prevents cracking and helps maintain that delicate, ethereal structure. The crust can be made a day ahead, making your Gluten-Free Chocolate Angel Pie Recipe great for planning ahead.
Step 8: Melt the Chocolate
Place chopped chocolate and water in a microwave-safe bowl, heating gently in 30-second bursts at half power. Stir between each interval, stopping when only a few small unmelted bits remain to let residual heat finish the job. The finer the chop, the smoother the filling will be.
Step 9: Make the Custard Base
Whisk egg yolks, sugar, and salt until pale yellow and slightly thickened. Heat half-and-half until it just simmers, then temper the eggs by slowly drizzling hot half-and-half into the egg mixture while whisking constantly to avoid scrambling. Return the combined mixture to low heat and stir gently until it thickens to coat the back of a spoon. This custard forms the creamy heart of your pie’s chocolate filling.
Step 10: Combine Chocolate and Custard
Pour the custard into the melted chocolate, stirring until glossy and smooth. After cooling for about 10 minutes, fold in one-third of whipped cream to lighten the mixture, then gently fold in the remaining cream to create a light yet decadent filling.
Step 11: Chill the Filling
Cover and refrigerate the chocolate filling for at least three hours or up to 24 hours to ensure it firms up perfectly before assembling.
Step 12: Assemble the Pie
Let the filling soften slightly at room temperature, then spoon it into the cooled meringue shell and smooth the surface with an offset spatula. This contrast of temperatures enhances the pie’s luscious texture.
Step 13: Whip the Topping
Whip remaining heavy cream with powdered sugar and vanilla until stiff peaks form. For extra stability, adding a bit of dissolved gelatin helps keep your topping picture-perfect longer, particularly useful for warm environments or celebrations.
Step 14: Add Final Touches
Spread or pipe whipped cream over the chocolate filling, decorating with cocoa powder or chocolate curls for a gallery-worthy finish. This finishing touch adds an elegant flair that elevates your Gluten-Free Chocolate Angel Pie Recipe to the next level.
Step 15: Chill Before Serving
Refrigerate the assembled pie for at least an hour but no more than four, allowing flavors to meld and ensure clean slicing. When serving, dip your knife in hot water and wipe between cuts for those perfect, neat slices everyone will admire.
How to Serve Gluten-Free Chocolate Angel Pie Recipe
Garnishes
Nothing complements this pie better than a dusting of cocoa powder or a scattering of delicate chocolate curls. These simple garnishes add texture and a rich chocolate aroma that makes each bite even more irresistible. For an extra pop of color, try a few fresh raspberries or a sprinkle of toasted nuts.
Side Dishes
This pie is rich enough to stand on its own but pairs beautifully with fresh fruit, especially berries, which offer a bright counterpoint to the creamy chocolate. A scoop of vanilla or coconut ice cream can also enhance the decadent experience, making each forkful a creamy, dreamy bite.
Creative Ways to Present
For a fun twist, try serving mini individual versions in ramekins or meringue nests topped with chocolate mousse. Decorating the plate with raspberry coulis or a drizzle of caramel sauce adds an artistic touch that will impress your guests. No matter how you serve it, this Gluten-Free Chocolate Angel Pie Recipe is bound to steal the spotlight.
Make Ahead and Storage
Storing Leftovers
Leftover pie can be refrigerated, covered tightly with plastic wrap or foil, to keep the filling and topping fresh for up to 2 days. The meringue crust will maintain its crispness if stored in a cool, dry place separately; however, the assembled pie will soften over time, so try to enjoy it fresh.
Freezing
This pie is best enjoyed fresh and is not ideal for freezing once assembled because the meringue tends to lose its crisp texture and the whipped topping may separate. However, you can freeze just the baked meringue shell for up to one month, wrapped well, and fill it fresh when you’re ready to serve.
Reheating
Since the pie relies on a crisp meringue shell and chilled filling, reheating is not recommended. Instead, allow leftovers to come to room temperature for about 15 minutes to bring out the flavors and soften the filling slightly before enjoying.
FAQs
Can I make this pie dairy-free?
Absolutely! You can substitute coconut milk for the half-and-half and heavy cream components. Opt for the solid part of canned coconut milk refrigerated overnight to achieve that perfect creamy texture needed for the filling and topping.
What if I don’t have cream of tartar?
If you’re out of cream of tartar, you can substitute with a few drops of lemon juice or white vinegar to stabilize the egg whites. This helps your meringue reach those firm, glossy peaks essential for the pie’s structure.
Can I use dark chocolate instead of semisweet?
Yes! Using bittersweet or dark chocolate with 60-70% cacao content adds a deeper, richer flavor to your pie. Just adjust the sugar slightly if your chocolate is very bitter, to maintain the right balance of sweetness.
How long will this pie keep fresh?
For best taste and texture, serve your Gluten-Free Chocolate Angel Pie Recipe within 24 hours of assembly. If stored properly in the refrigerator and covered, it can last up to 2 days, though the meringue crust may soften slightly over time.
Is it possible to prepare components ahead of time?
Yes, you can bake the meringue shell up to 24 hours ahead and store it at room temperature. The chocolate filling can be made a day in advance and chilled, making assembly quick and stress-free when it’s time to serve.
Final Thoughts
There’s something truly magical about the way the airy meringue, rich chocolate filling, and fluffy whipped cream come together in this Gluten-Free Chocolate Angel Pie Recipe. It’s a dessert that promises joy with every bite and is perfect for celebrations or cozy nights in. I encourage you to give this recipe a try—your taste buds will thank you, and your friends will be asking for your secret!
Print
Gluten-Free Chocolate Angel Pie Recipe
- Prep Time: 3 hours 30 minutes
- Cook Time: 2 hours 30 minutes
- Total Time: 6 hours
- Yield: 8 servings
- Category: Dessert
- Method: Baking
- Cuisine: American
- Diet: Gluten Free
Description
This Gluten Free Chocolate Angel Pie features a crisp and airy meringue shell filled with a rich, silky chocolate custard and topped with whipped cream. Perfectly balanced textures and flavors make it an elegant dessert suitable for special occasions or any chocolate lover’s craving. Dairy-free options are included to accommodate dietary preferences without compromising taste or structure.
Ingredients
Meringue Shell
- 4 large egg whites, at room temperature
- ¼ teaspoon cream of tartar
- ⅛ teaspoon fine salt
- 1 cup granulated sugar
- 1 tablespoon cornstarch, plus extra for dusting
- ½ teaspoon vanilla extract
Chocolate Filling
- 8 ounces semisweet or bittersweet chocolate (60-70% cacao), finely chopped
- 3 tablespoons water (or coconut milk for dairy-free)
- 4 large egg yolks
- ¼ cup granulated sugar
- ½ teaspoon fine salt
- ½ cup half-and-half (or full-fat coconut milk for dairy-free)
- 1 teaspoon vanilla extract
- 1½ cups heavy cream, chilled (or solid part of 2 cans coconut milk, refrigerated overnight)
Whipped Cream Topping
- 1⅓ cups heavy cream, chilled (or solid part of 1 can coconut milk, refrigerated overnight)
- 2 tablespoons powdered sugar
- 1 teaspoon vanilla extract
- 2 tablespoons unsweetened cocoa powder for dusting, or chocolate curls for garnish
Instructions
- Prepare pie plate: Preheat the oven to 275°F. Thoroughly grease a 9-inch pie plate and dust it evenly with cornstarch using a pastry brush. Line the bottom with parchment paper before greasing to ensure easy removal of the meringue shell after baking.
- Mix sugar and cornstarch: In a small bowl, whisk together granulated sugar and cornstarch to prevent grittiness in the meringue.
- Beat egg whites: Using a clean, grease-free bowl, beat room temperature egg whites with salt and cream of tartar until foamy. Increase speed until soft, billowy mounds form.
- Add sugar mixture: Gradually add the sugar-cornstarch mixture, 2 tablespoons at a time, while continuously beating until stiff, glossy peaks form. Fold in vanilla extract gently.
- Shape meringue: Spread the meringue evenly into the prepared pie plate, building up higher edges with a slight depression in the center to hold the filling. Avoid overworking to retain airiness.
- Bake meringue: Bake on the lower-middle rack for 90 minutes. Lower oven temperature to 200°F and bake for an additional hour until the meringue is completely dry without browning. Some small cracks are normal.
- Cool crust: Turn off oven, crack door open, and let the crust cool in the oven for 15 minutes. Remove and cool at room temperature for about 30 minutes. Can be made up to 24 hours ahead and stored in a cool dry place.
- Melt chocolate: Place finely chopped chocolate and water in a microwave-safe bowl. Heat at 50% power in 30-second intervals, stirring between each until mostly melted, leaving a few unmelted pieces. Let residual heat finish melting.
- Prepare custard base: Whisk egg yolks, sugar, and salt in a medium bowl until pale yellow and slightly thickened. Heat half-and-half until barely simmering. Slowly drizzle hot half-and-half into egg mixture while whisking to temper. Return to saucepan and cook over low heat while stirring until mixture thickens and coats the back of a spoon, about 1-2 minutes.
- Combine chocolate and custard: Pour hot custard into melted chocolate and stir until fully combined and glossy. Cool for 10 minutes, stirring occasionally. Whip cold cream until soft peaks form and gently whisk one-third into the chocolate mixture. Carefully fold in remaining whipped cream until no streaks remain.
- Chill filling: Cover and refrigerate chocolate filling for at least 3 hours or up to 24 hours until firm.
- Fill meringue shell: Let chocolate filling sit at room temperature for 10–15 minutes to soften slightly. Spoon it into the cooled meringue shell and smooth the top with an offset spatula.
- Whip topping cream: In a chilled bowl, whip heavy cream with powdered sugar and vanilla until stiff peaks form. For extra stability, dissolve ½ teaspoon unflavored gelatin in 1 tablespoon water, microwave 5 seconds, cool slightly, then incorporate while whipping.
- Top pie: Spread or pipe whipped cream over the chocolate filling, covering completely or leaving a visible chocolate border. Dust with cocoa powder or garnish with chocolate curls.
- Chill assembled pie: Refrigerate pie for at least 1 hour (up to 4 hours) before serving. For clean slices, dip knife in hot water and wipe dry between cuts.
Notes
- Ensure egg whites are at room temperature for maximum volume in meringue.
- Use cornstarch dusting to prevent the meringue from sticking to the pie plate.
- Do not overbeat meringue to avoid deflating air bubbles.
- Small cracks in the meringue shell are normal and will be concealed by the filling.
- Chopping chocolate finely helps melting evenly for a smooth custard.
- Tempering eggs properly prevents curdling in the custard.
- Dairy-free substitutions using coconut milk and coconut cream yield excellent results.
- Gelatin in whipped cream topping adds stability, especially on warm days.
- Do not refrigerate the meringue shell alone; keep in a cool dry place to maintain crispness.
- For best slicing, warm the knife with hot water between cuts.

