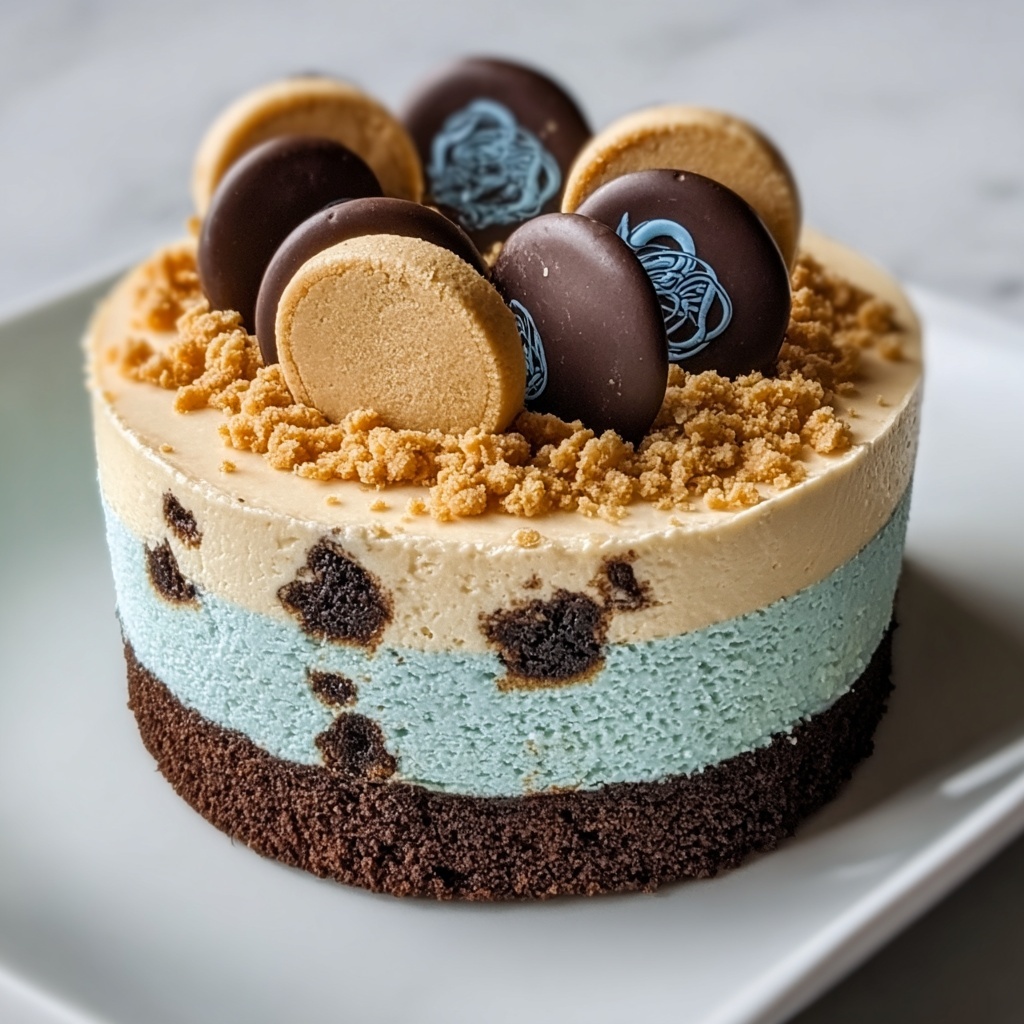
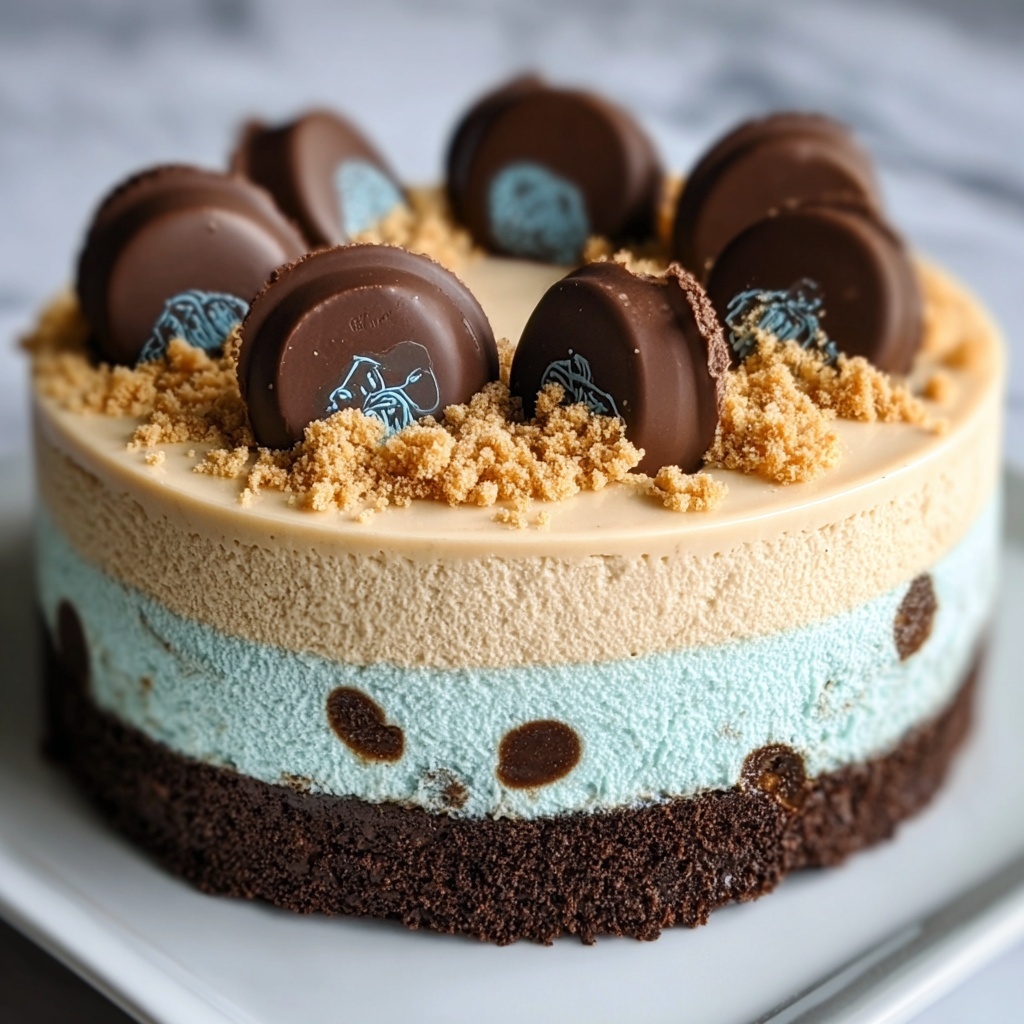
If you’ve been on the hunt for a dessert that combines whimsy, nostalgia, and pure indulgence, look no further than the Cookie Monster Cheesecake: A Fun and Indulgent Treat Recipe. This show-stopping cheesecake layers a rich, buttery chocolate chip cookie blondie base with a vibrant blue, cookies and cream-infused cheesecake filling that’s bursting with crushed Oreos. Topped with luscious chocolate ganache and a mini cookie sprinkle, it’s like your childhood favorites all got together to throw one incredible party in your mouth. Whether you’re gearing up for a celebration or just want to treat yourself to something truly special, this recipe brings happiness and sweetness to every bite.
Ingredients You’ll Need
Gathering your ingredients is a breeze, but each one plays an essential role in building the vibrant flavors and textures that make the Cookie Monster Cheesecake so unforgettable. From the rich cream cheese to the crunchy Oreos, every component contributes to the magic.
- Unsalted butter (4 oz / ½ cup): Provides the perfect richness and moisture to the cookie blondie base.
- Salt (½ tsp): Balances sweetness and enhances all the flavors beautifully.
- Brown sugar (2.6 oz / ⅓ cup, tightly packed): Adds a deep, caramel sweetness for the blondie layer.
- Egg (1): Binds the cookie batter for the perfect chewy texture.
- Vanilla extract (1 tsp plus 1 tsp): Infuses warmth and depth to both cookie and cheesecake layers.
- All-purpose flour (4.4 oz / 1 cup, spoon and level): Gives structure to the blondie without toughness.
- Semisweet mini chocolate chips (4 oz / ⅔ cup + 6 oz / 1 cup): Bring pockets of melty chocolate goodness to blondie and ganache.
- Cream cheese (16 oz / 2 packets): The star of the cheesecake layer, lending creaminess and tang.
- Cornflour (2 tsp): Ensures the cheesecake sets up smoothly without cracking.
- Granulated sugar (3.5 oz / ½ cup): Sweetens the cheesecake just right, balancing with the tang of cream cheese.
- Pinch of salt: Enhances the overall flavor profile in the cheesecake and ganache.
- Whipping cream (½ cup + ½ cup): Adds luscious richness to the cheesecake and the chocolate ganache topping.
- Blue gel food coloring: Creates that playful, iconic Cookie Monster blue that makes this treat so visually joyful.
- Eggs (3, for cheesecake): Provide the necessary structure while keeping the cheesecake silky.
- Oreo cookies (15, crushed): Deliver that classic cookies and cream crunch and flavor.
- Mini chocolate chip cookies (whole and crushed): Perfect for decorating and adding extra cookie crunch to the finish.
How to Make Cookie Monster Cheesecake: A Fun and Indulgent Treat Recipe
Step 1: Prepare the Chocolate Chip Cookie Blondie Base
Start by preheating your oven to 350°F (180°C) and getting your 8-inch springform pan ready — grease it, line the bottom with parchment paper, and dust the sides with flour to prevent sticking. Melt the butter with salt and brown sugar in the microwave, stirring every 30 seconds until smooth. Once slightly cooled, whisk in the egg and vanilla extract, then gradually fold in the flour. Finish by folding in the mini chocolate chips to add bursts of chocolatey goodness throughout. Spread this tasty batter evenly in your pan and bake for 15 minutes, then let it cool for 10–15 minutes while you prepare the cheesecake layer. Don’t forget to reduce the oven temperature to 300°F (150°C) afterward for baking the cheesecake properly.
Step 2: Mix the Cookies and Cream Cheesecake Filling
While your blondie base cools, it’s time to whip up that dreamy blue cheesecake filling. Using a mixer, beat together the cream cheese, cornflour, and granulated sugar until smooth and creamy. Add a pinch of salt, whipping cream, a few drops of blue gel food coloring, and vanilla extract, mixing at medium speed to get that perfect Cookie Monster hue—feel free to add more coloring if you want it more vibrant. Next, incorporate the eggs one at a time on low speed to keep your batter silky and avoid overmixing. Finally, gently fold in the crushed Oreo cookies; these little bits of crunch bring the iconic cookies and cream texture to the cheesecake.
Step 3: Bake the Cookie Monster Cheesecake: A Fun and Indulgent Treat Recipe
Pour your vibrant cheesecake batter over the cooled blondie base and get ready for the water bath magic. Double wrap the springform pan in foil to prevent water leaks, and nestle it inside a larger tray. Pour hot water into the larger tray until it reaches about halfway up the sides of the springform pan. Bake at 300°F (150°C) for 60 to 70 minutes until the cheesecake is just set but still jiggles slightly in the center. After baking, turn off the oven and leave the cheesecake inside with the door slightly open for 15 to 30 minutes—this prevents cracks by allowing it to cool gently. Then, take it out, cool to room temperature for up to four hours, and refrigerate it overnight or at least eight hours to set completely.
Step 4: Prepare and Add the Chocolate Ganache Topping
To add indulgence on top, melt semisweet chocolate chips, cream, and a pinch of salt together in 30-second microwave bursts, stirring until glossy and smooth. Let the ganache cool until thick enough to spread without running (pop it into the fridge for speed). Once chilled, generously spread it over the cheesecake’s top and sides. The rustic look with some uneven swirls is perfect here as it prepares the canvas for your cookie decorations!
Step 5: Decorate and Serve Your Masterpiece
For the final cherry on top, scatter whole and crushed mini chocolate chip cookies all over the ganache. This charming decoration offers an inviting texture contrast and drives home that Cookie Monster vibe. After chilling, slice into this playful yet indulgent treat and prepare for oohs and ahhs with every bite!
How to Serve Cookie Monster Cheesecake: A Fun and Indulgent Treat Recipe

Garnishes
Add extra flair with a sprinkle of mini cookie crumbs around the plate or a dollop of whipped cream tinted with a hint of blue food coloring to echo the cheesecake’s signature color. Fresh berries can also offer a nice tart contrast that brightens the experience without stealing the show.
Side Dishes
Since the Cookie Monster Cheesecake is rich and sweet, keep sides simple with a light scoop of vanilla or cookies and cream ice cream. A cup of freshly brewed coffee or a cold glass of milk pairs beautifully and balances the dessert’s indulgence.
Creative Ways to Present
For parties, serve this cheesecake in mini portions with individual cookie toppers on each slice for a playful presentation. You could also turn it into a dessert table centerpiece, surrounded by a mini cookie assortment for your guests to grab as a nostalgic cookie celebration!
Make Ahead and Storage
Storing Leftovers
Keep your leftover Cookie Monster Cheesecake sealed tightly in the refrigerator, preferably in an airtight container or wrapped in plastic wrap. Properly stored, it stays delicious for 3 to 5 days without losing its moisture or flavor.
Freezing
If you want to save this fun and indulgent treat for later, freezing works beautifully. Slice the cheesecake first, wrap each piece tightly in plastic wrap and foil, then place in a freezer-safe container or bag. It can stay frozen for up to 2 months; just thaw overnight in the fridge before serving.
Reheating
Cheesecake is usually best enjoyed chilled. However, if you prefer it slightly warmer, let the slice sit at room temperature for 15 to 20 minutes before eating. Avoid microwaving, as it can affect the texture and cause unwanted melting of the creamy layers.
FAQs
Can I use regular sized chocolate chips instead of mini ones?
Yes, you can, but mini chocolate chips distribute more evenly and create a smoother bite experience in the blondie base. Regular chips might sink or create bigger pockets of chocolate, which some may enjoy but is less balanced.
What can I substitute if I don’t have blue gel food coloring?
Gel food coloring is preferred for its vivid color without watery consistency, but you can use liquid food coloring just be cautious not to add too much, or even natural blue colors like butterfly pea powder. Keep in mind the shade won’t be as bright.
How do I avoid cracks in the cheesecake?
The water bath is key—it maintains even, gentle heat and moisture during baking, preventing the cheesecake from cracking. Also, avoid overmixing the batter and allow it to cool gradually in the oven with the door ajar.
Can I make this cheesecake gluten-free?
Yes! Swap the all-purpose flour in the blondie base with a gluten-free flour blend that measures cup-for-cup equal. Just ensure your Oreos are gluten-free, too, and all other ingredients are safe.
Is it possible to make this recipe vegan?
This recipe relies heavily on dairy and eggs for its signature texture and flavor, so veganizing would require significant substitutions like vegan cream cheese, plant-based butter, and egg replacements. It’s doable but will alter the taste and consistency somewhat.
Final Thoughts
If you’re ready to bring joy, color, and an irresistible cookie twist to your dessert table, dive right into making the Cookie Monster Cheesecake: A Fun and Indulgent Treat Recipe. It’s truly a celebration on a plate that invites smiles and happy taste buds with every luscious bite. Trust me when I say this is one recipe you’ll want to keep coming back to, again and again!
Print
Cookie Monster Cheesecake: A Fun and Indulgent Treat Recipe
- Prep Time: 30 minutes
- Cook Time: 1 hour 25 minutes
- Total Time: 10 hours 55 minutes
- Yield: 8 servings
- Category: Dessert
- Method: Baking
- Cuisine: American
Description
This Cookie Monster Cheesecake is a delightful, indulgent dessert combining a rich chocolate chip cookie blondie base with a vibrant blue cookies and cream cheesecake layer, topped with a luscious chocolate ganache and mini chocolate chip cookies. Perfect for cookie lovers and fans of creative cheesecakes, this recipe offers a fun and flavorful treat that’s sure to impress.
Ingredients
Chocolate Chip Cookie Blondie
- 4 oz (½ cup) unsalted butter
- ½ tsp salt
- 2.6 oz (⅓ cup) brown sugar, tightly packed
- 1 egg
- 1 tsp vanilla extract
- 4.4 oz (1 cup) all-purpose flour (spoon and level)
- 4 oz (⅔ cup) semisweet mini chocolate chips
Cookies and Cream Cheesecake
- 16 oz (2 packets) cream cheese
- 2 tsp cornflour (cornstarch)
- 3.5 oz (½ cup) granulated sugar
- Pinch of salt
- ½ cup (118 ml) whipping cream
- Blue gel food coloring (quantity as needed for color)
- 1 tsp vanilla extract
- 3 eggs
- 15 Oreo cookies, crushed into small pieces
Chocolate Ganache
- 6 oz (1 cup) semisweet chocolate chips
- ½ cup (118 ml) whipping cream
- Pinch of salt
Decoration
- Mini chocolate chip cookies (whole and crushed)
Instructions
- Prepare the Blondie Base: Preheat your oven to 350°F (180°C). Grease an 8-inch (20 cm) springform pan, line the bottom with parchment paper, and dust the sides with flour to prevent sticking.
- Melt Butter Mixture: In a heatproof bowl, melt the butter, salt, and brown sugar in the microwave in 30-second intervals, stirring in between until smooth. Allow to cool slightly.
- Combine Wet Ingredients: Once the butter mixture is cooled, whisk in the egg and vanilla extract until fully incorporated.
- Add Flour and Chips: Fold in half of the flour gently, then add the remaining flour along with the semisweet mini chocolate chips, folding carefully to combine without overmixing.
- Bake Blondie Layer: Spread the batter evenly into the prepared pan and bake for 15 minutes. Remove from oven and let cool for 10-15 minutes. Reduce oven temperature to 300°F (150°C) for the cheesecake layer.
- Prepare Cheesecake Filling: While the blondie cools, beat the cream cheese, cornflour, and sugar until smooth and creamy using a mixer.
- Add Color and Flavor: Mix in salt, whipping cream, blue gel food coloring (adding more as needed for the signature Cookie Monster blue), and vanilla extract on medium speed until fully combined.
- Add Eggs and Oreos: Add eggs one at a time, mixing gently on low speed or by hand to avoid overmixing. Fold in the crushed Oreo cookies carefully.
- Assemble Layers: Pour the cheesecake batter over the slightly cooled blondie layer evenly.
- Prepare Water Bath: Double wrap the springform pan in foil to prevent water seepage. Place it in a larger baking tray and fill the tray with hot water halfway up the sides of the springform pan for a gentle bake.
- Bake Cheesecake: Bake for 60-70 minutes until the cheesecake is set but still slightly jiggly in the center. Turn off the oven and let the cheesecake cool inside with the door ajar for 15-30 minutes.
- Cool and Chill: Remove the cheesecake from the oven and water bath, then cool at room temperature up to 4 hours before refrigerating for at least 8 hours or overnight to fully set.
- Make Chocolate Ganache: Heat chocolate chips, whipping cream, and a pinch of salt in a heatproof bowl in 30-second intervals in the microwave, stirring until smooth. Cool ganache until thick enough to spread, refrigerating if needed.
- Decorate Cheesecake: Spread the ganache over the top and sides of the chilled cheesecake. It does not need to be perfectly smooth.
- Add Final Touches: Decorate with whole and crushed mini chocolate chip cookies for an appealing finish.
- Serve: Slice and enjoy this fun and indulgent treat with family and friends!
Notes
- Ensure the butter mixture is cooled before adding the egg to prevent cooking it prematurely.
- Do not overmix the cheesecake batter after adding eggs to avoid cracking during baking.
- The water bath ensures gentle baking and prevents the cheesecake from cracking.
- Adjust the blue gel food coloring quantity to achieve your preferred shade of blue.
- Refrigeration overnight improves texture and flavor development.
- The ganache can be made a day ahead and refrigerated, then gently warmed before spreading.
- Use full-fat cream cheese and whipping cream for best creaminess and texture.


