
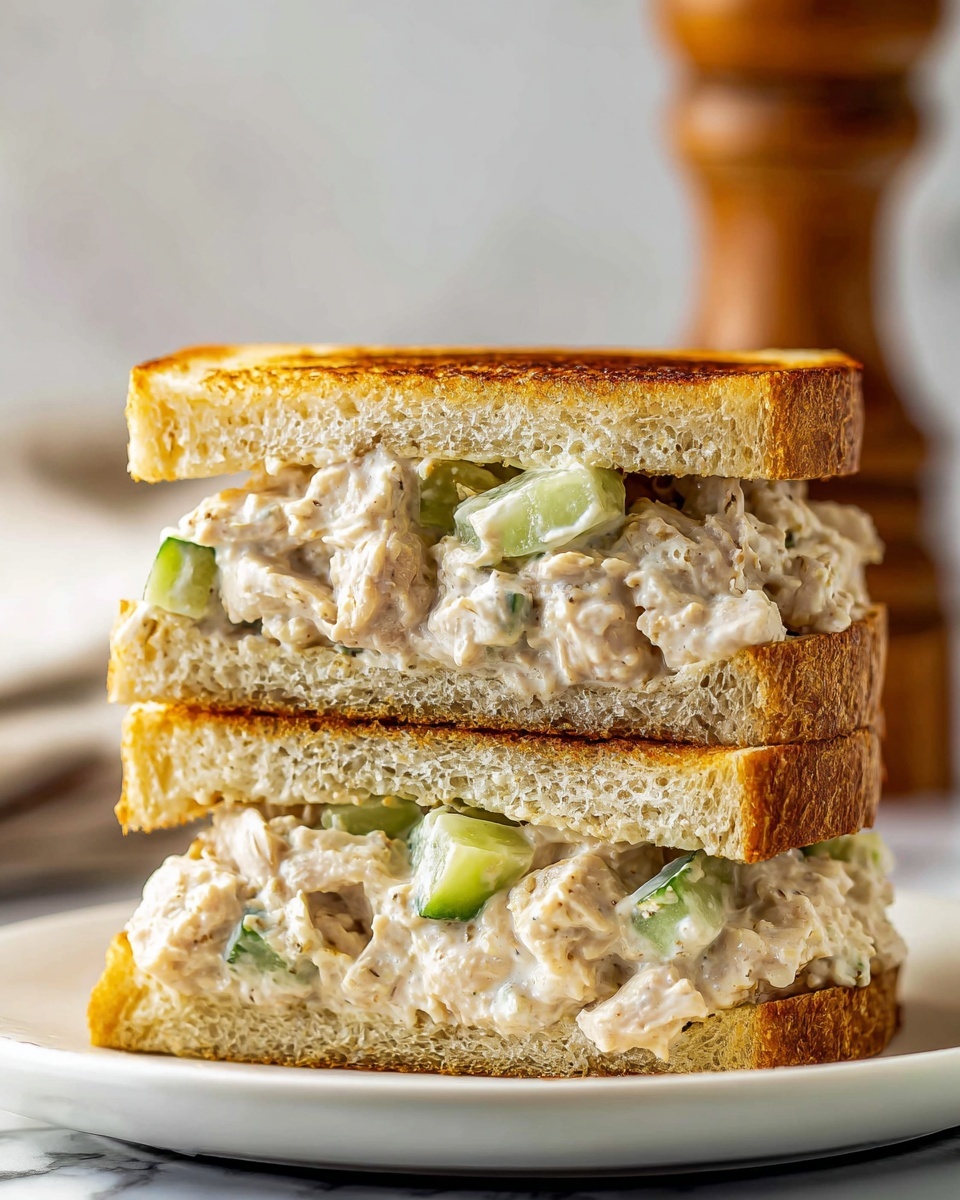
If you’re craving a meal that feels like a warm hug on a busy day, you can’t go wrong with this Classic Tuna Salad Sandwich Recipe. It combines simple, wholesome ingredients into a creamy, flavorful filling that’s perfect for sandwiches, wraps, or even a salad topper. With every bite, you’ll get the delightful mix of tender tuna, crunchy celery, and a tangy hint of pickle relish that makes this dish a beloved staple in lunchboxes everywhere. It’s quick, comforting, and something I’ve loved making again and again when I need a satisfying meal in a flash.

Ingredients You’ll Need
The beauty of this Classic Tuna Salad Sandwich Recipe lies in its straightforward ingredients. Each component brings its own charm to the table, from the tender tuna to the zesty dressing that pulls everything together into a luscious blend of flavors and textures.
- 1 (12 ounce) can tuna, drained: Use good-quality tuna for the best flavor and be sure to drain it well to avoid a watery salad.
- 2 hardboiled eggs, chopped: Adds creaminess and extra protein, plus a lovely richness.
- ¼ cup celery, chopped: Brings a fresh crunch that contrasts beautifully with the creamy mix.
- ½ cup mayonnaise: The creamy base that binds all the ingredients while adding richness.
- 2 tablespoons pickle relish: Gives a pop of tangy sweetness and texture that makes the salad exciting.
- 1 teaspoon lemon juice: Adds brightness and a subtle zing to balance the richness.
- Salt and pepper, to taste: Essential for enhancing all the flavors and bringing balance.
How to Make Classic Tuna Salad Sandwich Recipe
Step 1: Drain the Tuna
Start by opening your can of tuna and draining it carefully. This step prevents the salad from turning soggy or watery, which can happen if the tuna retains excess liquid. Patting the tuna lightly with a paper towel helps soak up any lingering moisture.
Step 2: Mix the Ingredients
In a bowl large enough to mix comfortably, combine the drained tuna with chopped hardboiled eggs and celery. Add mayonnaise, pickle relish, and lemon juice next. Season your mixture with salt and pepper. Use a fork or spoon to blend everything until the salad reaches a creamy and well-incorporated texture. Each ingredient should complement each other without overpowering.
Step 3: Chill the Mixture
Cover your bowl tightly with plastic wrap or a secure lid and refrigerate it for about 30 minutes. This resting time allows the flavors to marry beautifully and gives the salad a chance to firm up for easier sandwich assembly. It’s a small step that makes a big difference in taste.
Step 4: Serve the Tuna Salad
Once chilled, give the salad a gentle stir. Then, scoop a generous amount onto your favorite bread, whether that’s a fluffy white loaf, hearty whole grain, or a crisp baguette. This is where your creativity can shine—feel free to try it in a wrap, on fresh lettuce leaves, or paired with your preferred crackers.
How to Serve Classic Tuna Salad Sandwich Recipe
Garnishes
Adding garnishes can elevate your Classic Tuna Salad Sandwich Recipe to something special. Consider topping with sliced tomatoes, fresh dill, or thinly sliced cucumbers to add freshness and a pop of color. A sprinkle of paprika or a few cracked black peppercorns on top can add a gentle kick and make the presentation irresistible.
Side Dishes
Pair your sandwich with crunchy pickles, a crisp garden salad, or even homemade potato chips for a satisfying meal. A cup of tomato soup or a light coleslaw also complements the creamy tuna salad wonderfully, offering contrasting textures and flavors that keep the meal balanced and enjoyable.
Creative Ways to Present
If you want to shake things up, serve the salad in avocado halves for a low-carb option or stuffed inside pita pockets for a delightful handheld treat. You can also use it as a topping on toasted crackers or cucumber slices as an elegant appetizer, perfect for casual get-togethers or lunch on the go.
Make Ahead and Storage
Storing Leftovers
Any leftover tuna salad should be stored in an airtight container and kept in the refrigerator. It’s best enjoyed within 2 to 3 days to maintain freshness and flavor. Make sure it hasn’t been sitting out too long before refrigerating to keep it safe and tasty.
Freezing
Freezing this Classic Tuna Salad Sandwich Recipe is generally not recommended because the mayonnaise and chopped eggs can change texture and separate when thawed. For best results, enjoy the salad fresh or store it in the fridge rather than freezing.
Reheating
This tuna salad is typically served cold, so reheating is not necessary or recommended. Instead, give it a good stir after taking it from the fridge and enjoy it straight away on your favorite bread or sides.
FAQs
Can I use different types of tuna for this salad?
Absolutely! While canned light tuna is common, you can use chunk white tuna or even fresh cooked tuna if you prefer. Each variety brings a slightly different flavor and texture, so feel free to try what you like best.
Is mayonnaise the only dressing option?
You can substitute mayonnaise with Greek yogurt or a mix of both for a lighter twist. Some people also like adding a bit of mustard or sour cream to add new layers of flavor.
Can I add other vegetables to the salad?
Definitely! Ingredients like chopped red onion, bell peppers, or even shredded carrots work great and add more crunch and color without overwhelming the classic flavor.
How long will this tuna salad keep in the fridge?
Stored properly in an airtight container, it should stay fresh and delicious for about 2 to 3 days. Beyond that, the quality starts to decline, so it’s best to consume it sooner.
What breads work best for a Classic Tuna Salad Sandwich Recipe?
Almost any bread is a good canvas, but I love whole grain, sourdough, or rye for their hearty texture and ability to hold up well against the creamy filling. Toasting the bread also adds a delightful crunch.
Final Thoughts
There’s something truly comforting about a well-made Classic Tuna Salad Sandwich Recipe, and I hope you enjoy making it as much as I do. Its simple ingredients and easy preparation make it a perfect go-to meal for any day. So grab that can of tuna, whip up this tasty salad, and treat yourself to a sandwich that feels like a little homemade love. Trust me, it’s a classic that never goes out of style!
Print
Classic Tuna Salad Sandwich Recipe
- Prep Time: 10 minutes
- Cook Time: 0 minutes
- Total Time: 35 minutes
- Yield: 2 servings
- Category: Lunch
- Method: No-Cook
- Cuisine: American
Description
A classic and creamy tuna salad sandwich recipe that combines canned tuna, hardboiled eggs, celery, and a tangy dressing of mayonnaise, pickle relish, and lemon juice. Perfect for a quick, satisfying lunch or light dinner, this tuna salad is versatile enough to enjoy on bread, wraps, or as a topping on fresh greens or crackers.
Ingredients
Salad Base
- 1 (12 ounce) can tuna, drained
- 2 hardboiled eggs, chopped
- ¼ cup celery, chopped
Dressing & Flavor
- ½ cup mayonnaise
- 2 tablespoons pickle relish
- 1 teaspoon lemon juice
- Salt and pepper, to taste
Instructions
- Drain the Tuna: Open the can of tuna and carefully drain all the water to ensure the salad isn’t watery.
- Mix the Ingredients: In a large bowl, place the drained tuna. Add the chopped hardboiled eggs, celery, mayonnaise, pickle relish, and lemon juice. Season with salt and pepper. Mix thoroughly until all ingredients are combined and the mixture is creamy.
- Chill the Mixture: Cover the bowl with plastic wrap or a lid and chill in the refrigerator for about 30 minutes to allow the flavors to meld and the salad to set.
- Serve the Tuna Salad: After chilling, stir the salad and serve on your favorite bread, as a wrap, atop lettuce leaves, with crackers, or over a fresh salad for a lighter option.
Notes
- Make sure to drain the tuna thoroughly to prevent a watery salad.
- Chilling the salad enhances the flavor and texture.
- Feel free to add celery leaves or fresh herbs like dill for extra flavor.
- Use whole grain or gluten-free bread for a healthier or dietary-specific sandwich.
- The salad can be made a day in advance and stored in the refrigerator for convenience.


