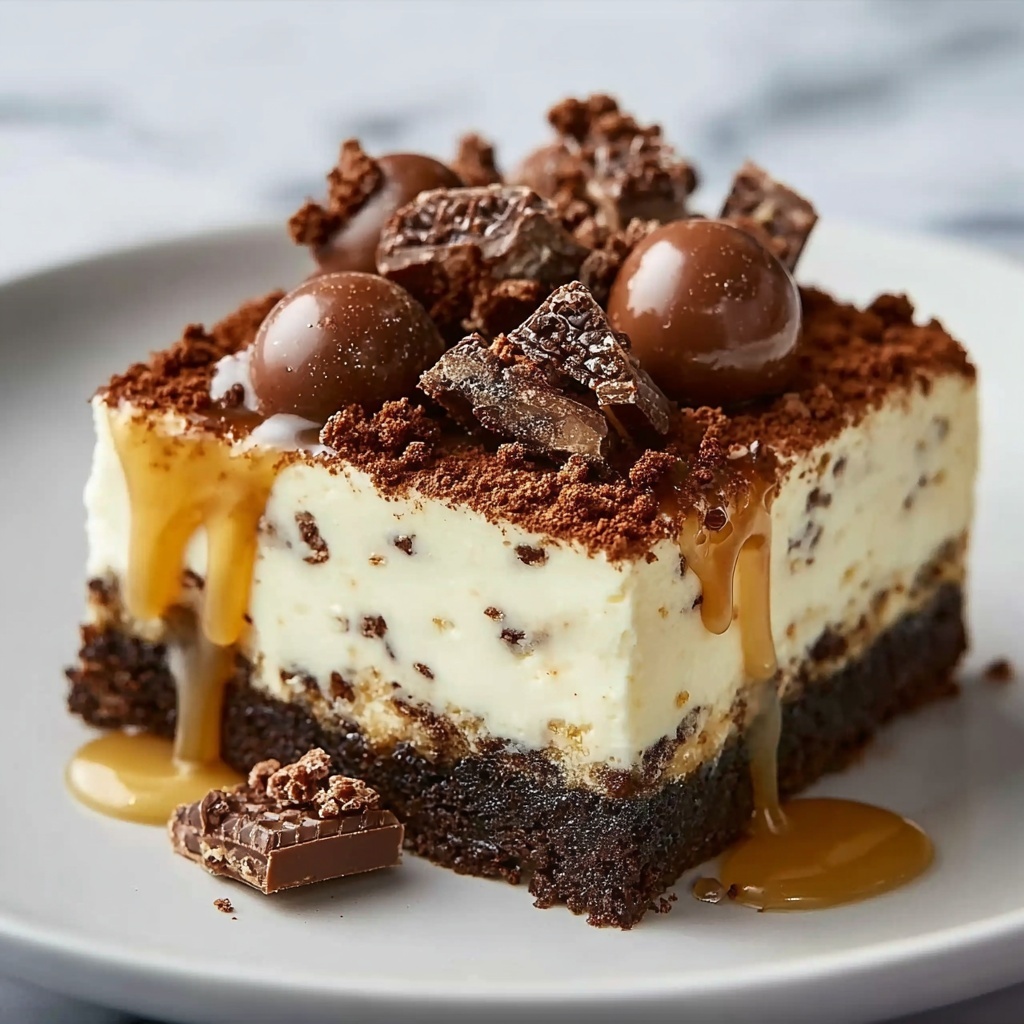
If you have a sweet tooth and a love for all things rich and peanut buttery, this Butterfinger Cheesecake Recipe is about to rock your dessert world. Imagine a creamy, dreamy cheesecake loaded with crunchy, chocolatey Butterfinger pieces that add the perfect balance of texture and flavor. This decadent treat brings together the nostalgic crunch of a beloved candy bar with the smooth, velvety richness of classic cheesecake – a match made in dessert heaven that’s sure to impress both family and friends alike. Once you dive in, this Butterfinger Cheesecake Recipe might just become your new favorite go-to for every celebration or cozy night in.

Ingredients You’ll Need
The magic behind this Butterfinger Cheesecake Recipe lies in its simple but carefully chosen ingredients. Each one plays a vital role, from texture and flavor to that luscious creamy consistency you dream of in a cheesecake.
- Chocolate sandwich cookies (crushed): Forms a sturdy, crunchy crust base full of chocolate goodness.
- Unsalted butter (melted): Binds the cookie crumbs for a moist and flavorful crust.
- Cream cheese (softened): The rich and creamy foundation of the cheesecake filling.
- Granulated sugar: Adds sweetness without overshadowing other flavors.
- Brown sugar: Offers a subtle caramel note that enhances depth.
- Eggs: Provide structure and help the cheesecake set properly.
- Vanilla extract: A warm, aromatic touch that rounds out the filling.
- Sour cream: Contributes tanginess and keeps the filling silky smooth.
- Heavy cream: Adds richness and makes the texture luxuriously creamy.
- Chopped Butterfinger candy bars: The star ingredient that brings crunchy, peanut buttery bursts in every bite.
- Chocolate syrup: For drizzling that adds extra chocolate decadence.
- Whipped cream: Perfect for a light, airy finishing touch on top.
How to Make Butterfinger Cheesecake Recipe
Step 1: Prepare the Crust
Start by preheating your oven to 325°F. Mix together the crushed chocolate sandwich cookies with the melted unsalted butter until everything is evenly moistened. Press this mixture firmly into the bottom of a greased springform pan to create your crust base. Bake it briefly until the crust is set, then let it cool completely before adding the filling. This step ensures a crisp, delicious base that will hold up beautifully against the creamy filling.
Step 2: Make the Cheesecake Filling
In a large bowl, cream the softened cream cheese until it’s silky smooth. Gradually add your granulated sugar and brown sugar, mixing until fully incorporated—this gives your filling a lovely sweetness with a hint of caramel. Beat in the eggs one at a time, being gentle and mixing only until combined to prevent cracks during baking. Stir in vanilla extract, sour cream, and heavy cream, continuing to mix until the texture is smooth and luscious.
Step 3: Add Butterfinger Pieces
Gently fold most of the chopped Butterfinger candy bars into the cheesecake batter. These irresistible chunks will give every bite a delightful crunch and signature peanut buttery flavor. Be careful to fold them in softly so the candy pieces stay intact and evenly distributed.
Step 4: Bake the Cheesecake
Pour the rich filling over the cooled crust, smoothing the top with a spatula. Bake the cheesecake at 325°F until the center is just set but still has a slight jiggle—this usually takes about an hour. Then, turn off the oven, crack the door open, and let the cheesecake cool gradually inside to prevent cracks. Once cooled, refrigerate for several hours or overnight so it can fully chill and develop its iconic creamy texture.
Step 5: Garnish and Serve
Before serving, drizzle luscious chocolate syrup over the cheesecake. Top with dollops of whipped cream and sprinkle the reserved Butterfinger pieces on top for that extra pop of texture and decoration. This finishing touch makes the presentation as spectacular as the flavor.
How to Serve Butterfinger Cheesecake Recipe

Garnishes
The classic combination of whipped cream, chocolate syrup, and chopped Butterfinger pieces is a crowd-pleaser. You can also add a sprinkle of crushed peanuts or a dusting of cocoa powder for a little extra flair and texture contrast. Garnishes not only elevate the look but offer additional layers of flavor and crunch.
Side Dishes
Pair this decadent dessert with fresh berries or a simple berry compote to balance the richness with a touch of tartness. A cup of strong coffee or rich espresso makes a perfect companion, helping to cleanse the palate and highlight the complex flavors of the cheesecake.
Creative Ways to Present
For special occasions, consider serving individual mini Butterfinger cheesecakes in small mason jars or clear cups. Layer some crushed cookie crumbs at the bottom, add the filling, and top with the garnishes. This not only looks elegant but makes serving and enjoying easier and more personal for guests.
Make Ahead and Storage
Storing Leftovers
Wrap any leftover cheesecake tightly with plastic wrap or store it in an airtight container. Keep it refrigerated for up to 4 days to maintain freshness. The flavors actually meld beautifully after a day, so leftovers often taste even better!
Freezing
You can freeze Butterfinger Cheesecake slices by wrapping them individually in plastic wrap followed by aluminum foil. Freeze for up to 2 months. When ready to enjoy, thaw overnight in the refrigerator to keep the texture creamy and smooth.
Reheating
This cheesecake is best served chilled, so reheating is not recommended. However, if you prefer a softer texture, let the slices sit at room temperature for about 20 minutes before serving to gently warm without compromising flavor or structure.
FAQs
Can I use a different candy bar instead of Butterfinger?
Absolutely! While Butterfinger adds a unique peanut buttery crunch, other candy bars like Heath or Snickers can work well too, offering their own distinct flavors and textures. Just chop them into small pieces and fold them into the batter as instructed.
Do I need a springform pan to make this cheesecake?
A springform pan is highly recommended because it allows you to release the cheesecake easily without damaging its shape. If you don’t have one, you can use a regular cake pan but make sure to line it well with parchment paper for easier removal.
Why is it important not to overmix after adding eggs?
Overmixing incorporates too much air, which can cause the cheesecake to crack while baking. Mixing just until combined keeps the batter smooth and dense, resulting in a perfectly creamy texture.
Can I make this recipe gluten-free?
Yes! Simply substitute gluten-free chocolate sandwich cookies for the crust. The rest of the ingredients are naturally gluten-free, making this a fantastic dessert option for gluten-sensitive friends and family.
How long should I chill the cheesecake before serving?
For best results, refrigerate the cheesecake for at least 4 hours, but preferably overnight. This gives the flavors time to meld and ensures the cheesecake sets perfectly for clean, beautiful slices.
Final Thoughts
This Butterfinger Cheesecake Recipe is a celebration of everything indulgent and delightful in dessert form. It’s a recipe that brings joy with every bite, blending creamy cheesecake with the nostalgic crunch of Butterfinger candy bars. If you want to impress your loved ones or simply treat yourself, do not hesitate to give this recipe a whirl. Trust me, you’ll be smitten with the wonderful flavors and textures it offers, and it just might become your new signature dessert!
Print
Butterfinger Cheesecake Recipe
- Prep Time: 25 minutes
- Cook Time: 1 hour
- Total Time: 5 hours 25 minutes
- Yield: 12 servings
- Category: Dessert
- Method: Baking
- Cuisine: American
- Diet: Vegetarian
Description
A rich and indulgent Butterfinger Cheesecake featuring a chocolate cookie crust, creamy cream cheese filling studded with crunchy Butterfinger candy pieces, and topped with chocolate syrup and whipped cream. This classic American dessert combines the perfect blend of chocolate, peanut butter, and creamy textures for a crowd-pleasing treat.
Ingredients
Crust
- 24 chocolate sandwich cookies, crushed
- 6 tbsp unsalted butter, melted
Filling
- 24 oz cream cheese, softened
- 1 cup granulated sugar
- ½ cup brown sugar
- 4 large eggs
- 2 tsp vanilla extract
- ½ cup sour cream
- ½ cup heavy cream
- 1 ½ cups Butterfinger candy bars, chopped (divided)
Topping
- Chocolate syrup, for drizzling
- Whipped cream, for garnish
- Remaining chopped Butterfinger pieces, for sprinkling
Instructions
- Prepare the crust: Preheat your oven to 325°F (163°C). In a bowl, mix the crushed chocolate cookies with the melted butter until the mixture holds together. Press this firmly into the bottom of a greased 9-inch springform pan. Bake the crust for about 8-10 minutes until set, then remove from the oven and allow it to cool completely.
- Make the filling: In a large bowl, beat the softened cream cheese until smooth and creamy using a hand or stand mixer. Add the granulated sugar and brown sugar, mixing until fully incorporated. Beat in the eggs one at a time, mixing just until combined after each addition to avoid overmixing. Stir in vanilla extract, sour cream, and heavy cream until the batter is smooth.
- Fold in Butterfinger pieces: Gently fold in most of the chopped Butterfinger candy bars, keeping some pieces aside for topping later.
- Assemble and bake: Pour the cheesecake filling over the cooled crust, smoothing the top with a spatula. Bake in the preheated oven for approximately 55-65 minutes, or until the center is just set and has a slight jiggle when the pan is gently shaken.
- Cool the cheesecake: Turn the oven off and crack open the oven door. Let the cheesecake cool gradually inside the oven for about an hour to prevent cracking.
- Chill: Remove the cheesecake from the oven and refrigerate it for at least 4 hours, preferably overnight, until fully chilled and firm.
- Serve: Before serving, drizzle the top with chocolate syrup, add whipped cream dollops, and sprinkle the remaining Butterfinger pieces for added crunch and decoration.
Notes
- Avoid overmixing the batter after adding the eggs to prevent cracks in the cheesecake surface.
- For clean slices, use a sharp knife dipped in warm water and wiped clean between each cut.
- Make sure the crust is fully cooled before adding the filling to avoid sogginess.
- Using full-fat cream cheese and heavy cream ensures a creamy texture.
- Chilling the cheesecake overnight improves flavor and texture.


