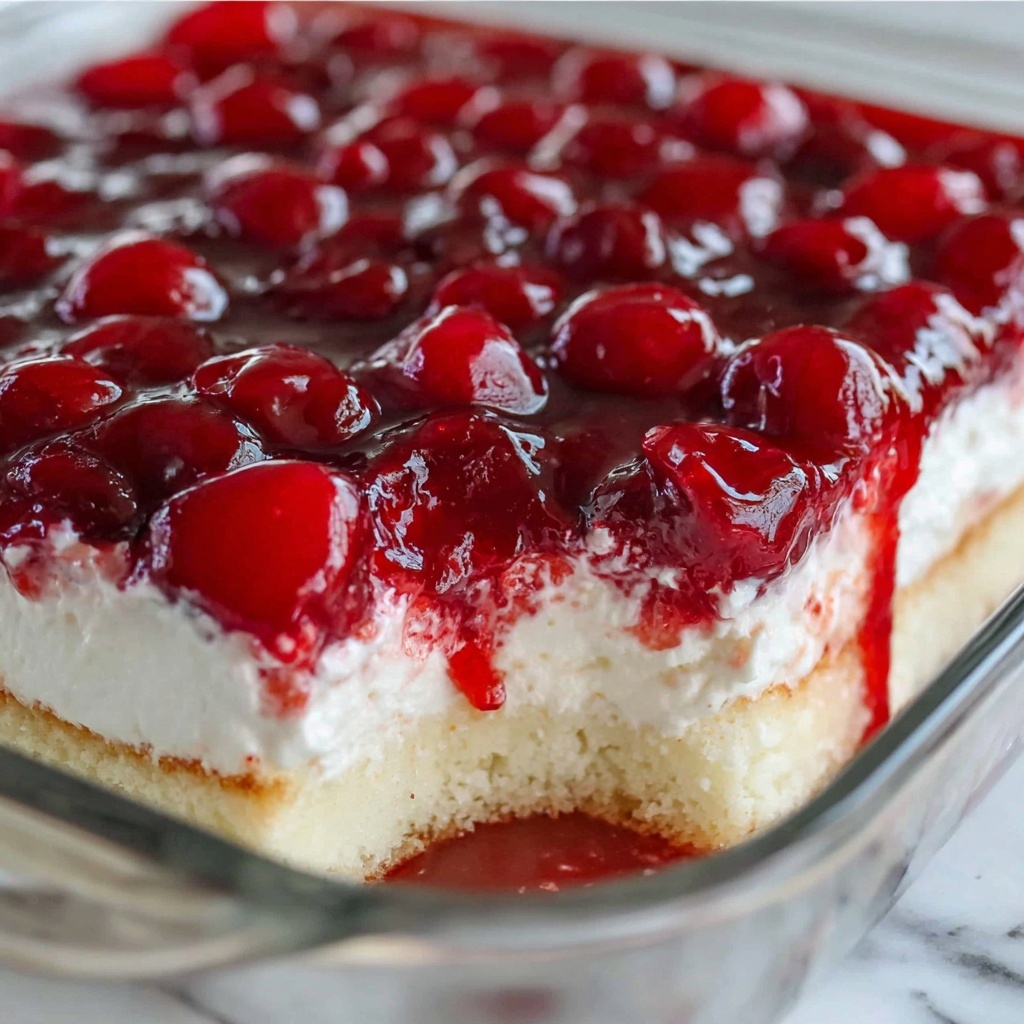
If you’re craving a dessert that feels like a cozy winter hug and bursts with bright, fruity happiness, the Cherries in the Snow Dessert Recipe is your new best friend. This delightful, no-bake treat perfectly combines fluffy angel food cake, creamy whipped layers, and luscious cherry pie filling to create a heavenly mix of textures and flavors that everyone will adore. Simple to make yet impressive on the table, it’s a crowd-pleaser that shines bright at any gathering or as a sweet indulgence to brighten your day.
Ingredients You’ll Need
This dessert’s magic comes from a few essential ingredients that play perfectly together—each bringing its own texture, richness, or pop of flavor. From the airy angel food cake to the tangy-sweet cherry topping, every bite is a treat.
- Cream cheese, 8 ounces: Softened to room temperature for smooth blending and a tangy creamy base.
- Powdered sugar, 1/2 cup: Adds just the right amount of sweetness without any grit.
- 2% milk, 1/2 cup (divided): Helps create that perfectly smooth, mousse-like texture.
- Cool Whip whipped topping, 12 ounces: Light and fluffy, it elevates the cream cheese mixture into a luscious cloud.
- Angel food cake, 9-inch pre-baked: The star sponge—airy and delicate, perfect for soaking up flavors.
- Cherry pie filling, 2 cans (21 ounces each): Bursting with sweet-tart cherries that crown this dessert with color and juice.
How to Make Cherries in the Snow Dessert Recipe
Step 1: Cream the Base
Start by whipping together the softened cream cheese and powdered sugar in a large bowl until velvety and smooth. Gradually add half the milk, mixing well, then pour in the rest of the milk and blend again until everything is fully incorporated. This step sets the stage for a creamy, dreamy base that’s slightly tangy with just the right sweetness to balance the cherries.
Step 2: Fold in the Fluff
Next, gently fold in the thawed Cool Whip with a spatula. Take your time here and avoid overmixing—the goal is to keep the mixture light and airy, ensuring each bite melts beautifully in your mouth without becoming dense.
Step 3: Add the Cake Pieces
Break the angel food cake into small, bite-sized chunks and carefully fold these into your fluffy mixture. This adds a soft, springy texture that soaks up the creamy mixture while keeping the dessert delightfully light.
Step 4: Layer the Cake Mixture
Spread the creamy cake mixture evenly in a 9×13-inch glass baking dish. This will be the base layer for your cherry topping, so smooth it out for an even surface that looks as good as it tastes.
Step 5: Top with Cherry Filling
Pour the cherry pie filling evenly over the cake mixture, making sure every corner is covered with those juicy, sweet cherries that give this dessert its signature burst of flavor and festive color.
Step 6: Chill and Serve
Cover your creation and refrigerate it for at least two hours. This chilling time lets all the layers meld together into a refreshing, cool delight. When you’re ready to serve, slice into generous squares and watch everyone’s faces light up!
How to Serve Cherries in the Snow Dessert Recipe
Garnishes
Add a little extra sparkle with a dollop of freshly whipped cream or a sprinkle of toasted sliced almonds on top. These garnishes not only enhance the dessert’s look but also introduce subtle textures and flavors that complement the cherries beautifully.
Side Dishes
This dessert pairs wonderfully with a cup of freshly brewed coffee or a glass of chilled sparkling wine. For an afternoon treat, serve alongside a light green salad with citrus vinaigrette—it’s a lovely balance to the creamy sweetness of the dessert.
Creative Ways to Present
For a fun twist, serve individual portions in clear parfait glasses to show off the vibrant layers. You can even drizzle a bit of melted white chocolate on top or sprinkle miniature chocolate chips for an extra touch of indulgence and eye-catching detail.
Make Ahead and Storage
Storing Leftovers
Leftovers should be kept in an airtight container in the refrigerator. This dessert holds up well for 3 to 4 days, maintaining its creamy texture and fresh cherry flavor, making it a perfect treat to enjoy over a few days.
Freezing
While this dessert’s texture is best fresh or chilled, you can freeze it if needed. Wrap it tightly with plastic wrap and foil to prevent ice crystals. Thaw overnight in the refrigerator before serving but expect a slight change in texture—more suited for a frozen treat experience.
Reheating
Since this is a no-bake, chilled dessert, reheating is not recommended. It’s best enjoyed cold to fully appreciate the contrast between fluffy cake, creamy layers, and juicy cherries that define the Cherries in the Snow Dessert Recipe.
FAQs
Can I use fresh cherries instead of canned pie filling?
Absolutely, but keep in mind fresh cherries won’t have the same syrupy consistency as canned pie filling. You might want to lightly cook them with sugar and a bit of lemon juice to mimic that luscious pie filling texture.
Is this dessert gluten-free?
Traditional angel food cake contains gluten, so this recipe is not gluten-free unless you substitute with a gluten-free angel food cake available at specialty stores.
Can I make this dessert vegan?
To make a vegan version, use dairy-free cream cheese, coconut-based whipped topping, and a vegan angel food cake. Check the cherry pie filling ingredients or make your own to ensure no animal products are included.
How far in advance can I prepare this dessert?
You can assemble the entire dessert up to 24 hours before serving. Just keep it covered and refrigerated to let the flavors meld beautifully.
What if I don’t have a hand mixer?
No worries! Use a sturdy whisk and a bit of elbow grease to mix the cream cheese and sugar until smooth, then gently fold in the whipped topping and cake pieces by hand.
Final Thoughts
If you’re searching for a dessert that feels like a celebration of lightness and fruity joy, give the Cherries in the Snow Dessert Recipe a try. It’s the kind of recipe that doesn’t just impress guests but warms hearts with every bite. Once you make it, you’ll find yourself reaching for it again and again whenever you want a dessert that’s effortless, elegant, and absolutely delicious.
Print
Cherries in the Snow Dessert Recipe
- Prep Time: 20 minutes
- Cook Time: 0 minutes
- Total Time: 2 hours 20 minutes
- Yield: 15 servings
- Category: Dessert
- Method: No-Cook
- Cuisine: American
Description
Cherries in the Snow is a light, creamy no-bake dessert featuring fluffy angel food cake pieces mixed with a sweet cream cheese and Cool Whip filling, topped with luscious cherry pie filling. Perfectly chilled, this easy-to-make treat combines airy textures with rich cherry flavor in every bite.
Ingredients
Cream Cheese Mixture
- 8 ounces cream cheese, room temperature
- 1/2 cup powdered sugar
- 1/2 cup 2% milk, divided
- 12 ounces Cool Whip whipped topping, thawed
Base and Topping
- 1 (9-inch) pre-baked angel food cake
- 2 cans (21 ounces each) cherry pie filling
Instructions
- Prepare cream cheese mixture: In a large bowl, use a hand mixer to whip the cream cheese and powdered sugar together until smooth and creamy. Mix in 1/4 cup of milk, then add the remaining 1/4 cup milk and blend again until the mixture is smooth and well-combined.
- Fold in Cool Whip: Gently fold the thawed Cool Whip into the cream cheese mixture using a spatula. Be careful not to overmix to retain the light and fluffy texture.
- Incorporate angel food cake: Break the pre-baked angel food cake into small bite-sized pieces. Add these pieces into the cream cheese and Cool Whip mixture, folding gently until all cake pieces are coated evenly.
- Assemble base layer: Spoon the cake mixture into a 9×13-inch glass baking pan. Spread it out evenly in the pan to form a uniform layer.
- Add cherry topping: Evenly spread the cherry pie filling over the cake mixture, ensuring the whole surface is covered with the luscious cherry topping.
- Chill: Cover the dessert and refrigerate until chilled, at least 2 hours or until ready to serve. Slice and enjoy directly from the pan.
Notes
- Use room temperature cream cheese for easier mixing and a smoother texture.
- Be gentle when folding the Cool Whip to keep the mixture light and airy.
- The dessert must be refrigerated for a minimum of 2 hours to allow flavors to meld and the texture to set.
- This recipe can be made a day ahead and stored covered in the refrigerator.
- For variation, substitute cherry pie filling with blueberry or strawberry pie filling.
