
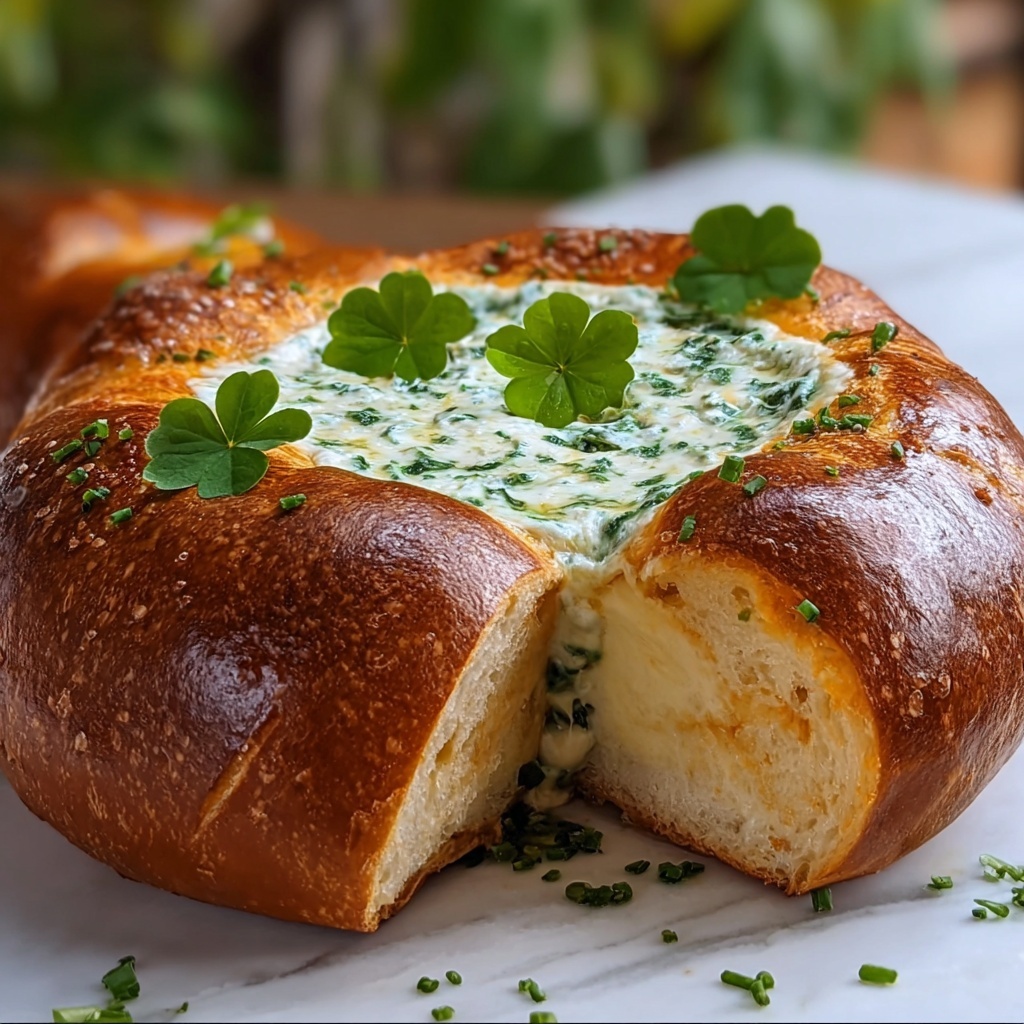
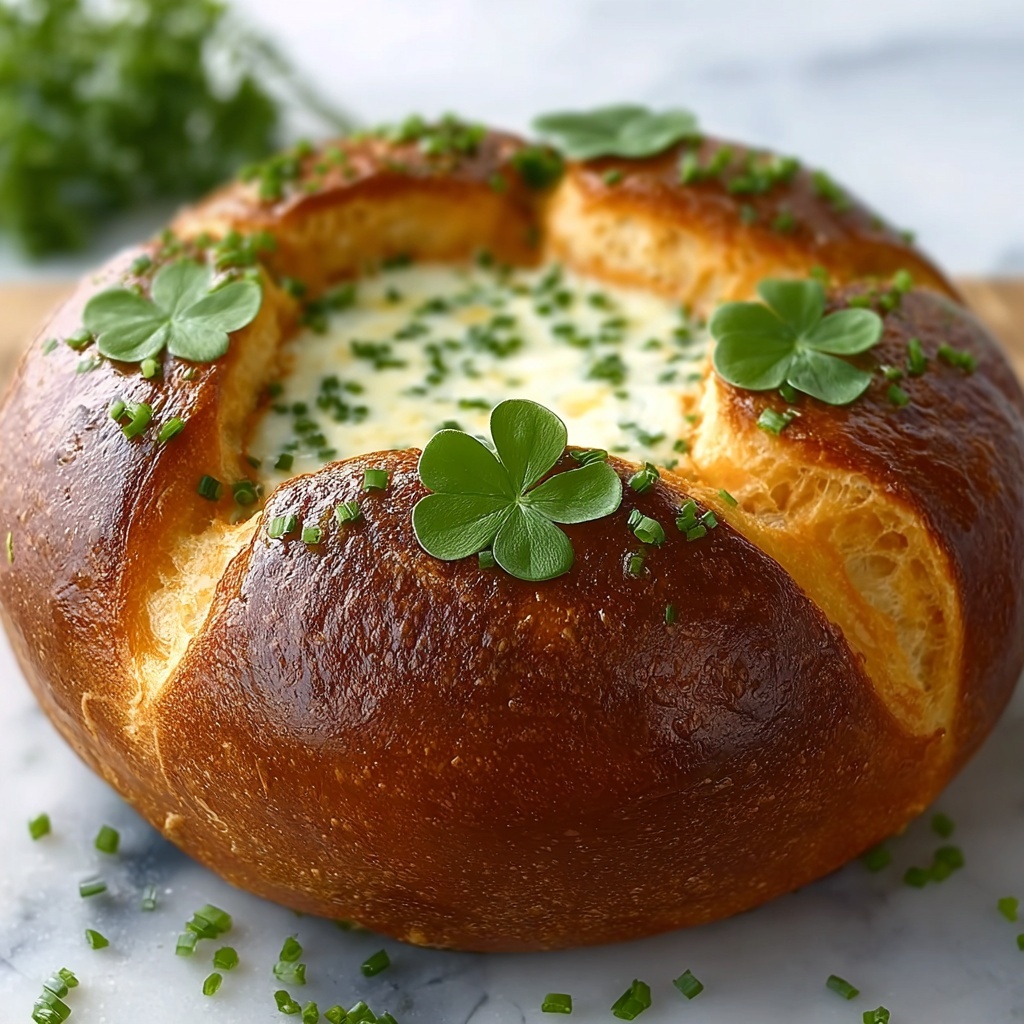
If you’ve ever wanted to bring a touch of whimsy and warmth to your table, this Clover-Shaped Bread Bowl Recipe is exactly what you need. It’s not just any bread; it’s a charming, festive bread bowl made from soft, golden dough shaped into a lucky clover—perfect for serving soups, dips, or even as a centerpiece. The combination of simple, fresh ingredients creates a texture that’s delightfully chewy on the inside with a buttery, golden crust on the outside. Making this from scratch is easier than you think and makes every meal feel special and heartfelt.
Ingredients You’ll Need
Gathering these few essential ingredients is all it takes to craft a beautifully shaped, flavorful bread bowl. Each component plays a vital role in achieving that tender crumb and rich crust that make this recipe stand out.
- 2 cups warm water (110°F): The perfect temperature activates the yeast without killing it, ensuring a good rise.
- 2 1/4 teaspoons active dry yeast (1 packet): This is your secret weapon for fluffy, airy dough.
- 1 tablespoon sugar: Feeds the yeast and helps develop a light caramelization on the crust.
- 3 tablespoons olive oil: Adds moisture and a subtle richness to the dough.
- 1 teaspoon salt: Balances flavor and strengthens the dough structure.
- 4 cups all-purpose flour (plus extra for dusting): Provides the sturdy base needed for shaping the bowl without collapsing.
- 1 tablespoon melted butter (for brushing): Brushed on top before baking, it creates that inviting golden finish.
How to Make Clover-Shaped Bread Bowl Recipe
Step 1: Activate the Yeast
Start by combining the warm water, sugar, and yeast in a large mixing bowl. Let it sit for about 5 to 10 minutes until it gets foamy. This foam means the yeast is alive and ready to work its magic on your dough, setting the foundation for a beautiful rise.
Step 2: Prepare the Dough
Next, stir in the olive oil and salt, then gradually add the flour. Stir with a wooden spoon or use a stand mixer fitted with a dough hook until the dough starts pulling away from the sides and forms a soft ball. If it’s too sticky, sprinkle in a little extra flour, but be careful not to add too much or the bread will be dense.
Step 3: Knead Until Smooth
For the best texture, knead your dough on a floured surface for about 8 to 10 minutes until it’s smooth and elastic. Kneading develops the gluten, which gives your bread that delightful chew and helps it keep its clover shape during baking.
Step 4: First Rise
Place your dough in a lightly oiled bowl, cover it with a clean kitchen towel or plastic wrap, and let it rise in a warm spot for about 1 hour or until doubled in size. This step is crucial because it prepares the dough to puff up beautifully when baked.
Step 5: Shape the Clover
Once risen, punch the dough down gently to release excess air. Divide it into four equal pieces, then shape each into a round ball. Arrange the balls close together on a greased baking sheet, gently pressing them to touch so they form a clover shape with slight gaps for a lovely pull-apart bread bowl effect.
Step 6: Second Rise
Cover your clover dough with a towel and let it rise again for about 30 minutes. This second rise ensures the bread will be light and soft when baked.
Step 7: Brush and Bake
Preheat your oven to 375°F (190°C). Brush the dough generously with melted butter to encourage a golden crust, then bake for 25 to 30 minutes until the bread is beautifully browned and sounds hollow when tapped on the bottom. Your Clover-Shaped Bread Bowl Recipe has come to life!
How to Serve Clover-Shaped Bread Bowl Recipe
Garnishes
Brushing with melted butter post-bake adds shine, but you can also sprinkle flaky sea salt, garlic powder, or fresh herbs like rosemary or thyme before baking for extra aroma and a bite of color that invites guests to dig in.
Side Dishes
This bread bowl is fabulous with creamy soups such as tomato bisque, clam chowder, or broccoli cheddar. Serving it alongside fresh salads or roasted vegetables rounds out a comforting, vibrant meal that’s both inviting and satisfying.
Creative Ways to Present
Try placing the clover bread bowl in the center of a rustic wooden board surrounded by small bowls of hummus, olive tapenade, or cheese spreads for a festive sharing platter. The pull-apart nature makes it interactive and perfect for gatherings.
Make Ahead and Storage
Storing Leftovers
Wrap any leftover bread tightly in aluminum foil or place in an airtight container at room temperature. It will stay fresh for up to two days, keeping that soft crumb and crispy crust intact.
Freezing
If you want to save the bread for longer, freeze it wrapped securely in plastic wrap and foil. It’s best frozen uncut and can be stored for up to three months without losing its delightful texture or flavor.
Reheating
Reheat your clover bread bowl in a 350°F oven for 10 minutes to revive the crust and warm the interior. Avoid microwaving as it can lead to a chewy or soggy texture, and you want all that charm and softness back to enjoy fully.
FAQs
Can I use whole wheat flour for this recipe?
Yes, you can substitute some or all of the all-purpose flour with whole wheat flour, but keep in mind it might make the bread a bit denser. For best results, try replacing half and see how you like the texture and flavor.
How do I shape the clover if I want a bigger bread bowl?
Simply increase the size of each dough ball and space them closely to maintain the clover appearance. You may also want to adjust the baking time slightly to make sure it cooks through evenly.
Can I add herbs or cheese into the dough?
Absolutely! Adding fresh herbs or shredded cheese to the dough during mixing can create an exciting savory twist. Just fold them in with the flour for even distribution before the first rise.
What’s the best way to serve this bread bowl with soup?
Once baked, hollow out each dough ball slightly before filling it with warm soup. The cozier the soup, the better the bread holds up without becoming soggy right away.
Is the Clover-Shaped Bread Bowl Recipe suitable for beginners?
Definitely! The steps are straightforward and forgiving, especially because you work with a soft dough that’s easy to shape. Plus, watching it rise and turn golden is incredibly rewarding.
Final Thoughts
Now that you’ve discovered this delightful Clover-Shaped Bread Bowl Recipe, I hope you’ll enjoy making it as much as eating it. It’s the kind of recipe that not only fills your home with the inviting aroma of fresh bread but also adds a playful, heartwarming touch to any meal. Go ahead, gather your ingredients and get shaping—it’s time to fill your kitchen with love and luck, one delicious clover at a time!
Print
Clover-Shaped Bread Bowl Recipe
- Prep Time: 20 minutes
- Cook Time: 25 minutes
- Total Time: 1 hour 45 minutes
- Yield: 6 bread bowls
- Category: Bread
- Method: Baking
- Cuisine: American
Description
This charming clover-shaped bread bowl recipe combines the homely appeal of fresh homemade bread with a unique, festive twist perfect for serving soups, dips, or salads. Soft on the inside with a golden crust, this bread bowl not only adds visual interest to your table but also deliciously encases your favorite fillings.
Ingredients
For the Bread Dough
- 2 cups warm water (110°F)
- 2 1/4 teaspoons active dry yeast (1 packet)
- 1 tablespoon sugar
- 3 tablespoons olive oil
- 1 teaspoon salt
- 4 cups all-purpose flour (plus extra for dusting)
For Finishing
- 1 tablespoon melted butter (for brushing)
Instructions
- Activate Yeast: In a large mixing bowl, combine the warm water, active dry yeast, and sugar. Stir gently and let it sit for about 5-10 minutes until the mixture becomes frothy, indicating the yeast is active.
- Mix Dough: Add the olive oil and salt to the yeast mixture. Gradually add the all-purpose flour, stirring with a wooden spoon or your hands until a sticky dough forms.
- Knead Dough: Transfer the dough onto a floured surface. Knead for 8-10 minutes until the dough is smooth and elastic. Add a bit more flour if the dough is too sticky.
- First Rise: Place the dough in a lightly oiled bowl, cover it with a clean cloth or plastic wrap, and let it rise in a warm place for about 1 hour or until it doubles in size.
- Shape the Clover: Punch down the dough to release air. Divide the dough into six equal parts. Shape each piece into a round ball. Arrange five balls in a circle on a baking sheet lined with parchment paper, then place the sixth ball in the center, creating a clover shape. Pinch seams lightly to connect them but keep the balls slightly distinct.
- Second Rise: Cover the shaped dough loosely and let it rise again for about 20-30 minutes until puffed up.
- Bake: Preheat the oven to 375°F (190°C). Brush the top of the dough gently with melted butter to achieve a rich golden crust. Bake for 25 minutes or until the bread is golden brown and sounds hollow when tapped.
- Cool and Use: Remove from the oven and let cool on a rack. To create the bread bowl effect, carefully cut out the centers of the dough balls (except the center ball if desired) to hollow them slightly and serve with your preferred soup, dip, or filling.
Notes
- Use warm water to activate the yeast properly without killing it.
- Make sure the dough is soft but not too sticky while kneading—add flour gradually.
- You can brush the bread with egg wash instead of butter for a shinier crust.
- This bread bowl is best served the same day for optimal freshness.
- To keep leftover bread fresh, store in an airtight container or wrap in foil.
- Experiment with different shaped buns or sizes to fit your serving needs.


