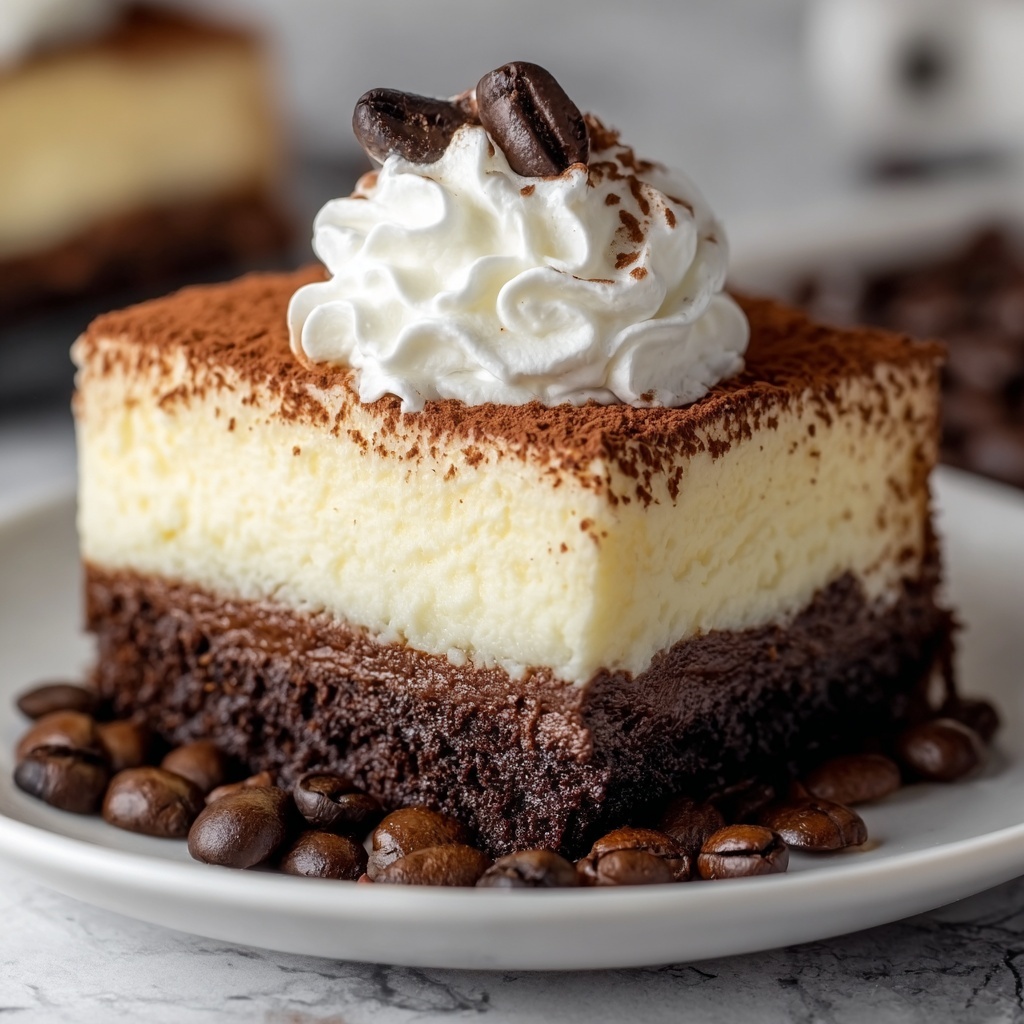
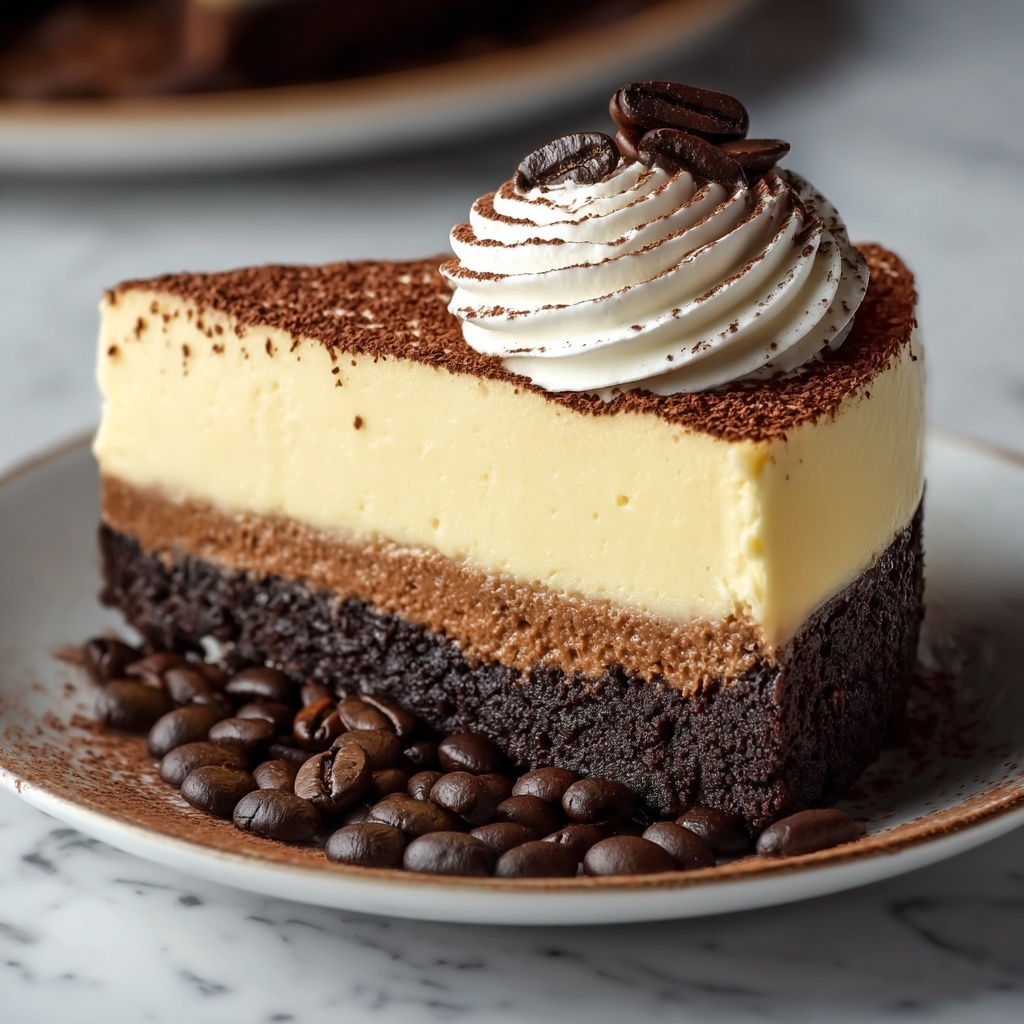
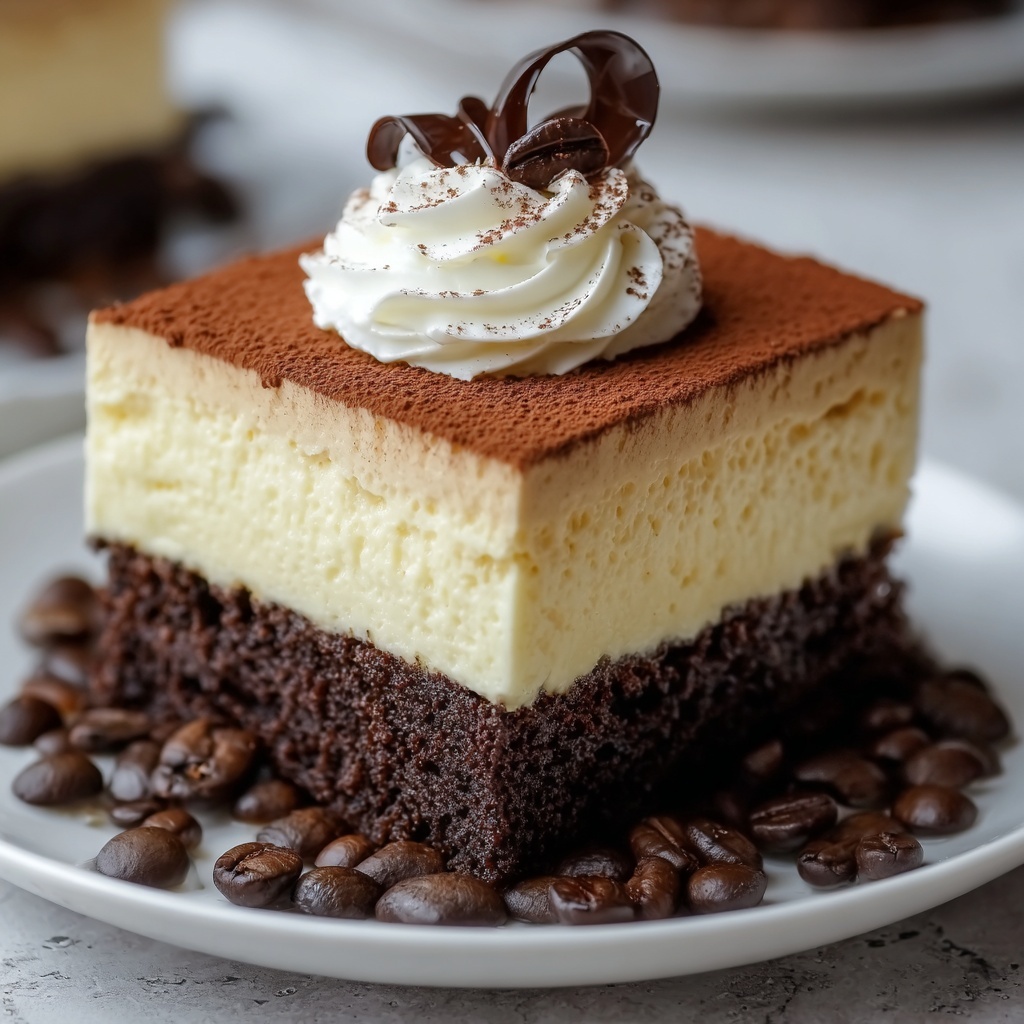
If you love the rich depths of chocolate combined with the invigorating hint of coffee, this Coffee Brownie Cheesecake Recipe is destined to become your new favorite indulgence. Imagine a fudgy brownie base layered with a smooth, creamy coffee-infused cheesecake that brings together the best of both worlds. This dessert is perfect for sharing at gatherings or simply treating yourself to a slice of pure bliss. Trust me, once you try this Coffee Brownie Cheesecake Recipe, your dessert game will never be the same.
Ingredients You’ll Need
Getting this Coffee Brownie Cheesecake Recipe right depends on a handful of simple yet carefully chosen ingredients. Each one plays a key role, from creating the fudgy brownie base to enhancing the velvety cheesecake layer with a lovely coffee kick.
- Unsalted butter, 1/2 cup (115g), melted: Provides rich moisture and helps create that dense brownie texture.
- Granulated sugar, 1 cup + 1/2 cup (200g + 100g): Sweetens both brownie and cheesecake layers evenly without overpowering.
- Large eggs, 4: Bind the batter and add structure while keeping it tender.
- Vanilla extract, 2 teaspoons: Enhances the flavor profile with subtle warmth.
- Unsweetened cocoa powder, 1/3 cup (40g): Delivers deep chocolate flavor to the brownie base.
- All-purpose flour, 1/2 cup + 2 tablespoons (60g + 16g): Essential for giving the brownie and cheesecake their perfect firmness.
- Salt, 1/4 teaspoon: Balances sweetness and amplifies the other flavors.
- Baking powder, 1/4 teaspoon: Helps the brownie layer rise just enough for a soft bite.
- Cream cheese, 16 oz (450g), softened: Creates the signature creamy, luscious cheesecake layer.
- Strong brewed coffee, 1/4 cup (60ml), cooled: Infuses the cheesecake with an irresistible coffee aroma and flavor.
How to Make Coffee Brownie Cheesecake Recipe
Step 1: Preheat and Prepare Your Pan
Start by setting your oven to 350°F (175°C). This temperature is perfect to ensure everything cooks evenly and the cheesecake sets beautifully. Grease a 9-inch springform pan to guarantee easy release once your dessert is ready to shine.
Step 2: Mix Brownie Ingredients
In a large bowl, whisk the melted butter with 1 cup of sugar until completely smooth. Add in the eggs, one at a time, along with the vanilla extract, creating a harmonious base. Next, sift in the cocoa powder, flour, salt, and baking powder to avoid lumps and mix gently until everything is just combined. Pour this luscious brownie batter into your prepared pan and spread it out evenly to form the first layer of this incredible dessert.
Step 3: Prepare the Coffee Cheesecake Layer
Grab another bowl and beat the softened cream cheese with the remaining 1/2 cup of sugar until creamy and smooth. Beat in the eggs one at a time, making sure each is fully incorporated for that silky texture we all love. Stir in the cooled brewed coffee and the second teaspoon of vanilla extract. Finally, sprinkle the 2 tablespoons of flour and mix gently until the cheesecake filling is velvety and ready to pour.
Step 4: Combine and Bake
Slowly pour the coffee cheesecake mixture over the brownie layer, letting it spread evenly but carefully. Pop your pan into the oven for 45 to 50 minutes. You’ll know it’s ready when the center is set but still has a little jiggle — it’s that perfect creamy stage. Remove it from the oven and allow it to cool to room temperature before transferring it to the fridge for at least 4 hours or ideally overnight to set completely.
Step 5: Serve and Enjoy
Once thoroughly chilled, carefully remove the cheesecake from the springform pan. Slice generously and serve chilled. For an extra touch, top each slice with a cloud of whipped cream or sprinkle on some chocolate shavings—both add a wonderful finish to this layered masterpiece.
How to Serve Coffee Brownie Cheesecake Recipe
Garnishes
Elevate your Coffee Brownie Cheesecake Recipe presentation with a few simple garnishes. A dollop of freshly whipped cream adds light airiness, while chocolate shavings or a dusting of cocoa powder intensify the dessert’s chocolate notes. For a touch of elegance, arrange coffee beans or a sprinkle of espresso powder on top to hint at the delicious coffee flavor inside.
Side Dishes
This dessert shines on its own but pairs wonderfully with fresh berries like raspberries or strawberries, which bring a refreshing tartness to balance the richness. A scoop of vanilla or coffee ice cream alongside adds cool creaminess, making each bite even more indulgent and multi-dimensional.
Creative Ways to Present
To wow your guests, serve individual Coffee Brownie Cheesecake Recipe portions in clear glasses, layering brownie chunks with cheesecake and whipped cream. Another fun idea is to cut the cheesecake into small squares, then dip edges in melted chocolate for a fancy finish. No matter how you serve it, this dessert always commands attention and compliments.
Make Ahead and Storage
Storing Leftovers
Leftover Coffee Brownie Cheesecake Recipe keeps beautifully covered in the refrigerator for up to 4 days. Use an airtight container or cover the pan tightly with plastic wrap to preserve moisture and prevent the cheesecake from absorbing other fridge odors.
Freezing
If you want to enjoy this dessert later, freezing works well. Wrap slices individually in plastic wrap and place in a freezer-safe container. Frozen cheesecake slices can last up to 2 months. Thaw overnight in the refrigerator for the best texture before serving.
Reheating
Since this is a chilled cheesecake, reheating is not usually recommended. However, if you’d like soft slices, let them sit at room temperature for 20 to 30 minutes before serving to bring out all the rich flavors and creamy texture.
FAQs
Can I use instant coffee instead of brewed coffee?
Yes! If you don’t have brewed coffee on hand, dissolving instant coffee granules in water works perfectly and still delivers that wonderful coffee flavor in the cheesecake layer.
How do I prevent cracks on my cheesecake?
Make sure not to overbake your Coffee Brownie Cheesecake Recipe. The center should still have a slight jiggle when you take it out of the oven. Cooling slowly and chilling overnight also helps keep cracks at bay.
Can I make this recipe gluten-free?
You can substitute all-purpose flour with a gluten-free flour blend in equal amounts for both the brownie and cheesecake layers, but be aware that texture might shift slightly depending on the blend used.
Is it okay to use a normal cake pan instead of a springform?
A springform pan is best due to its removable sides, making it much easier to release the delicate cheesecake layers without damage. A regular cake pan can be used but requires extra care and lining to prevent sticking.
Can I prepare the batter the day before?
It’s best to assemble and bake the layers on the same day you plan to serve, ensuring the freshest texture and flavor. However, you can prepare the batter and refrigerate it for a few hours if needed, but avoid letting eggs sit too long before baking.
Final Thoughts
There’s something truly magical about this Coffee Brownie Cheesecake Recipe that brings joy to every bite. It’s the perfect harmony of chocolate, coffee, and creamy cheesecake, all coming together in one stunning dessert. Whether you’re celebrating a special occasion or just craving a decadent treat, I can’t recommend this recipe enough. Give it a try and treat yourself—you deserve every luscious forkful!
Print
Coffee Brownie Cheesecake Recipe
- Prep Time: 20 minutes
- Cook Time: 50 minutes
- Total Time: 4 hours 70 minutes
- Yield: 12 servings
- Category: Dessert
- Method: Baking
- Cuisine: American
Description
This Coffee Brownie Cheesecake is a decadent dessert combining rich, fudgy brownie base with a creamy coffee-infused cheesecake topping. Perfect for coffee lovers, it features a moist cocoa brownie layer and a smooth cheesecake layer infused with strong brewed coffee, baked together for a delightful pairing of flavors and textures.
Ingredients
Brownie Layer
- 1/2 cup (115g) unsalted butter, melted
- 1 cup (200g) granulated sugar
- 2 large eggs
- 1 teaspoon vanilla extract
- 1/3 cup (40g) unsweetened cocoa powder
- 1/2 cup (60g) all-purpose flour
- 1/4 teaspoon salt
- 1/4 teaspoon baking powder
Coffee Cheesecake Layer
- 16 oz (450g) cream cheese, softened
- 1/2 cup (100g) granulated sugar
- 2 large eggs
- 1/4 cup (60ml) strong brewed coffee, cooled
- 1 teaspoon vanilla extract
- 2 tablespoons all-purpose flour
Instructions
- Preheat the Oven: Preheat your oven to 350°F (175°C) and grease a 9-inch springform pan to prepare for baking.
- Mix Brownie Ingredients: In a large bowl, whisk together melted butter and granulated sugar until smooth. Add the eggs and vanilla extract, mixing until fully combined. Sift in the cocoa powder, all-purpose flour, salt, and baking powder, then gently stir until just combined. Pour the brownie batter evenly into the prepared pan.
- Prepare Coffee Cheesecake: In a separate bowl, beat the softened cream cheese and sugar until smooth and creamy. Add the eggs one at a time, beating well after each addition to ensure a smooth mixture. Stir in the cooled brewed coffee and vanilla extract until fully incorporated, then add the flour and mix until smooth.
- Combine Layers: Pour the prepared cheesecake mixture over the brownie batter in the springform pan, spreading it evenly to cover the brownie layer.
- Bake: Place the pan in the preheated oven and bake for 45-50 minutes, or until the center is set and slightly jiggles when shaken. Once done, remove from oven and allow to cool to room temperature.
- Chill: Refrigerate the cheesecake for at least 4 hours or overnight to fully set and develop flavors.
- Serve: Remove the cheesecake from the springform pan. Slice and serve chilled. Optionally, garnish with whipped cream or chocolate shavings for an extra touch.
Notes
- Make sure the cream cheese is fully softened to avoid lumps in the cheesecake layer.
- Use strong brewed coffee for a pronounced coffee flavor in the cheesecake.
- Do not overmix the brownie batter to keep it fudgy and tender.
- Allow the cheesecake to fully chill before slicing for clean cuts.
- Store leftovers covered in the refrigerator for up to 3 days.


