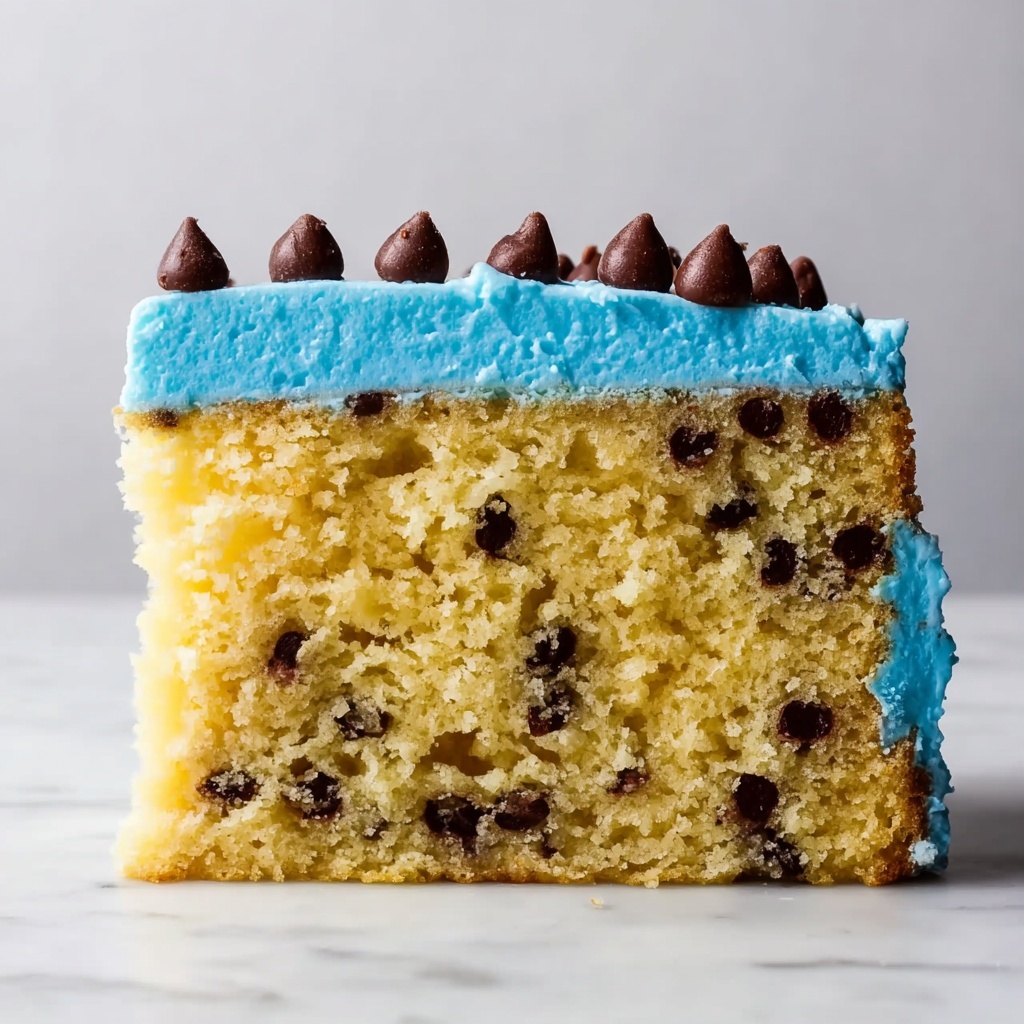
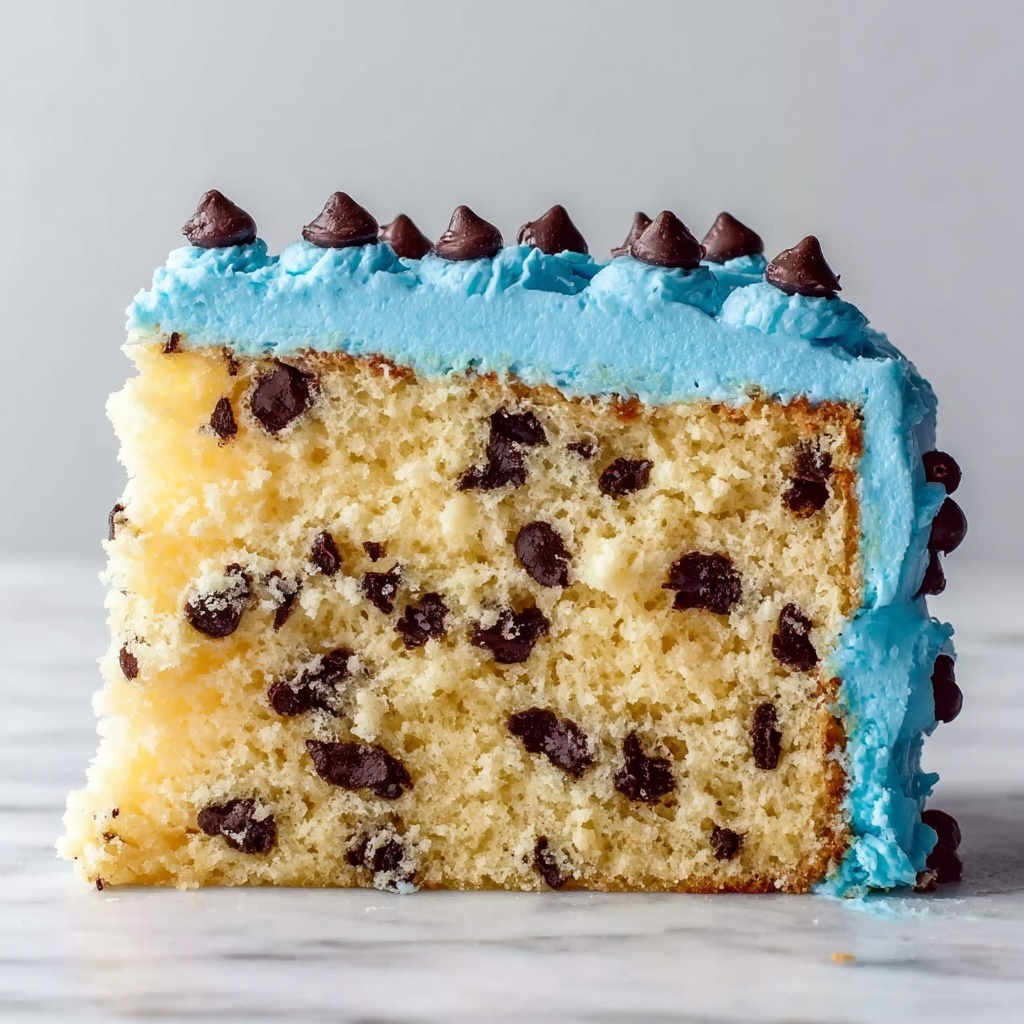
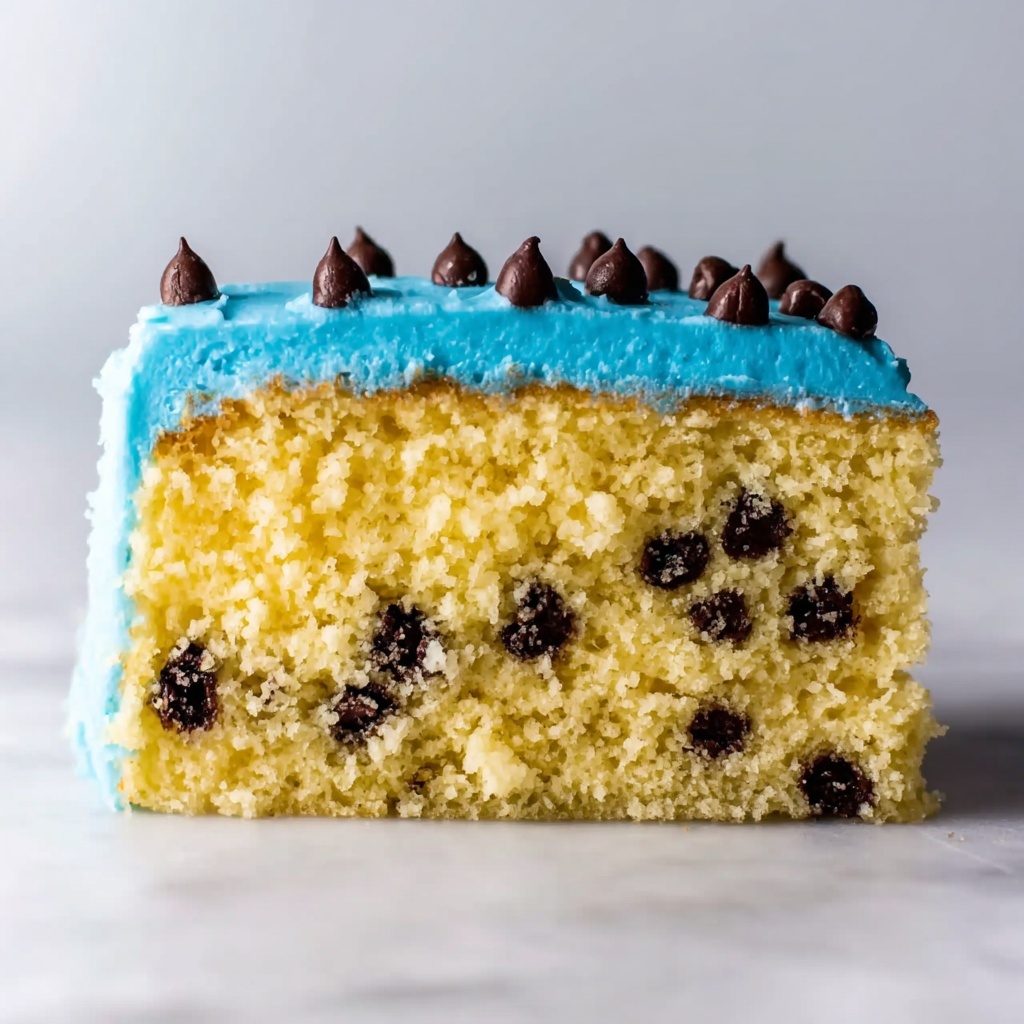
Oh, get ready to dive into one of the most fun and irresistibly delicious desserts you’ll ever meet — the Cookie Monster Cake Recipe! This playful, show-stopping cake brings together soft, moist layers speckled with mini chocolate chips, a luscious cookie dough filling, and that unmistakable blue “fur” frosting that mimics our beloved Sesame Street character’s wild and whimsical personality. The magic lies not just in its eye-catching appearance but in the perfect harmony of flavors and textures that will have everyone asking for seconds. Whether you’re celebrating a birthday, special event, or just craving some serious sweet comfort, this Cookie Monster Cake Recipe is your new best friend in the kitchen.
Ingredients You’ll Need
The secret to any unforgettable cake starts with simple, high-quality ingredients that each bring their own magic to the mix. From the tender cake crumb to the rich cookie dough filling and creamy frosting, every component is thoughtfully crafted to create something truly special.
- Cake flour: Provides a soft and tender crumb that melts in your mouth.
- Baking powder and baking soda: Essential for that perfect rise and light texture.
- Unsalted butter (softened): Adds richness and moisture to both the cake and fillings.
- Granulated sugar: Sweetens the cake while helping create a tender crumb.
- Egg whites (room temperature): Help the cake achieve a light, airy texture without heaviness.
- Sour cream (room temperature): Boosts moisture and adds a subtle tang for balance.
- Pure vanilla extract: Infuses warmth and depth of flavor across layers.
- Milk (room temperature): Ensures smooth batter consistency and even baking.
- Mini chocolate chips: Small bursts of chocolate throughout the cake and cookie dough for an extra punch.
- Instant espresso powder: Enhances chocolate flavor without making the cake taste like coffee.
- Brown sugar: Adds a hint of molasses flavor that’s perfect for cookie dough.
- All-purpose flour: Gives your cookie dough filling structure without toughness.
- Cream cheese: For that silky, tangy cream cheese–buttercream and the cute cheesecake eyes.
- Confectioners’ sugar: Sweetens and thickens the frosting to a fluffy perfection.
- Heavy cream: Helps keep frosting light and spreadable.
- Unflavored gelatin powder and cold water: Stabilize your frosting so it holds the signature fur texture all day.
- Gel food coloring (blue and black): Bring Cookie Monster’s iconic look to life with vibrant blues and expressive eyes.
- White chocolate and corn syrup: For dipping and decorating the adorable cheesecake eyes.
- Chocolate chip cookies: The finishing touch that makes this cake honestly feel like a Cookie Monster dream come true.
How to Make Cookie Monster Cake Recipe
Step 1: Prepare the Espresso-Milk Mixture
Start by stirring the instant espresso powder into your room temperature milk until completely dissolved. This little twist will amplify the chocolate flavor in your cake layers, adding a subtle complexity that makes every bite more exciting.
Step 2: Mix the Cake Batter and Bake
Whisk together your dry ingredients — cake flour, baking powder, baking soda, and salt — to ensure even distribution. Then, beat your softened butter and granulated sugar until pale and fluffy; this step aerates the batter for that tender crumb you’re dreaming of. Incorporate egg whites, sour cream, vanilla, and your espresso-infused milk, mixing gently to avoid deflating the batter. Gradually fold in the dry mix and chocolate chips for an inviting burst of sweetness. Divide the batter into pans, bake until a toothpick comes out clean, and let cool thoroughly — patience here truly pays off.
Step 3: Make the Cookie Dough Filling
In a fresh bowl, cream together softened butter, brown sugar, and granulated sugar until silky smooth. Add in the milk and flour to form a soft dough, then lovingly fold in those luscious mini chocolate chips. This filling is the secret indulgent center to your Cookie Monster Cake Recipe, so chilling it until firm ensures it spreads perfectly without slipping out.
Step 4: Create the Cheesecake Eyes
Whip cream cheese and sugar until smooth, gently mixing in egg yolk and vanilla for richness. Pour into silicone molds or shape by hand, freezing until solid to prepare for dipping. Melt white chocolate with corn syrup to create a glossy coating, then dip and chill the eyes for the perfect finish. Use black gel coloring to pipe quirky pupils that bring those eyes to life—this small detail turns your cake into a delightful character.
Step 5: Prepare the Gelatin Mixture
Sprinkle gelatin over cold water and let it bloom, then microwave briefly until melted. This mixture stabilizes your frosting, allowing Cookie Monster’s fur to keep its captivating texture without wilting.
Step 6: Whip the Cream Cheese–Buttercream
Beat cream cheese and butter until creamy, slowly adding confectioners’ sugar for sweetness and body. Mix in the cooled gelatin, heavy cream, vanilla, and salt before whipping on high to achieve a light, fluffy consistency perfect for piping those iconic blue strands of fur.
Step 7: Level the Cake Layers
Using a serrated knife, carefully slice off the domed tops from your cake layers. This simple step ensures a stable and stacked cake, letting your cookie dough filling and frosting shine evenly without sliding.
Step 8: Assemble with Cookie Dough Filling
Place your first cake layer cut side up, then spread chilled cookie dough filling evenly on top, leaving a border to keep everything neat. Gently place the second layer cut side down and chill the whole cake to let the filling set—you’ll love how this filling adds that special gooey center to each slice.
Step 9: Crumb Coat and Chill
Apply a thin layer of white frosting all around the cake to trap crumbs and create a smooth base for your bright blue fur. Let it chill to firm up before moving on to the fun part—decorating.
Step 10: Tint and Pipe the Blue Fur
Add blue gel food coloring to your reserved frosting, adjusting to match Cookie Monster’s signature hue. Using a grass piping tip, pipe lots of short strands by holding your bag perpendicular and lifting straight up, creating that playful textured fur that really brings the cake to life.
Step 11: Add the Eyes and Cookie Garnishes
Press your cheesecake eyes gently onto the center top of the cake for unmistakable googly eyes, and arrange chocolate chip cookies around the mouth area to complete the look. This final touch adds both visual charm and a craving-worthy crunch.
Step 12: Chill and Serve
Refrigerate for about 30 minutes to let everything set beautifully. Before serving, let the cake sit at room temperature to take the chill off, then slice into 14 to 16 generous pieces and watch the smiles unfold!
How to Serve Cookie Monster Cake Recipe
Garnishes
To keep the whimsy going, top your Cookie Monster Cake Recipe with an extra handful of chocolate chip cookies for that playful crunch. A sprinkle of mini chips or a few stray dollops of blue frosting on serving plates can add a festive, personalized touch that delights both kids and adults alike.
Side Dishes
This cake shines best as the star of any celebration, but you might complement it with simple sides like a scoop of vanilla ice cream or a dollop of fresh whipped cream. Fresh berries can add a burst of color and slight tartness that balances the rich, sweet layers wonderfully.
Creative Ways to Present
If you want to make the presentation truly special, serve slices on colorful plates with little Sesame Street-themed decorations or place it on a bright cake stand. You could even create mini versions of this cake recipe for individual servings or cookie-shaped cupcakes decorated with blue frosting—so many playful possibilities!
Make Ahead and Storage
Storing Leftovers
Your Cookie Monster Cake Recipe keeps beautifully in the fridge for up to 4 days. Make sure to cover it well with plastic wrap or store in an airtight container to keep the frosting moist and the cookie dough filling fresh.
Freezing
Want to save some for later? This cake freezes well. Wrap individual slices tightly in plastic wrap and then foil, or cover the whole cake securely before freezing. When ready, thaw in the fridge overnight for the best texture and flavor.
Reheating
Cookies and frosting don’t need reheating, but if your cake feels too chilled, simply leave it at room temperature for about 30 minutes before serving. This lets the flavors bloom and the frosting soften perfectly for the ultimate Cookie Monster experience.
FAQs
Can I use regular butter instead of unsalted butter in this Cookie Monster Cake Recipe?
Yes, you can, but reduce the added salt slightly to avoid making the cake too salty. Unsalted butter is preferred because it gives you better control of seasoning.
How do I make the blue frosting without it tasting bitter?
Using gel food coloring is key because it imparts bright color without the bitterness that some liquid dyes can add. Start with a small amount and build up the shade to your desired Cookie Monster blue.
Can I make the cheesecake eyes in advance?
Absolutely! The cheesecake eyes can be prepared and frozen for up to a week before assembling the cake, making your decorating process much easier on the big day.
Is the cookie dough filling safe to eat raw since it’s not baked?
This recipe is designed to be safe, but if you want extra peace of mind, you can use heat-treated flour and pasteurized milk to prevent any risk from raw ingredients.
What’s the best way to transport this cake?
Transport the cake chilled and well-covered to keep the frosting intact. Using a cake carrier or an airtight box with a sturdy base will help prevent any mishaps along the way.
Final Thoughts
Trying this Cookie Monster Cake Recipe is like inviting pure joy into your kitchen and onto your table. From the first forkful of moist chocolate chip studded cake to the playful blue frosting fur and cheeky eyes, this cake is guaranteed to brighten any occasion and make memories sweeter. Dive in and enjoy every fun and delicious moment with those you love!
Print
Cookie Monster Cake Recipe
- Prep Time: 1 hour 10 minutes
- Cook Time: 27 minutes
- Total Time: 1 hour 37 minutes
- Yield: 14-16 servings
- Category: Dessert
- Method: Baking
- Cuisine: American
Description
This Cookie Monster Cake is a delightful Sesame Street-inspired dessert featuring moist chocolate chip-studded cake layers, a rich cookie dough filling, and a fluffy cream cheese buttercream tinted blue to mimic Cookie Monster’s iconic fur. Decorated with googly cheesecake eyes and chocolate chip cookie accents, it’s a fun and impressive party centerpiece that serves 14 to 16 people.
Ingredients
Cake
- 2½ cups cake flour
- 2 teaspoons baking powder
- ½ teaspoon baking soda
- 1 teaspoon salt
- ¾ cup unsalted butter, softened
- 1¾ cups granulated sugar
- 5 large egg whites, room temperature
- ½ cup sour cream, room temperature
- 1 tablespoon pure vanilla extract
- ¾ cup milk, room temperature
- 1 teaspoon instant espresso powder
- 1 cup mini chocolate chips
Cookie Dough Filling
- ½ cup unsalted butter, softened
- ½ cup packed brown sugar
- ¼ cup granulated sugar
- 1 tablespoon milk
- 1 cup all-purpose flour
- 1 cup mini chocolate chips
Cream Cheese Buttercream
- 1 cup cream cheese, softened
- 1½ cups unsalted butter, softened
- 6 cups confectioners’ sugar
- ⅓ cup heavy cream
- 1 teaspoon pure vanilla extract
- 1/8 teaspoon salt
- 1 tablespoon unflavored gelatin powder
- ¼ cup cold water
- Blue gel food coloring
- Black gel food coloring
Cheesecake Eyes
- 8 ounces cream cheese, softened
- ¼ cup granulated sugar
- 1 egg yolk
- ½ teaspoon pure vanilla extract
- 6 ounces white chocolate, chopped
- 1 teaspoon corn syrup
- Black gel food coloring
Garnish
- 8 to 10 chocolate chip cookies
Instructions
- Prepare espresso milk: Stir the instant espresso powder into the room temperature milk until no grains remain. Set aside to allow the flavors to meld and deepen the chocolate notes in the cake batter.
- Make cake batter and bake: Whisk together cake flour, baking powder, baking soda, and salt in a large bowl. In a mixing bowl, beat softened butter and granulated sugar on medium speed until pale and fluffy, about 2 minutes. Add egg whites, sour cream, vanilla extract, and espresso milk mixture, mixing until just combined. Gradually add dry ingredients in two parts on low speed, scraping the bowl between additions. Fold in mini chocolate chips. Divide batter evenly between prepared pans, smooth tops, and bake at 350°F (175°C) for 25–28 minutes until a toothpick comes out clean. Cool in pans for 15 minutes, then transfer to racks to cool completely.
- Prepare cookie dough filling: In a clean bowl, beat softened butter with brown and granulated sugars until smooth. Mix in milk, then flour until dough forms. Fold in mini chocolate chips. Cover and chill for 30 minutes until firm.
- Make cheesecake eyes: Beat cream cheese and granulated sugar until smooth. Add egg yolk and vanilla, mixing until combined. Spoon mixture into silicone molds or shape discs on parchment. Freeze for 30 minutes. Melt white chocolate and corn syrup in microwave, stirring until smooth. Dip frozen discs into chocolate, letting excess drip off. Place on parchment and chill 15 minutes until set. Pipe off-center pupils with black gel coloring.
- Bloom gelatin: Sprinkle gelatin over cold water in a small bowl and let sit for 5 minutes. Microwave about 10 seconds until gelatin melts and liquefies.
- Make cream cheese buttercream: Beat cream cheese and unsalted butter until smooth. Gradually add confectioners’ sugar on low speed. Add gelatin mixture, heavy cream, vanilla, and salt; beat on high for 3 minutes until fluffy. Reserve ¾ cup white frosting uncolored if needed.
- Level cakes: Use a serrated knife to trim domed tops from cooled cake layers for stable stacking and even filling.
- Assemble cake layers: Place first cake layer cut side up on cake board. Spread chilled cookie dough filling evenly, leaving a ½-inch border to prevent overflow. Top with second cake layer, cut side down. Chill for 15 minutes to set filling.
- Crumb coat: Apply a thin layer of white frosting around sides and top to trap crumbs. Chill for 20 minutes.
- Color and pipe fur: Tint remaining frosting blue with gel food coloring to desired shade. Fill piping bag fitted with grass tip (#233) and pipe short strands vertically to create textured fur.
- Decorate eyes and cookies: Press cheesecake eyes centered on cake top. Arrange chocolate chip cookies around the mouth area. Refrigerate for 30 minutes to set decorations.
- Serve: Remove cake from refrigerator 30 minutes before serving to allow it to come to room temperature. Slice thinly to serve 14–16 portions.
Notes
- Using room temperature ingredients helps achieve a smoother batter and better cake texture.
- Be sure to chill the cookie dough filling so it spreads easily without melting into the cake layers.
- The gelatin stabilizes the buttercream, giving the frosting a fluffy but sturdy consistency perfect for piping fur.
- Pipe the frosting strands straight up to mimic the look of Cookie Monster’s fur for best visual effect.
- Letting the assembled cake come to room temperature before slicing ensures cleaner cuts.
- Store leftovers refrigerated and consume within 3 days for best freshness.


