
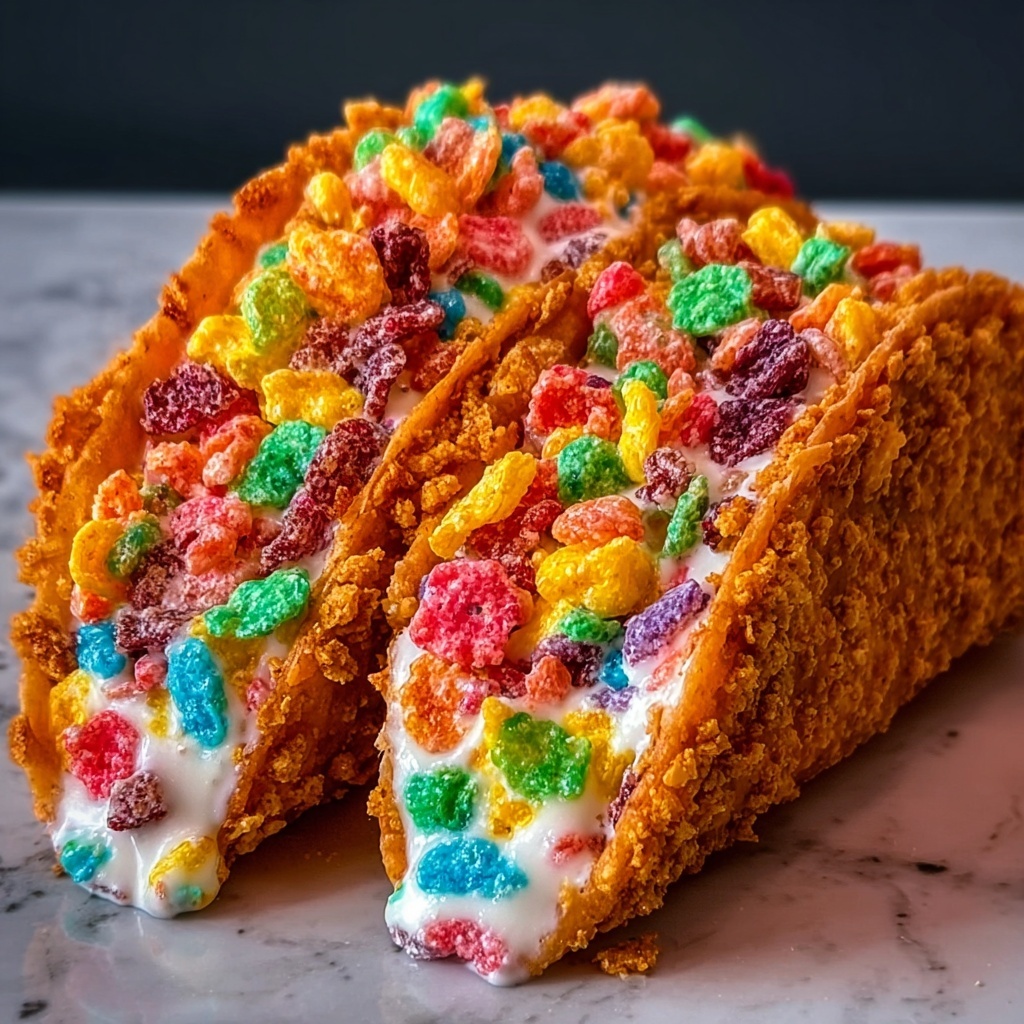
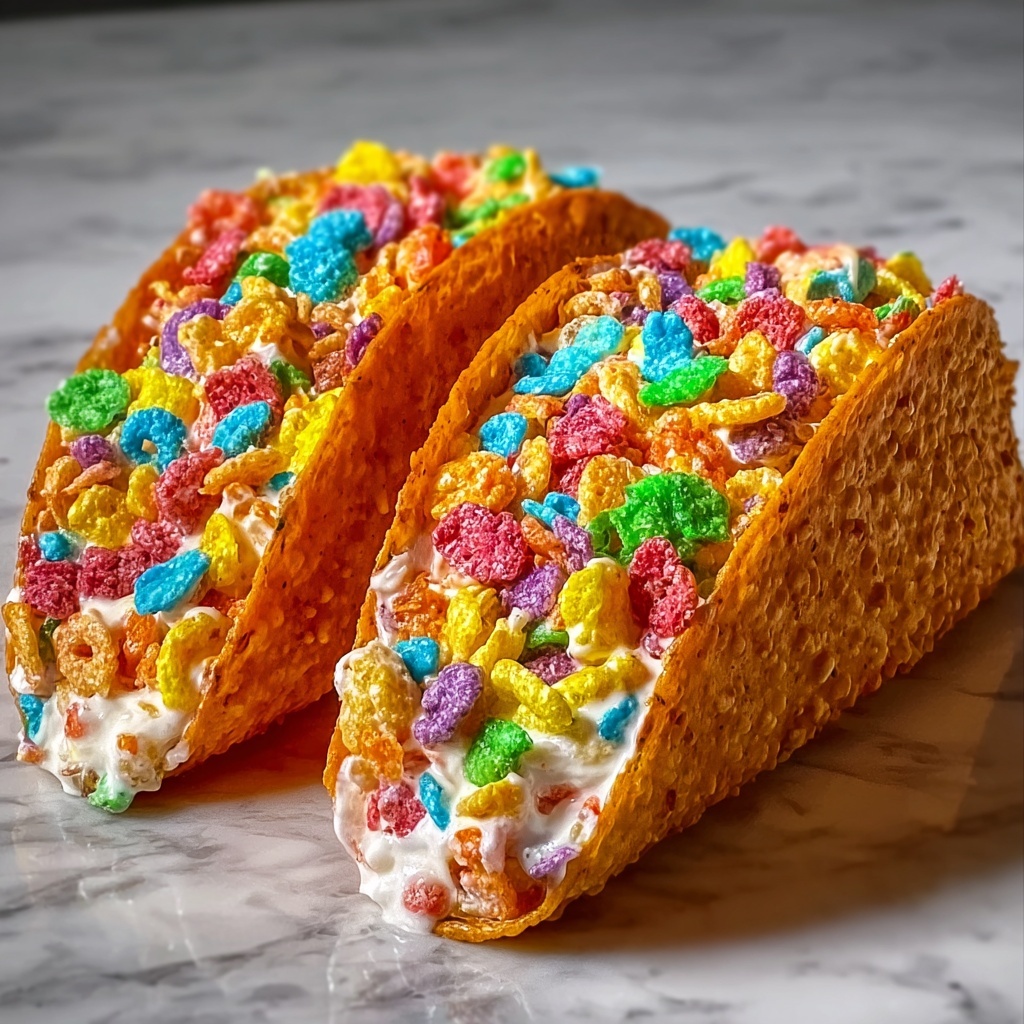
If you’re on the hunt for a fun, vibrant, and irresistibly creamy dessert, the Fruity Pebbles Cheesecake Tacos Recipe will quickly become your new go-to. Imagine the delightful crunch of Fruity Pebbles cereal transformed into a colorful taco shell, filled with a luscious, velvety no-bake cheesecake filling that’s light and fluffy. This playful twist on a classic favorite is perfect for parties, family gatherings, or just a cheerful treat to brighten your day. It’s as much a feast for the eyes as it is for your taste buds, delivering nostalgia and indulgence with every bite.
Ingredients You’ll Need
Gathering simple, well-chosen ingredients is the secret to nailing the perfect balance of texture and flavor in this dessert. Each one plays a crucial role, from the crispy taco shell to the smooth, creamy filling that makes these tacos absolutely unforgettable.
- 2 cups Fruity Pebbles cereal, crushed: Provides the colorful, crunchy base that forms the taco shells, packed with vibrant fruity flavor.
- 1/4 cup unsalted butter, melted: Binds the crushed cereal together and helps to create sturdy taco shells once baked.
- 1 package (8 ounces) cream cheese, softened: Forms the rich and creamy core of the cheesecake filling.
- 1/2 cup powdered sugar: Sweetens the cream cheese smoothly without adding graininess.
- 1 teaspoon vanilla extract: Adds a warm, fragrant note that complements the fruity cereal perfectly.
- 1 cup heavy whipping cream: Whipped to stiff peaks to give the filling its fluffy, airy texture.
- 1/4 cup granulated sugar: Sweetens the whipped cream, enhancing the overall richness.
- 1/2 cup additional Fruity Pebbles cereal for topping: Adds extra crunch and a pop of color just before serving.
- White chocolate drizzle (optional): For an elegant, sweet finishing touch that looks stunning and tastes divine.
How to Make Fruity Pebbles Cheesecake Tacos Recipe
Step 1: Prepare the Fruity Pebbles Taco Shells
Start by preheating your oven to 350°F to get ready for creating those colorful shells. Mix the crushed Fruity Pebbles cereal with melted unsalted butter until every bit is evenly coated—this ensures the cereal sticks together as it bakes. Next, carefully spoon the mixture into lightly greased taco-shaped molds. If you don’t have special molds, drape small portions over the back of a muffin tin to form that taco shape, pressing gently to hold the form. Bake for 8 to 10 minutes just until the shells are set and beginning to crisp up. After baking, it’s essential to let them cool completely to firm up nicely so they’ll hold the filling without breaking.
Step 2: Make the Cheesecake Filling
While the shells cool, whip up your decadent cheesecake filling. Beat the softened cream cheese, powdered sugar, and vanilla extract in a large bowl until the mixture is utterly smooth and creamy. In a separate bowl, whip the heavy cream with granulated sugar until stiff peaks form—this step is key to a light and fluffy texture. Gently fold the whipped cream into the cream cheese mixture, careful not to lose that beautiful airiness. This combination results in a luscious filling that contrasts perfectly with the crunchy shell.
Step 3: Assemble the Fruity Pebbles Cheesecake Tacos Recipe
Once the taco shells have cooled thoroughly, spoon or pipe the cheesecake filling generously into each shell. Top with an extra sprinkle of Fruity Pebbles cereal for added texture and that unmistakable pop of color. If you want to elevate the presentation and flavor, drizzle melted white chocolate over the top—it looks gorgeous and adds a creamy sweetness that’s simply irresistible. Serve the tacos immediately for the best crunch or refrigerate for about 30 minutes to let the filling set a bit before indulging.
How to Serve Fruity Pebbles Cheesecake Tacos Recipe
Garnishes
Enhance your Fruity Pebbles Cheesecake Tacos Recipe with playful garnishes like extra cereal sprinkles, a drizzle of white chocolate, or even tiny edible flowers for a whimsical touch. Fresh berries or a dollop of whipped cream on the side add freshness and balance the sweetness beautifully.
Side Dishes
While these cheesecake tacos shine as a dessert, pairing them with simple side dishes like a fresh fruit salad or a light scoop of vanilla ice cream can round out your treat and add a refreshing contrast. It’s especially delightful during warm-weather get-togethers.
Creative Ways to Present
For gatherings, consider serving the cheesecake tacos on a colorful platter lined with paper doilies or festive napkins to match the vibrant cereal colors. Another fun idea is placing them upright in a taco holder, which keeps their shape intact and adds a bit of flair to your dessert table.
Make Ahead and Storage
Storing Leftovers
If you have leftovers, store the cheesecake tacos in an airtight container in the refrigerator. Keep them in a single layer to preserve their crunch as much as possible. Ideally, enjoy within one day as the cereal shells tend to soften over time.
Freezing
Freezing is not recommended for the Fruity Pebbles Cheesecake Tacos Recipe since the fresh cereal shells can become soggy or lose their crisp texture after thawing. For best results, prepare the shells and filling separately and assemble just before serving.
Reheating
Because the shells are made from cereal and butter, reheating is tricky and generally not advised. Instead, if you prefer a warm dessert, enjoy the cheesecake filling on its own or try warming a simple biscuit to pair alongside the chilled tacos for a contrast.
FAQs
Can I use other cereals besides Fruity Pebbles?
Absolutely! While Fruity Pebbles provide wonderful color and fruity flavor, you can experiment with other cereals like Cocoa Pebbles or Rice Krispies for different tastes and textures, though the appearance will change.
Do I have to bake the taco shells?
Baking the shells is essential to help set the shape firmly and prevent them from crumbling or becoming too soft once filled. Skipping baking may result in fragile, less durable shells.
How long can I make these ahead of time?
Prepare the taco shells a day ahead and store them in an airtight container. Assemble the tacos on the day you’re serving to keep the shells crisp and the filling fresh and fluffy.
Is this recipe suitable for vegetarians?
Yes, the Fruity Pebbles Cheesecake Tacos Recipe is vegetarian-friendly, assuming the cereal ingredients align with your dietary preferences.
Can I make the filling dairy-free?
You can substitute dairy products with vegan cream cheese and coconut cream for a dairy-free version, though the texture and flavor will vary slightly from the original recipe.
Final Thoughts
There’s something truly magical about the Fruity Pebbles Cheesecake Tacos Recipe—it’s playful, colorful, and downright delicious. Whether you’re making it for a special occasion or just because you want to treat yourself, this dessert delivers all the fun and flavor of childhood nostalgia with a sophisticated, creamy twist. I encourage you to give it a try; once you do, these cheesecake tacos might just become your new favorite indulgence to share with friends and family.
Print
Fruity Pebbles Cheesecake Tacos Recipe
- Prep Time: 20 minutes
- Cook Time: 10 minutes
- Total Time: 30 minutes
- Yield: 8 tacos
- Category: Dessert
- Method: Baking
- Cuisine: American
- Diet: Vegetarian
Description
Delightfully fun and colorful Fruity Pebbles Cheesecake Tacos featuring crispy cereal taco shells filled with a creamy no-bake cheesecake filling, topped with extra cereal and white chocolate drizzle. Perfect for an eye-catching dessert or party treat combining textures and sweet flavors.
Ingredients
Taco Shells
- 2 cups Fruity Pebbles cereal, crushed
- 1/4 cup unsalted butter, melted
Cheesecake Filling
- 1 package (8 ounces) cream cheese, softened
- 1/2 cup powdered sugar
- 1 teaspoon vanilla extract
- 1 cup heavy whipping cream
- 1/4 cup granulated sugar
Toppings
- 1/2 cup additional Fruity Pebbles cereal
- White chocolate drizzle (optional)
Instructions
- Prepare Taco Shells: Preheat the oven to 350°F. In a medium bowl, mix the crushed Fruity Pebbles cereal with melted butter until the cereal is evenly coated. Spoon the mixture into lightly greased taco-shaped molds or alternatively drape small portions over the back of a muffin tin to form taco shells. Press gently to shape and bake for 8 to 10 minutes until the shells are set and firm. Allow them to cool completely to harden.
- Make Cheesecake Filling: In a large mixing bowl, beat the softened cream cheese, powdered sugar, and vanilla extract together until smooth and creamy. In a separate bowl, whip the heavy cream with granulated sugar until stiff peaks form. Gently fold the whipped cream into the cream cheese mixture to create a light and fluffy filling.
- Assemble Tacos: Spoon or pipe the cheesecake filling evenly into each cooled Fruity Pebbles taco shell. Sprinkle the tops with additional Fruity Pebbles cereal for extra crunch and color. Drizzle with melted white chocolate if desired for a decorative and tasty finish.
- Chill and Serve: Serve immediately for maximum crunchiness or refrigerate for 30 minutes to allow the filling to set further before serving.
Notes
- Ensure taco shells are completely cooled before adding filling to prevent them from becoming soggy.
- If taco molds are unavailable, shape the cereal mixture over foil-wrapped cardboard tubes for similar results.
- These cheesecake tacos are best enjoyed the same day for optimal texture and crunch.


