If you’re craving a snack that’s both indulgent and nourishing, you’re going to fall in love with this Healthy No-Bake Chocolate Peanut Butter Crunch Bars Recipe. These bars combine the creamy richness of peanut butter with the satisfying snap of crispy rice cereal and the luscious smoothness of dairy-free chocolate, all without ever turning on your oven. Each bite brings a perfect balance of sweet, salty, crunchy, and velvety textures that make it impossible to eat just one. Whether you need a quick pick-me-up, a post-workout treat, or something to share at your next gathering, this recipe will soon be your go-to delight.
Ingredients You’ll Need
The magic in this Healthy No-Bake Chocolate Peanut Butter Crunch Bars Recipe comes from a handful of simple ingredients that work harmoniously together. Each one adds depth to the flavor and texture, making the bars irresistible without complicating the process.
- 1 cup smooth peanut butter: Acts as the creamy, nutty base that binds everything together while delivering rich flavor.
- 1/2 cup maple syrup or agave nectar: Provides natural sweetness and helps the mixture set without refined sugars.
- 1/4 cup coconut oil: Adds a silky smooth texture and solidifies the bars once chilled.
- 1 tsp vanilla extract: Brings a subtle warmth and depth to the overall taste.
- 3 cups crispy rice cereal: Creates that satisfyingly crunchy bite in every bar.
- 1 1/2 cups dairy-free chocolate chips: Offers a luscious, rich chocolate layer that’s smooth and dairy-free.
- 1/4 cup peanut butter (for topping): Used for that decorative and flavorful peanut butter swirl on top.
How to Make Healthy No-Bake Chocolate Peanut Butter Crunch Bars Recipe
Step 1: Prepare Your Pan
Start by lining an 8×8-inch baking pan with parchment paper. This step is crucial because it ensures your bars won’t stick and makes removing them a breeze once set. You’ll thank yourself later!
Step 2: Melt Together the Peanut Butter, Maple Syrup, and Coconut Oil
In a large microwave-safe bowl, mix the smooth peanut butter, maple syrup (or agave), and coconut oil. Microwave in 20-second bursts, stirring in between, until everything melts into a velvety, uniform mixture. This liquid gold is the glue that holds your bars together while giving them that luscious flavor.
Step 3: Add Vanilla Extract
Stir in a teaspoon of vanilla extract for a warm, fragrant note that elevates the entire bar. Even this small addition makes a big difference in flavor complexity.
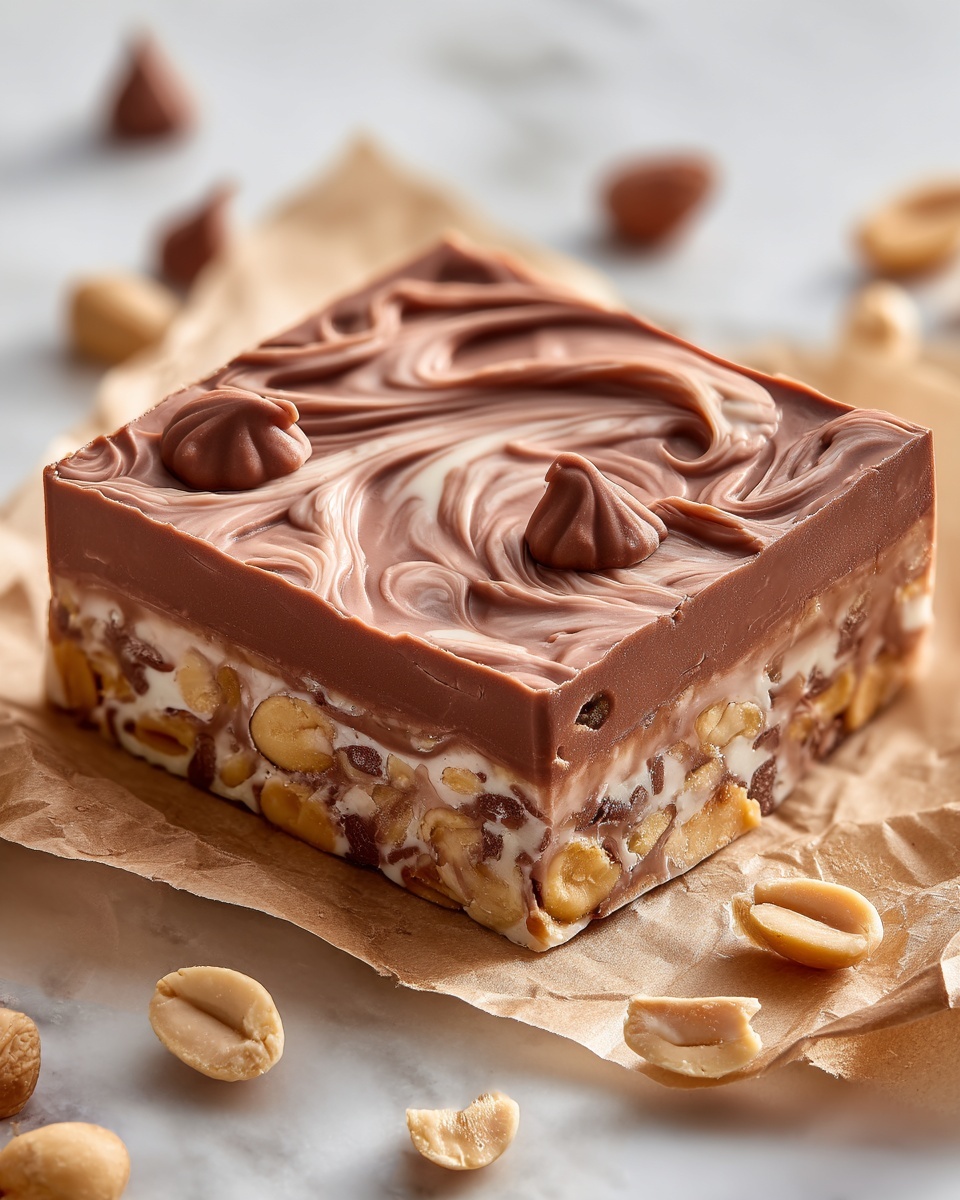
Step 4: Mix in the Crispy Rice Cereal
Add the crispy rice cereal to your peanut butter mixture and gently fold until every crunchy piece is evenly coated. This part is where the bars start to take shape, blending creamy and crunchy textures beautifully.
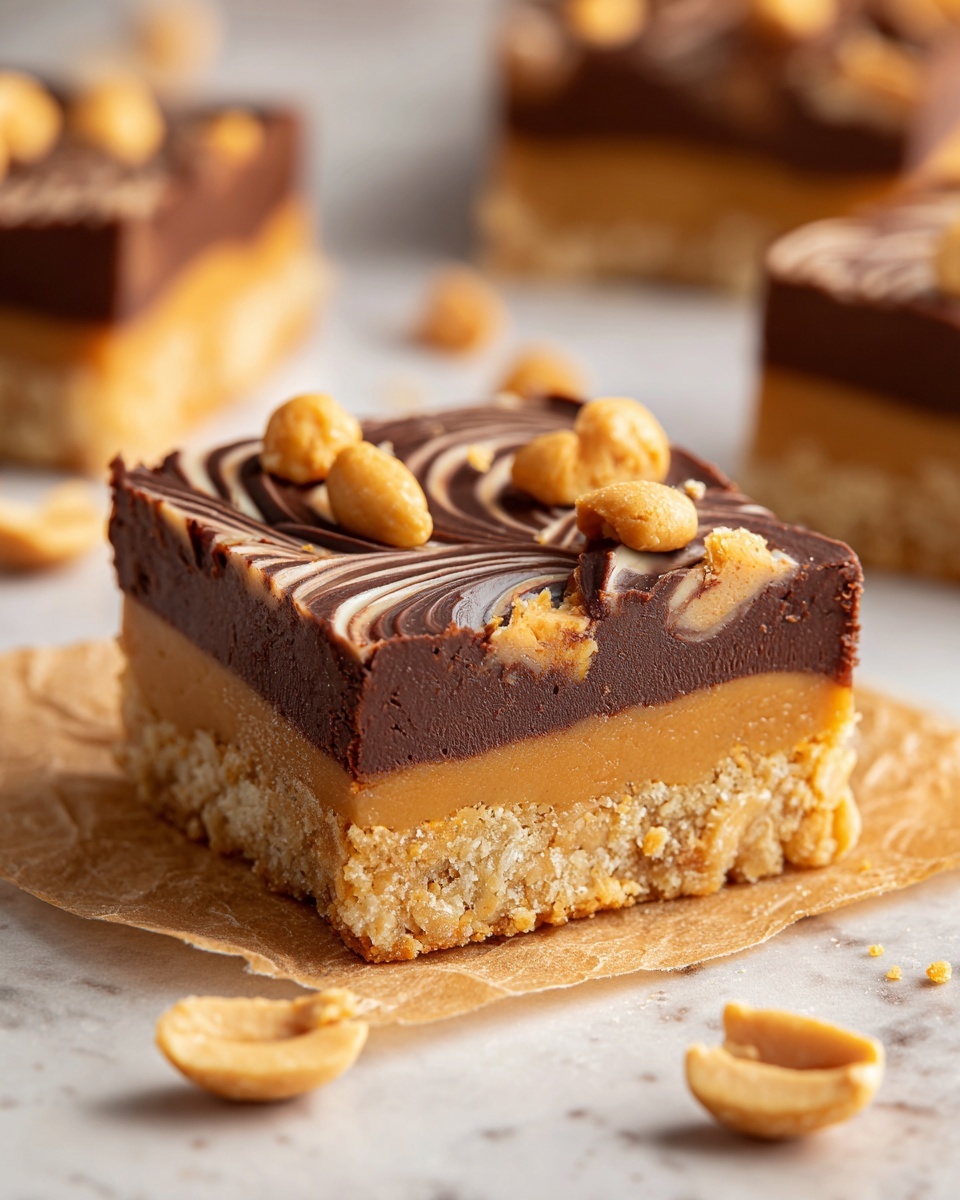
Step 5: Press the Mixture into the Pan
Transfer the full mixture into your parchment-lined pan. Use a spatula or clean hands to press it down firmly and evenly. This compression step ensures the bars hold together after chilling.
Step 6: Melt the Dairy-Free Chocolate Chips
In another microwave-safe bowl, melt your dairy-free chocolate chips in 20-second intervals, stirring frequently until smooth and shiny. This luscious chocolate layer will make these bars utterly irresistible.
Step 7: Spread the Chocolate Over the Cereal Base
Pour the melted chocolate over the pressed cereal mixture. Spread it evenly with a spatula so every bite has a perfect chocolate coating.
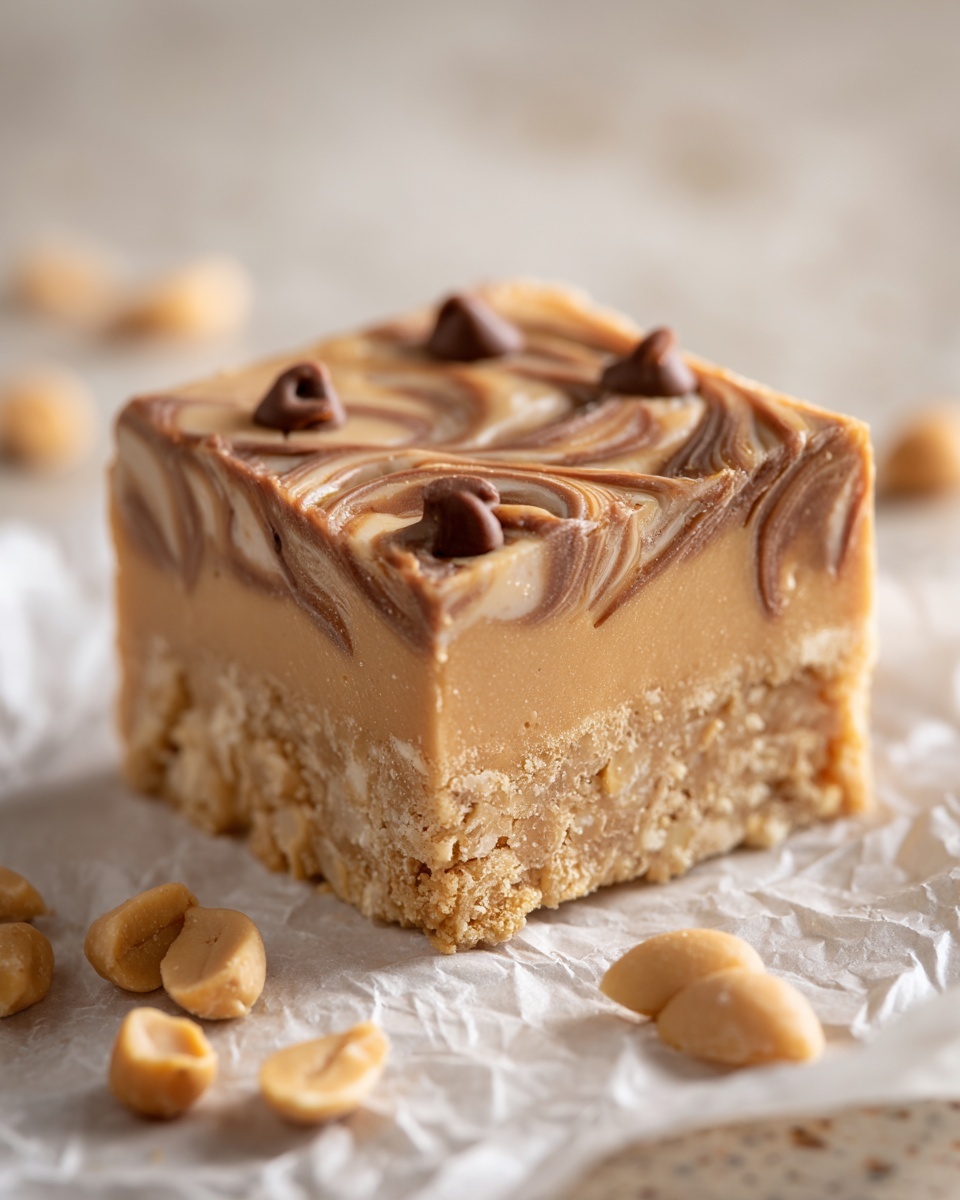
Step 8: Add a Peanut Butter Swirl
Drizzle the remaining 1/4 cup peanut butter across the top of the chocolate, then use a knife or toothpick to create beautiful swirling patterns. This finishing touch looks stunning and adds extra peanut butter flavor where each swirl lands.
Step 9: Chill Until Set
Place your pan in the refrigerator for at least 1 hour so the chocolate firms up completely and the bars become solid. This wait is worth it—the bars will slice neatly and hold their shape perfectly.
Step 10: Slice and Serve
Once chilled, lift the bars out easily by grabbing the parchment paper edges. Cut into squares, serve, and watch these Healthy No-Bake Chocolate Peanut Butter Crunch Bars disappear faster than you can say “yum!”
How to Serve Healthy No-Bake Chocolate Peanut Butter Crunch Bars Recipe
Garnishes
For an extra pop, sprinkle a pinch of flaky sea salt on top after swirling your peanut butter, enhancing the chocolate and peanut flavors beautifully. You could also add some chopped roasted peanuts or cocoa nibs for added texture and visual appeal.
Side Dishes
These bars shine on their own, but if you’re serving them as part of a spread, pair with fresh fruit like strawberries or banana slices, which complement the chocolate and peanut butter flavors perfectly and add refreshing brightness to the plate.
Creative Ways to Present
Try stacking a few bars between wax paper squares to create a vibrant snack box or wrap individual squares in parchment paper tied with twine for easy gifting. You might even use fun cookie cutters to create shapes for themed parties—there’s no limit to customization!
Make Ahead and Storage
Storing Leftovers
Keep your bars fresh by storing them in an airtight container in the refrigerator. They stay delicious and retain their perfect crunch for up to a week, making them a convenient grab-and-go treat whenever hunger strikes.
Freezing
If you want to make these bars well in advance or save some for later, they freeze beautifully. Wrap individual portions tightly in plastic wrap and place in a freezer-safe container. Thaw in the fridge overnight before enjoying for a perfectly preserved texture and taste.
Reheating
Since these bars are meant to be enjoyed cold or at room temperature, reheating is generally not necessary. If you prefer a slightly softer bar, allow it to sit at room temperature for 10-15 minutes before eating rather than using heat, which can alter the texture.
FAQs
Can I use crunchy peanut butter instead of smooth?
Absolutely! Using crunchy peanut butter will add extra little peanut pieces throughout the bars, giving them an even more delightful texture. Just be aware it might make pressing the mixture a bit more challenging, but the flavor payoff is worth it.
Are these bars suitable for those with a dairy allergy?
Yes! This recipe uses dairy-free chocolate chips and coconut oil, making it a wonderful dairy-free treat. Just double-check the chocolate chips you buy to ensure they meet your dietary needs.
Can I substitute the crispy rice cereal with another grain?
You can try puffed quinoa or gluten-free puffed millet for a different texture and added nutrition, but the traditional crispy rice gives the lightest crunch. Experiment to find your favorite!
What’s the best way to melt the chocolate chips without burning them?
Microwave the chocolate in short 20-second intervals, stirring well between each. This gentle, gradual approach ensures they melt smoothly without scorching.
How long will the bars stay fresh at room temperature?
Since they contain coconut oil and peanut butter, it’s safest to keep them refrigerated. At room temperature, they may soften and lose their crisp texture within a day or two, especially in warmer climates.
Final Thoughts
There is something truly special about making and sharing these Healthy No-Bake Chocolate Peanut Butter Crunch Bars Recipe. They combine wholesome ingredients and effortless preparation to deliver a snack that tastes every bit indulgent and perfectly satisfying. I encourage you to try this recipe and enjoy the warm smiles and happy snack times it brings to your kitchen and beyond!
Print
Healthy No-Bake Chocolate Peanut Butter Crunch Bars Recipe
- Prep Time: 15 minutes
- Cook Time: 10 minutes
- Total Time: 1 hour 10 minutes
- Yield: 16 bars
- Category: Snack
- Method: No-Cook
- Cuisine: American
- Diet: Vegan
Description
These Healthy No-Bake Chocolate Peanut Butter Crunch Bars combine creamy peanut butter, sweet maple syrup, and crispy rice cereal, topped with melted dairy-free chocolate and a peanut butter drizzle. Easy to prepare without any baking, they make a perfect guilt-free snack or dessert packed with flavor and texture.
Ingredients
Main Ingredients
- 1 cup smooth peanut butter
- 1/2 cup maple syrup or agave nectar
- 1/4 cup coconut oil
- 1 tsp vanilla extract
- 3 cups crispy rice cereal
Topping
- 1 1/2 cups dairy-free chocolate chips
- 1/4 cup peanut butter (for topping)
Instructions
- Prepare the Pan: Line an 8×8-inch baking pan with parchment paper and set aside to ensure easy removal of the bars later.
- Melt the Mixture: In a large microwave-safe bowl, combine the smooth peanut butter, maple syrup, and coconut oil. Heat in the microwave in 20-second increments, stirring well between each, until the mixture is fully melted and combined smoothly.
- Add Vanilla: Stir in the vanilla extract thoroughly to infuse the mixture with flavor.
- Combine with Cereal: Add the crispy rice cereal to the bowl and mix gently but thoroughly until all the cereal is evenly coated with the peanut butter mixture.
- Press into Pan: Transfer the coated cereal mixture into the prepared baking pan and press it down firmly to create an even layer.
- Melt Chocolate: In a microwave-safe bowl, melt the dairy-free chocolate chips in 20-second increments, stirring between each to achieve a smooth melted chocolate.
- Pour Chocolate Layer: Pour the melted chocolate over the pressed cereal mixture, spreading it evenly to cover the surface.
- Peanut Butter Drizzle: Drizzle the remaining 1/4 cup peanut butter over the chocolate layer. Use a knife or toothpick to swirl it gently into a decorative pattern.
- Chill: Refrigerate the pan for at least 1 hour, or until the chocolate topping is fully set and firm.
- Serve: Once set, lift the bars out of the pan using the parchment paper and cut into 16 squares. Serve immediately and enjoy your healthy, no-bake treat!
Notes
- Use dairy-free chocolate chips to keep this recipe vegan and dairy-free.
- Maple syrup or agave nectar can be used as a natural sweetener alternative to refined sugar.
- Press the mixture firmly into the pan to ensure the bars hold together well.
- Store leftover bars in an airtight container in the refrigerator for up to 1 week.
- For a nut-free version, substitute peanut butter with sunflower seed butter, but adjust measurements for consistency.
