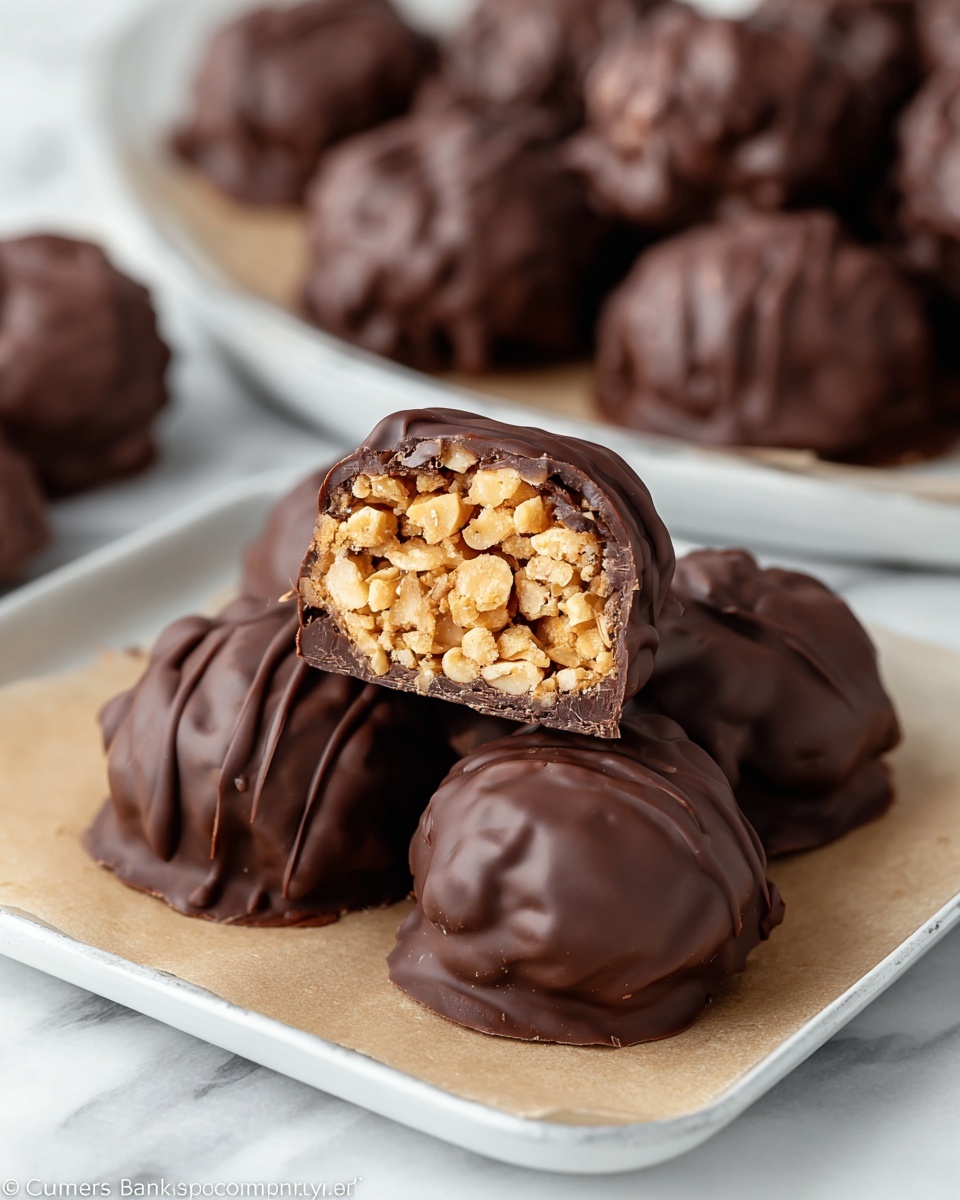
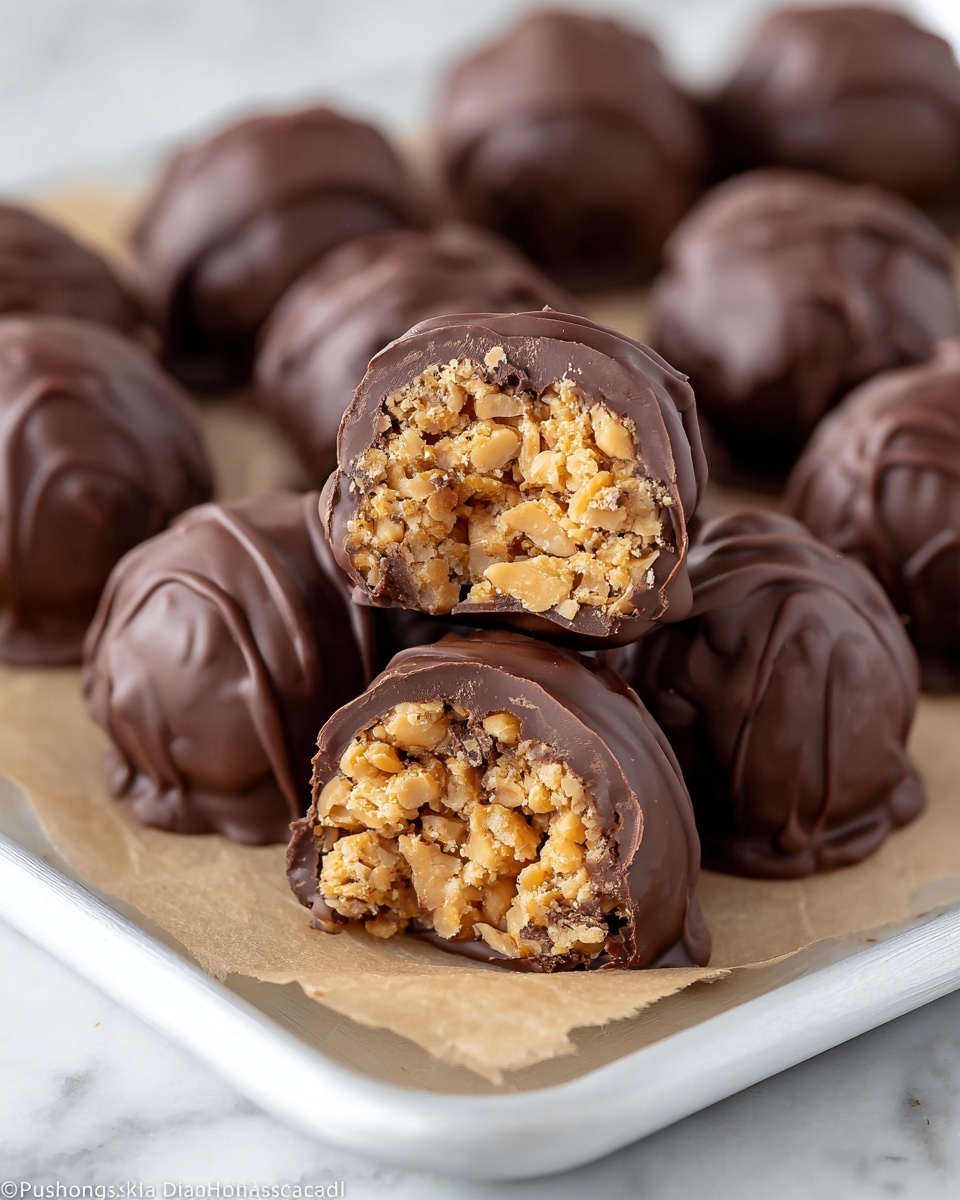
If you’re craving a sweet treat that perfectly balances creamy peanut butter, crunchy Rice Krispies, and a luscious chocolate shell, you’ve got to try this Peanut Butter Rice Krispies Balls with Chocolate Coating Recipe. These little bites are incredibly addictive and bring together classic flavors in a fun and nostalgic way. Whether you’re making them for a party, a quick snack, or just because, they offer a delightful mix of textures and a rich, satisfying flavor that’s tough to resist. Plus, they’re straightforward to make and sure to bring smiles all around!
Ingredients You’ll Need
Simple, pantry-friendly staples come together in this recipe, each playing a key role in creating the perfect balance of taste, texture, and visual appeal. Let’s break down what you’ll need and why.
- 1 cup creamy peanut butter: The star ingredient providing rich, nutty flavor and smooth creaminess for the base.
- ¼ cup softened butter: Adds buttery richness and helps bind the mixture while keeping it soft.
- 1 cup powdered sugar: Sweetens the mix without overpowering and helps with the perfect texture.
- 2 cups Rice Krispies cereal (slightly crushed): Adds delightful crunch and lightness, giving each bite a satisfying crisp.
- 2 cups semi-sweet chocolate chips: For melting into a smooth, glossy coating that seals in the peanut butter goodness.
- 2 tablespoons vegetable shortening: Helps the chocolate coating set smoothly and shine beautifully without hardening too much.
How to Make Peanut Butter Rice Krispies Balls with Chocolate Coating Recipe
Step 1: Prepare the Baking Sheet
Start by lining a baking sheet with parchment or wax paper. This simple step ensures your peanut butter balls won’t stick and makes cleanup effortless. Set it aside because you’ll need it once your balls are ready to chill and coat.
Step 2: Make the Peanut Butter Mixture
In a large bowl, cream together the creamy peanut butter, softened butter, and powdered sugar until the mixture becomes smooth and well blended. This combo creates a perfect base that’s rich, slightly sweet, and easy to shape.
Step 3: Mix in Rice Krispies
Next, gently fold in the slightly crushed Rice Krispies cereal. The slight crushing ensures they’ll blend nicely while still giving that essential crunchy texture that contrasts delightfully with the smooth peanut butter mixture.
Step 4: Shape into Balls
Roll the peanut butter and Rice Krispies mixture into small bite-sized balls. Place them on the prepared baking sheet, making sure they’re spaced slightly apart. Once shaped, chill them in the refrigerator for at least 30 minutes. This step firms the balls up so they hold their shape when coated.
Step 5: Melt the Chocolate Coating
In a microwave-safe bowl, combine the semi-sweet chocolate chips and vegetable shortening. Heat in 1-minute bursts, stirring well after each, until the chocolate is fully melted and gorgeously smooth. The shortening keeps the chocolate coating silky and makes it easier to dip the balls.
Step 6: Coat the Peanut Butter Balls
One by one, dip each chilled peanut butter ball into the melted chocolate, making sure they are completely coated. Allow any excess chocolate to drip off before returning the balls to your baking sheet. This coating creates a decadent exterior, sealing in the peanut buttery center and adding a delightful snap on the outside.
Step 7: Chill to Set
Finally, refrigerate the chocolate-coated peanut butter balls for about 10 to 15 minutes. This gives the chocolate time to set perfectly, resulting in a beautiful glossy finish that’s just waiting to be enjoyed.
How to Serve Peanut Butter Rice Krispies Balls with Chocolate Coating Recipe

Garnishes
To elevate these Peanut Butter Rice Krispies Balls with Chocolate Coating Recipe, try garnishing with a light sprinkle of crushed peanuts or a dusting of flaky sea salt on top of the chocolate before it sets. This adds extra texture and a touch of sophistication to these simple treats.
Side Dishes
Serve these irresistible bites alongside a cold glass of milk or a cup of freshly brewed coffee. Their sweet, nutty flavor and satisfying crunch make them a wonderful companion to beverages, perfect for a cozy afternoon snack or dessert course.
Creative Ways to Present
For a fun twist, arrange the Peanut Butter Rice Krispies Balls with Chocolate Coating Recipe on a decorative platter, interspersed with vibrant fresh berries or edible flowers. You could also place them in colorful paper cups for parties or gift-giving, turning these snacks into little works of edible art everyone will adore.
Make Ahead and Storage
Storing Leftovers
Any leftover Peanut Butter Rice Krispies Balls with Chocolate Coating Recipe should be kept in an airtight container in the refrigerator. Stored properly, they will stay fresh and delicious for up to one week, making them a fantastic make-ahead treat.
Freezing
These balls freeze wonderfully! Place them in a single layer on a parchment-lined tray and freeze until solid. Then transfer to a freezer-safe container. They’ll keep well for up to a month. When you want a sweet surprise, just thaw in the refrigerator before serving.
Reheating
Since these treats aren’t typically served warm, reheating isn’t necessary. If you prefer softer centers, you can simply leave them at room temperature for 10–15 minutes to take the chill off before enjoying.
FAQs
Can I use crunchy peanut butter instead of creamy?
Absolutely! Using crunchy peanut butter will add an extra layer of texture inside the balls, which some people really enjoy for that added crunch alongside the Rice Krispies.
Is there a substitute for vegetable shortening in the chocolate coating?
You can substitute coconut oil for vegetable shortening if you prefer a natural alternative. It will still help the chocolate set nicely and add a slight coconut hint that pairs beautifully with peanut butter.
Can I use a different cereal instead of Rice Krispies?
Yes, feel free to experiment! Crispy cereals like Cornflakes or Chex work well, but Rice Krispies are preferred for their lightness and classic texture that balance perfectly with peanut butter.
Do these peanut butter balls need to be refrigerated always?
Refrigeration helps them hold their shape, especially with the chocolate coating. Keeping them chilled also preserves their freshness and ensures the chocolate stays firm for the best eating experience.
Can I make these nut-free?
If you have a peanut allergy, you could try substituting sunflower seed butter or another safe nut butter alternative. The flavor will be different, but the texture and overall experience will still be delightful.
Final Thoughts
Making this Peanut Butter Rice Krispies Balls with Chocolate Coating Recipe is like creating little bites of joy that everyone will ask for again and again. With just a handful of simple ingredients and easy steps, you get a snack that’s crunchy, creamy, chocolatey, and simply irresistible. So give it a try—your taste buds will thank you, and your friends and family will be begging you to share your secret!
Print
Peanut Butter Rice Krispies Balls with Chocolate Coating Recipe
- Prep Time: 15 minutes
- Cook Time: 0 minutes
- Total Time: 50 minutes
- Yield: 12 servings
- Category: Snack
- Method: No-Cook
- Cuisine: American
Description
These Peanut Butter Balls with Rice Krispies are a delightful no-bake treat combining creamy peanut butter, crunchy Rice Krispies cereal, and a smooth chocolate coating. Perfect for snacking or sharing, these bite-sized sweets are easy to make and require just a few simple ingredients.
Ingredients
Main Ingredients
- 1 cup creamy peanut butter
- ¼ cup softened butter
- 1 cup powdered sugar
- 2 cups Rice Krispies cereal (slightly crushed)
Chocolate Coating
- 2 cups semi-sweet chocolate chips
- 2 tablespoons vegetable shortening
Instructions
- Prepare the baking sheet: Line a baking sheet with parchment or wax paper and set aside to prevent sticking when placing the peanut butter balls.
- Make the peanut butter mixture: In a large bowl, cream together the peanut butter, softened butter, and powdered sugar until the mixture is smooth and well combined.
- Mix in Rice Krispies: Gently fold in the slightly crushed Rice Krispies cereal until evenly distributed throughout the peanut butter mixture.
- Shape into balls: Roll the mixture into small bite-sized balls and arrange them on the prepared baking sheet. Chill in the refrigerator for at least 30 minutes to firm up properly.
- Melt the chocolate coating: In a microwave-safe bowl, combine the semi-sweet chocolate chips and vegetable shortening. Heat in 1-minute intervals, stirring thoroughly between each until the chocolate is fully melted and smooth.
- Coat the peanut butter balls: Dip each chilled peanut butter ball into the melted chocolate to coat completely. Allow any excess chocolate to drip back into the bowl, then place the coated balls back onto the baking sheet.
- Chill to set: Refrigerate the chocolate-coated peanut butter balls for about 10-15 minutes, or until the chocolate hardens and sets perfectly.
Notes
- Use creamy peanut butter for a smooth texture; chunky can be used if extra crunch is desired.
- Chilling the balls before dipping helps the chocolate coat evenly without melting the peanut mixture.
- Vegetable shortening helps achieve a smooth, shiny chocolate coating that hardens nicely.
- Store the finished peanut butter balls in an airtight container in the refrigerator for up to one week.
- These are not baked, making them a quick and easy dessert or snack option.


