
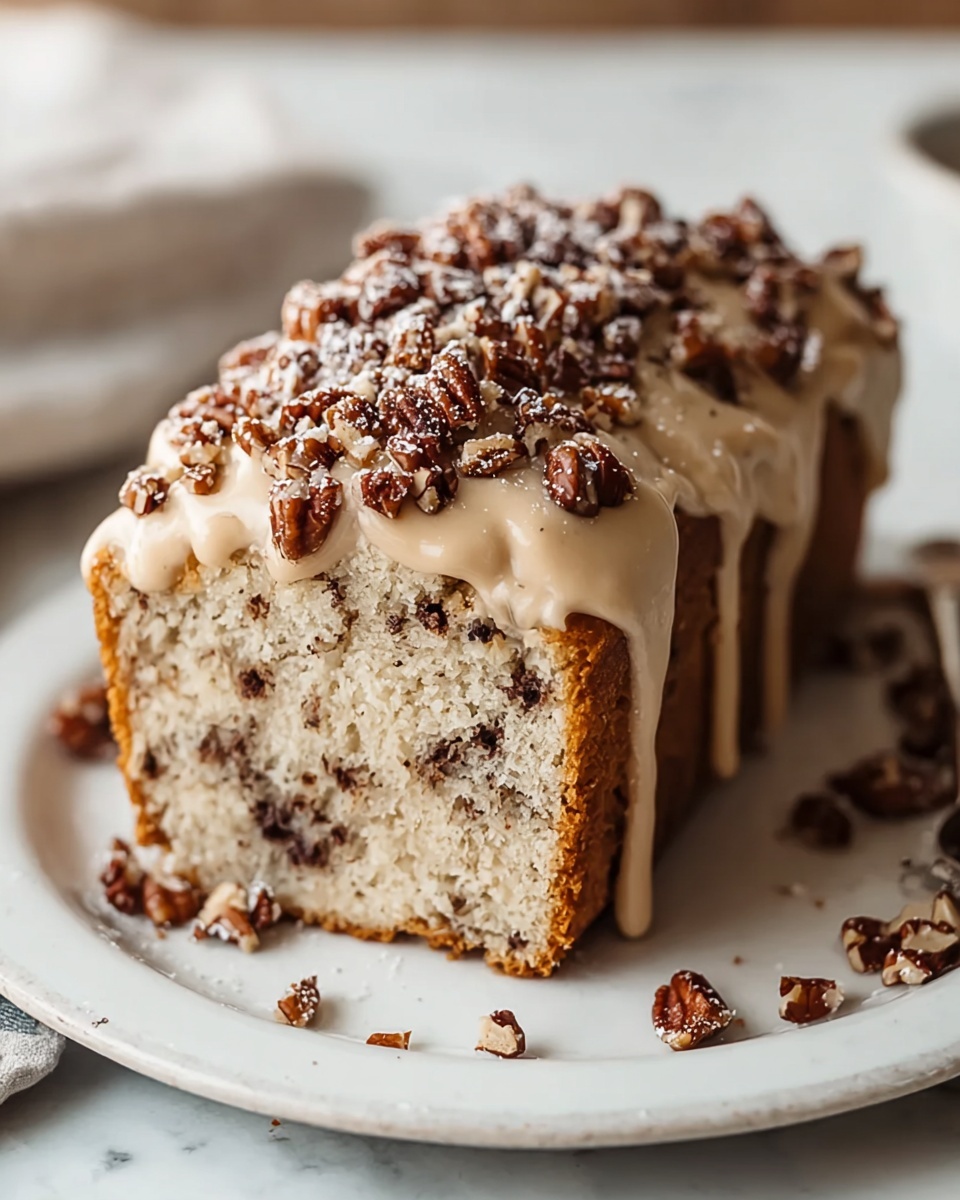
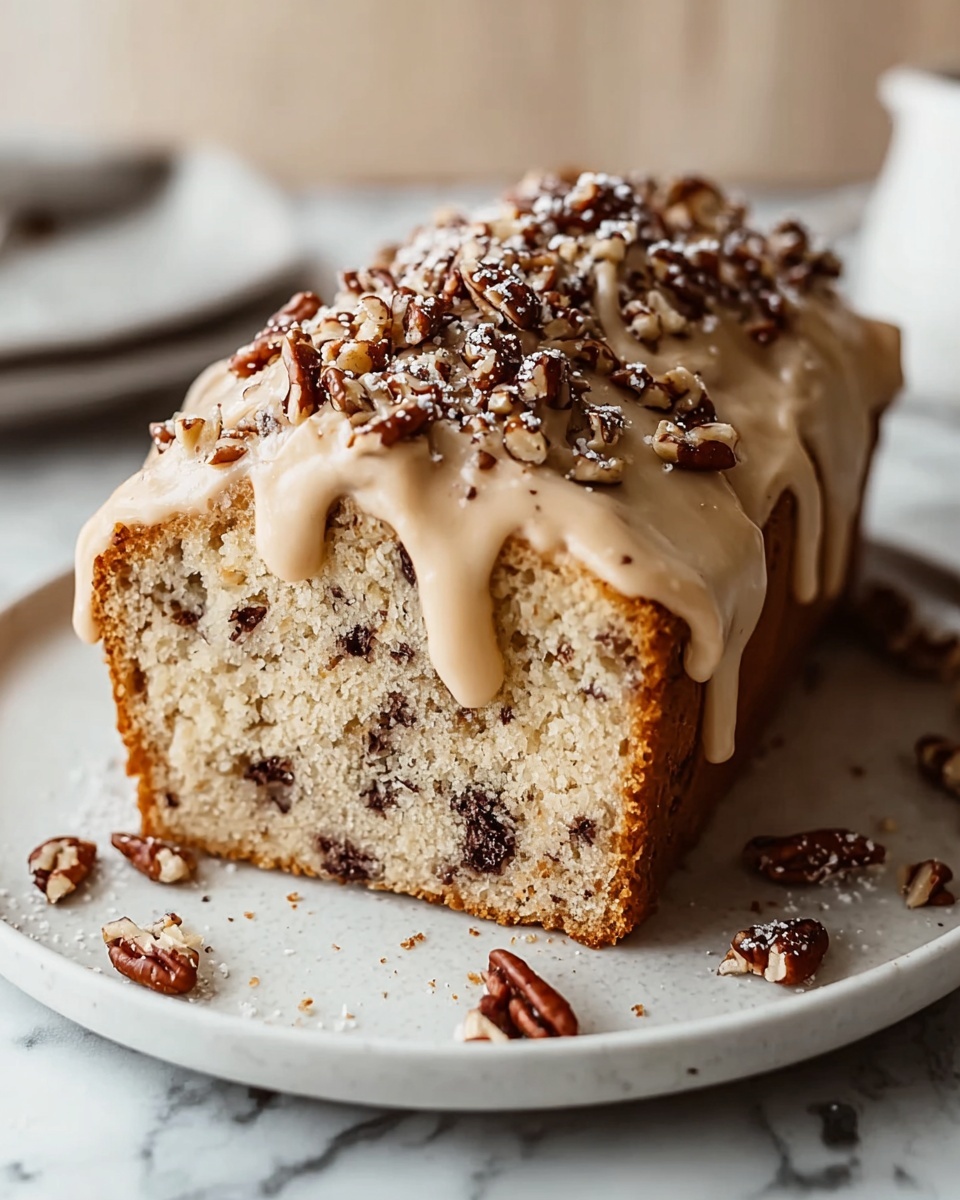
If you’re searching for a delightful treat that feels both nostalgic and effortlessly charming, the Vintage Ice Cream Bread Recipe is exactly what you need in your life. This wonderfully simple recipe transforms just two everyday ingredients into a sweet, golden loaf that’s incredibly soft with a hint of creamy richness from the ice cream. It’s the kind of recipe that feels like a comforting hug from the past, perfect for cozy afternoons or impromptu dessert moments. Trust me, once you try this Vintage Ice Cream Bread Recipe, it’s going to become a cherished favorite in your baking repertoire.
Ingredients You’ll Need
One of the best things about the Vintage Ice Cream Bread Recipe is how straightforward and accessible the ingredients are. Each component plays a vital role in achieving the perfect balance of taste, texture, and color that makes this bread so special.
- 2 cups ice cream (any flavor, softened): This adds moisture, sweetness, and a subtle flavor twist that makes every loaf unique.
- 1 1/2 cups self-rising flour: The self-rising flour ensures your bread rises perfectly without any extra fuss.
How to Make Vintage Ice Cream Bread Recipe
Step 1: Prepare Your Oven and Pan
Start by preheating your oven to 350°F (175°C). Grease a loaf pan generously with butter or non-stick spray to make sure your bread doesn’t stick and comes out with a beautiful crust.
Step 2: Mix the Ingredients
In a large bowl, combine the softened ice cream and self-rising flour. Stir until the mixture is fully incorporated. The batter will be thick, which is exactly how it should be, setting the stage for a dense, moist bread that’s divine.
Step 3: Transfer and Smooth
Pour the thick batter into your prepared loaf pan. Use a spatula to smooth the top evenly so the bread bakes uniformly with a golden-brown crust.
Step 4: Bake to Perfection
Place your pan in the preheated oven and bake for 45 to 50 minutes. You’re looking for a golden-brown surface and that classic toothpick test—insert one into the center and ensure it comes out clean, meaning your Vintage Ice Cream Bread Recipe is perfectly cooked.
Step 5: Cool Before Slicing
Allow the bread to cool in the pan for 10 minutes. This lets it firm up a bit so it holds together when you slice it. Then transfer the loaf to a wire rack and let it cool completely. This step is key for the best texture and flavor experience.
How to Serve Vintage Ice Cream Bread Recipe
Garnishes
This bread is delicious all on its own, but a little garnish can elevate it to a special treat. Try spreading a pat of creamy butter, a drizzle of honey, or a dusting of powdered sugar. If you’re feeling adventurous, a light smear of fruit preserves complements the subtle sweetness of the bread beautifully.
Side Dishes
The Vintage Ice Cream Bread Recipe pairs wonderfully with simple accompaniments like fresh berries, a cup of hot tea, or a scoop of vanilla ice cream if you want to lean into the ice cream theme! It also works well alongside breakfast favorites like scrambled eggs or yogurt for a sweet and savory balance.
Creative Ways to Present
For a fun twist, slice the bread into thick pieces and toast them lightly, turning it into an unexpected base for a breakfast bruschetta or a dessert “sandwich.” You could even cut small cubes for a bread pudding with a rich custard, giving new life to this classic recipe.
Make Ahead and Storage
Storing Leftovers
Leftover Vintage Ice Cream Bread Recipe should be wrapped tightly in plastic wrap or stored in an airtight container to keep it moist and fresh. It typically stays good for up to three days at room temperature.
Freezing
To enjoy this bread later, slice it before freezing so you can thaw just what you need. Wrap slices individually or stack with parchment paper in between, then store in a freezer-safe bag for up to two months without losing that delightful texture.
Reheating
Reheat slices gently in a toaster or oven at a low temperature to bring back their just-baked warmth and softness. Avoid the microwave to prevent sogginess. A light toast really revives the crusty exterior and melts any butter you add beautifully.
FAQs
Can I use any flavor of ice cream for this Vintage Ice Cream Bread Recipe?
Absolutely! Different ice cream flavors give your bread unique twists, so feel free to experiment. Classic vanilla, chocolate, or even fruity sorbets each deliver delicious results.
Do I need to add any extra leavening agents?
Nope! The self-rising flour has baking powder and salt included, so it’s perfectly balanced to help your bread rise without adding anything extra.
Is this bread more cake-like or traditional bread?
It’s soft like quick bread, leaning toward cake in texture, thanks to the ice cream’s sugar and fat. It’s perfect as a sweet snack or breakfast item rather than a savory sandwich base.
Can I substitute all-purpose flour?
You can, but you’ll need to add baking powder and salt to mimic self-rising flour—about 1 1/2 teaspoons baking powder and 1/2 teaspoon salt per cup of all-purpose flour.
How long will this bread stay fresh?
Stored properly at room temperature, it stays fresh for about three days, but for longer storage, freezing is your best bet.
Final Thoughts
This Vintage Ice Cream Bread Recipe is a delightful little gem that brings simplicity and nostalgia right to your kitchen. It’s one of those recipes that’s easy to love and share with friends because it’s both fun and forgiving. So go ahead and whip up a loaf for your next tea time or cozy afternoon—once you try it, this sweet, moist bread is bound to become a beloved classic in your baking collection.
Print
Vintage Ice Cream Bread Recipe
- Prep Time: 10 minutes
- Cook Time: 45-50 minutes
- Total Time: 55-60 minutes
- Yield: 1 loaf (about 8 slices)
- Category: Quick Bread
- Method: Baking
- Cuisine: American
Description
This Vintage Ice Cream Bread recipe is an easy and delightful quick bread made with just two simple ingredients: ice cream and self-rising flour. By combining softened ice cream of any flavor with self-rising flour, you create a moist, flavorful bread with minimal effort. Perfect for a last-minute treat or a creative way to use leftover ice cream, this bread is baked in a loaf pan to golden perfection and has a tender crumb that pairs wonderfully with butter, jam, or even a scoop of ice cream.
Ingredients
Ingredients
- 2 cups ice cream (any flavor, softened)
- 1 1/2 cups self-rising flour
Instructions
- Preheat and prepare the pan: Preheat your oven to 350°F (175°C). Grease a loaf pan thoroughly with butter or non-stick spray to prevent the bread from sticking.
- Mix the batter: In a large bowl, combine the softened ice cream with the self-rising flour. Stir gently until the ingredients are fully incorporated and a thick batter forms.
- Pour batter into pan: Transfer the batter to the prepared loaf pan and smooth the surface using a spatula for even baking.
- Bake the bread: Place the pan in the preheated oven and bake for 45 to 50 minutes. The bread is done when the top turns golden brown and a toothpick inserted into the center comes out clean.
- Cool before slicing: Remove the bread from the oven and allow it to cool in the pan for 10 minutes. Then, carefully transfer it onto a wire rack to cool completely before slicing and serving.
Notes
- You can use any flavor of ice cream, but avoid varieties with large chunks or mix-ins for best texture.
- If you don’t have self-rising flour, you can make your own by mixing 1 1/2 cups all-purpose flour with 2 teaspoons baking powder and 1/2 teaspoon salt.
- This bread is best served the same day but can be wrapped and stored at room temperature for 1-2 days.
- For a sweeter loaf, choose flavored ice creams like vanilla, chocolate, or strawberry.
- Ensure the ice cream is properly softened to room temperature for easier mixing.


